Create a Lambda Function with AWS CLI - Complete Guide
Last updated: Feb 26, 2024
Reading time·12 min
# Table of Contents
- Creating the Role of the Lambda Function
- Creating the Lambda Function with AWS CLI
- Invoking a Lambda Function with AWS CLI
- Updating a Lambda Function with AWS CLI
- Updating a Lambda Function's Configuration with AWS CLI
- Creating Lambda layers with AWS CLI
- Create Lambda Environment Variables with AWS CLI
# Creating the Role of the Lambda Function
We will create and manage a Node.js Lambda function using the AWS CLI.
The second section creates Lambda Layers using the AWS CLI.
Every Lambda function requires an execution role. This is the role the function assumes before it runs.
Let's start by creating the trust policy for the role. In this case, the trust policy allows the Lambda service to assume the role.
Save the contents of the trust policy in a file named trust-policy.json:
{ "Version": "2012-10-17", "Statement": [ { "Effect": "Allow", "Principal": { "Service": "lambda.amazonaws.com" }, "Action": "sts:AssumeRole" } ] }
Now open your terminal in the directory where trust-policy.json is stored and
pass it to the create-role command:
aws iam create-role --role-name lambda-example-role --assume-role-policy-document file://trust-policy.json

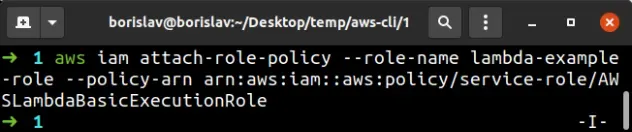
role ARN into a notepad because we'll need it when creating the Lambda function.The next step is to attach a policy to the role. This policy grants permissions to the Lambda function to log to CloudWatch.
aws iam attach-role-policy --role-name lambda-example-role --policy-arn arn:aws:iam::aws:policy/service-role/AWSLambdaBasicExecutionRole
# Creating the Lambda Function with AWS CLI
With the IAM role of the function created, let's
create the index.js file which stores the code for our function:
exports.handler = async event => { const response = { statusCode: 200, body: JSON.stringify({ greeting: `Hello ${event.name}`, double: event.number * 2, department: process.env.DEPARTMENT, }), }; return response; };
The function expects that we provide the name and number parameters on the
event object and set the DEPARTMENT environment variable.
The next step is to zip the code for the function:
zip -r9 lambda.zip index.js

Since our Lambda function requires an
environment variable called DEPARTMENT,
create a file called environment.json, next to your index.js file, with the
following JSON in it:
{ "Variables": { "DEPARTMENT": "accounting" } }
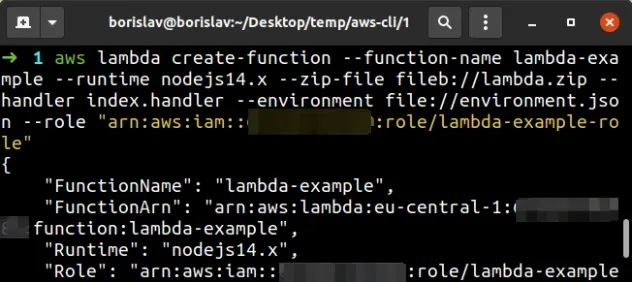
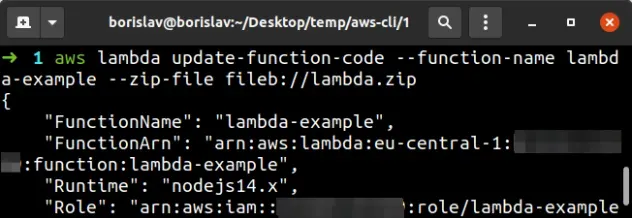
Now we're ready to create the Lambda function using the AWS CLI.
Open your terminal in the directory where the lambda.zip file is stored and
run the create-function command:
aws lambda create-function --function-name lambda-example --runtime nodejs14.x --zip-file fileb://lambda.zip --handler index.handler --environment file://environment.json --role "arn:aws:iam::YOUR_ACCOUNT_NUMBER:role/lambda-example-role"
--parameter, you must prefix the file with file:// for human-readable files or fileb:// for binary (non human-readable) files.In our case, we have prefixed the lambda.zip file with fileb:// because it's
binary, non-human-readable and the environment.json file with file://,
because it's human-readable.
# Invoking a Lambda Function with AWS CLI
Before we invoke the function, we have to store the event properties that the
function expects into a file. Our Lambda function expects a name and a
number property on the event object.
Create a file named event.json with the following JSON in it:
{ "name": "John Doe", "number": 42 }
Open your terminal in the directory where even.json is stored and run the
invoke command:
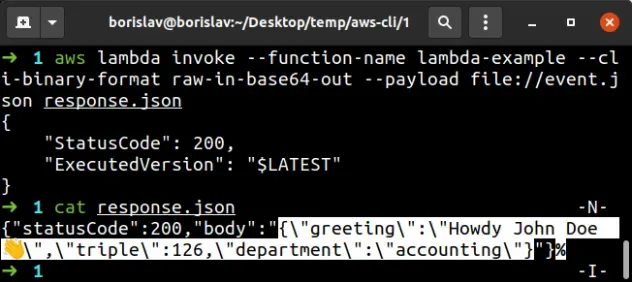
aws lambda invoke --function-name lambda-example --cli-binary-format raw-in-base64-out --payload file://event.json response.json
The invoke command takes the following parameters:
| Name | Description |
|---|---|
| function-name | the name of the lambda function |
| cli-binary-format | by default, AWS CLI v2 takes base64 input, but we're passing a raw JSON string |
| payload | the event, the function gets invoked with |
| response.json | a random name for a file where the function response should be stored |
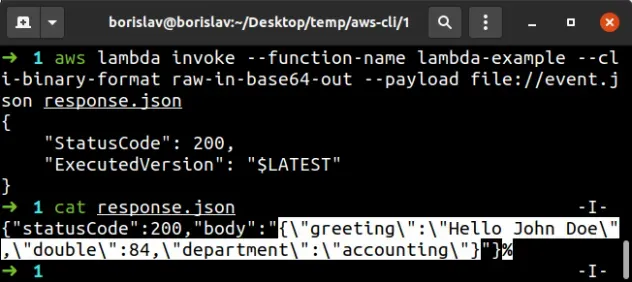
The contents of the response.json file show that the Lambda function responds
as expected.
# Updating a Lambda Function with AWS CLI
Open your index.js file and update the function's code to the following.
exports.handler = async event => { const response = { statusCode: 200, body: JSON.stringify({ greeting: `Howdy ${event.name} 👋`, triple: event.number * 3, department: process.env.DEPARTMENT, }), }; return response; };
Now open your terminal in the directory where the index.js file is located and
zip its contents.
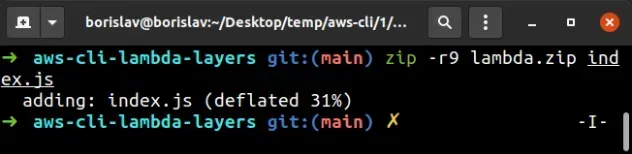
zip -r9 lambda.zip index.js
To update a Lambda function's code using the AWS CLI, run the
update-function-code command:
aws lambda update-function-code --function-name lambda-example --zip-file fileb://lambda.zip
Now that the function's code has been updated, let's run the invoke command
again and look at the function's response:
aws lambda invoke --function-name lambda-example --cli-binary-format raw-in-base64-out --payload file://event.json response.json
The response shows that the function's code has been updated successfully.
# Updating a Lambda Function's Configuration with AWS CLI
Let's update the function to have 1024 MB of RAM (128 is the default) and
set its timeout to 5 seconds (3 is the default).
To update the function's memory and timeout with the AWS CLI, run the
update-function-configuration command.
aws lambda update-function-configuration --function-name lambda-example --timeout 5 --memory-size 1024

Next, let's add environment variables to the function, using the AWS CLI.
Update the contents of the environment.json file to look as follows:
{ "Variables": { "COLOR": "green", "FRUIT": "avocado" } }
To update a function's environment variables, we again use the
update-function-configuration command:
aws lambda update-function-configuration --function-name lambda-example --environment file://environment.json --query "Environment"
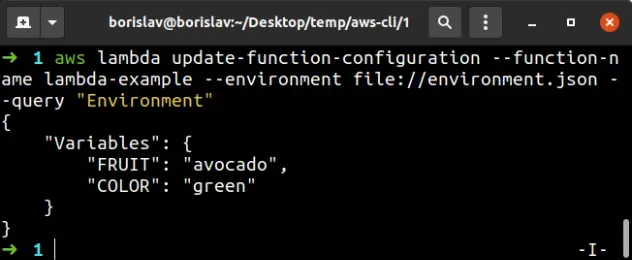
In the command above, we've used the optional --query parameter to limit the
output to only consist of the environment variables of the function.
However, if we look at the function's environment variables, we see that our
DEPARTMENT env variable is missing.
update-function-configuration command replaces any existing environment variables with the newly created environment variables.The way to add environment variables to a function with the AWS CLI, rather than
replace them, is to first list the function's current environment variables, by
running the get-function-configuration command:
aws lambda get-function-configuration --function-name lambda-example --query '{revisionId: RevisionId, env: Environment}'

We used the --query parameter to filter the output to only relevant
properties:
- the function's environment variables.
- the
revisionId, which can be included in theupdate-function-configurationcommand and is only used when multiple people work on the same Lambda function.
The revisionId prevents the scenario where you would list a function's
environment variables and a colleague of yours would update them before you
update them, causing a race condition.
It only makes sense to include the revisionId in the
update-function-configuration command if there are multiple people working on
the same lambda function.
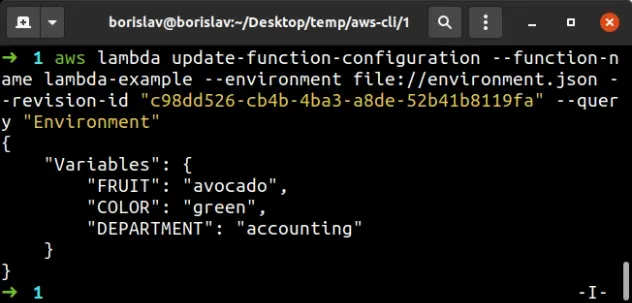
Now that we have the function's environment variables, let's update our
environment.json file to include the department variable:
{ "Variables": { "COLOR": "green", "FRUIT": "avocado", "DEPARTMENT": "accounting" } }
And finally, let's update the function's environment variable, passing in the
revisionId to the update-function-configuration command:
aws lambda update-function-configuration --function-name lambda-example --environment file://environment.json --revision-id "YOUR_REVISION_ID" --query "Environment"
The way the update-function-configuration command works with environment
variables applies to Lambda layers as well.
Using the command and passing in a layer, replaces any layers the function previously had, rather than adding them.
# Creating Lambda layers with AWS CLI
In this section of the article, we will create a Node.js Lambda function with 2 layers using AWS CLI.
The layers consist of:
- a 3rd party library, called
date-fns - our own helper function
Before creating the Lambda function, we must create a role for it.
The role needs to have a trust policy that allows the Lambda service to assume
it.
Save the following json into a trust-policy.json file:
{ "Version": "2012-10-17", "Statement": [ { "Effect": "Allow", "Principal": { "Service": "lambda.amazonaws.com" }, "Action": "sts:AssumeRole" } ] }
Open your terminal in the directory where you stored the trust-policy.json
file and pass it to the create-role command:
aws iam aws iam create-role --role-name lambda-layers-role --assume-role-policy-document file://trust-policy.json
role ARN into a notepad because we'll need it when creating the Lambda function.Next, attach a policy to the role, which grants permissions to log to CloudWatch.
aws iam attach-role-policy --role-name lambda-layers-role --policy-arn arn:aws:iam::aws:policy/service-role/AWSLambdaBasicExecutionRole
# Creating the Lambda Function with AWS CLI
Now that we have the role, let's create the node.js Lambda function, create an
index.js file with the following code:
const {format} = require('date-fns'); const {double} = require('calc'); exports.handler = async event => { const response = { statusCode: 200, body: JSON.stringify({ today: format(new Date(), "'Today is a' eeee"), doubled: double(15), }), }; return response; };
The function imports the layers and uses them to form the response.
Let's zip the Lambda function code so we can create it using the CLI:
zip -r9 lambda.zip index.js
And finally, let's create the function using the AWS CLI, open your terminal in
the directory where you stored the lambda.zip file and run the
create-function command:
aws lambda create-function --function-name layers-function --runtime nodejs14.x --zip-file fileb://lambda.zip --handler index.handler --role "arn:aws:iam::YOUR_ACCOUNT_NUMBER:role/lambda-layers-role"
# Packaging and Deploying Lambda Layers with AWS CLI
At this point we've created the node.js function, however, we haven't packaged
and deployed the layers it makes use of.
The directory paths for the layers are kind of tricky because Lambda expects a specific folder structure.
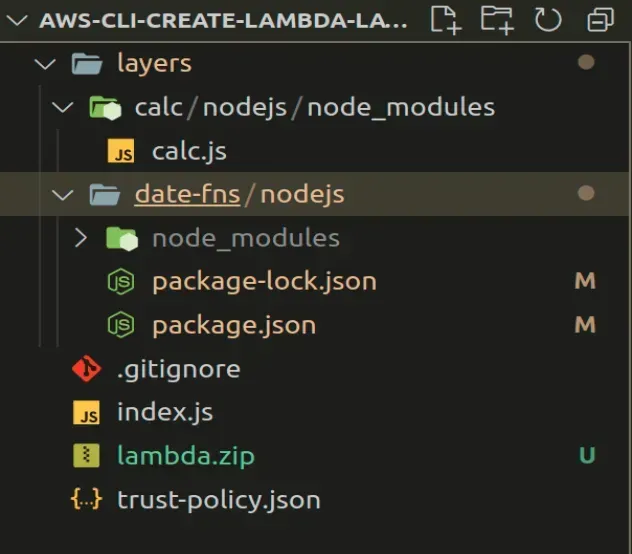
Create the following folders and files in the directory where you stored the
lambda's index.js file:
layers calc nodejs node_modules calc.js date-fns nodejs package.json index.js
If you get confused about the folder structure, check out the GitHub repository.
Let's take care of the calc layer first. Open the calc.js file and enter the
following code in it:
exports.double = (number) => { return number * 2; }
The file exports a utility function that we can include as a layer and reuse in multiple Lambda functions.
node_modules is added to .gitignore, since we are storing a helper function, in the node_modules directory and not a 3rd party package, make sure to exclude the file from your .gitignore, e.g. by adding the following line to your .gitignore - !layers/calc/**/node_modules.Now let's take care of the layer that imports a 3rd party package. Open your
terminal in the layers/date-fns/nodejs directory and run the following
commands:
# in the layers/date-fns/nodejs directory npm init -y npm install date-fns@2.24.0
Your folder structure should look as follows.
At this point, we are ready to zip the code for the layers, create them and
add them to the Lambda function.
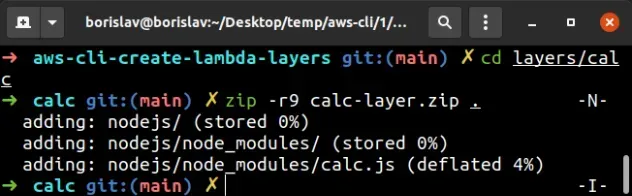
Let's zip the code for the calc layer first, open your terminal in the
layers/calc directory and run the zip command:
# in the layers/calc directory zip -r9 calc-layer.zip .
To create the calc layer use the publish-layer-version command from the
/layers/calc directory:
aws lambda publish-layer-version --layer-name calc-layer --description "added double fn" --zip-file fileb://calc-layer.zip --compatible-runtimes nodejs10.x nodejs12.x nodejs14.x
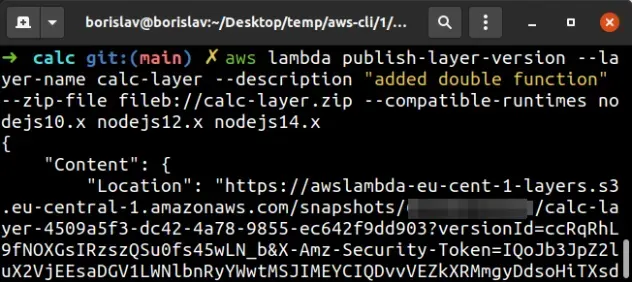
LayerVersionArn property in a notepad because we will need it when attaching the layer to the Lambda function. The LayerVersionArn will look something like: "arn:aws:lambda:YOUR_REGION:YOUR_ACCOUNT_ID:layer:calc-layer:1"Let's also zip and publish the date-fns layer. Open your terminal in the
layers/date-fns directory and run the zip command:
# in the layers/date-fns directory zip -r9 date-fns-layer.zip .
To create the date-fns layer, open your terminal in the layers/date-fns
directory and run the publish-layer-version command:
# in the layers/date-fns directory aws lambda publish-layer-version --layer-name date-fns-layer --description "add date-fns library" --zip-file fileb://date-fns-layer.zip --compatible-runtimes nodejs10.x nodejs12.x nodejs14.x
LayerVersionArn property in a notepad because we will need it when attaching the layer to the Lambda function. The LayerVersionArn will look something like: "arn:aws:lambda:YOUR_REGION:YOUR_ACCOUNT_ID:layer:date-fns-layer:1"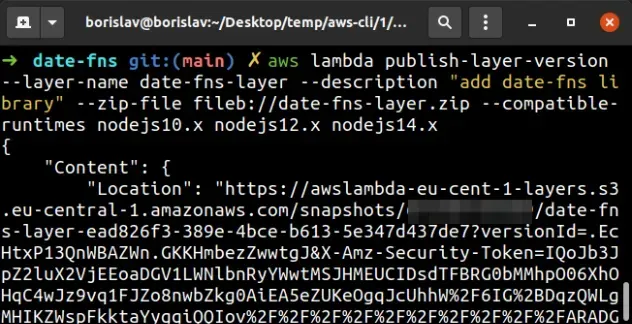
# Attaching Layers to a Lambda Function with AWS CLI
At this point, we've created the layers and all we have to do is attach the layers to the Lambda function.
We'll need the LayerVerionArns for both of the layers. In case you didn't copy
the LayerVersionArns, run the following commands to retrieve them:
aws lambda list-layer-versions --layer-name calc-layer --query "LayerVersions[*].LayerVersionArn" aws lambda list-layer-versions --layer-name date-fns-layer --query "LayerVersions[*].LayerVersionArn"
The command returns a list of all the LayerVersionArns of a layer, just pick
the latest version if you have multiple.
Finally, let's add the layers to the Lambda function and test if everything works as expected.
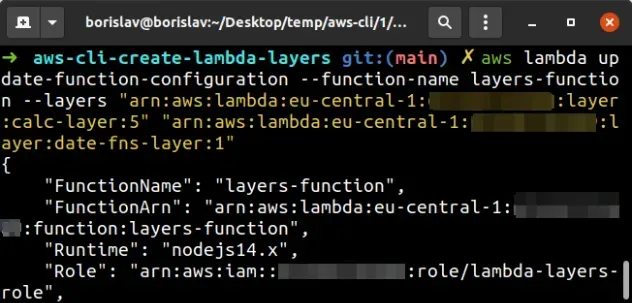
Run the update-function-configuration command, setting the --layers
parameter as our space-separated LayerVersionArns.
aws lambda update-function-configuration --function-name layers-function --layers "CALC_LAYER_VERSION_ARN" "DATE_FNS_LAYER_VERSION_ARN"
Let's test if everything works as expected,
invoke the lambda function, storing the
response in a response.json file:
aws lambda invoke --function-name layers-function response.json
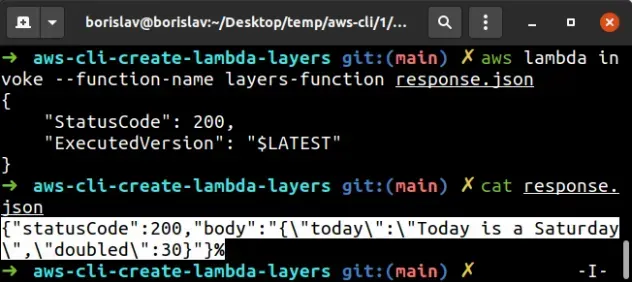
The Lambda function's response shows that the layers work as expected.
update-function-configuration command that we used to attach the layers to the function simply replaces the existing function's layers (if any), with the new layers we specified.To be on the safe side, we can list the existing function's layers and include
the ARNs in the update-function-configuration command.
To list the function's layers, run the get-function-configuration command:
aws lambda get-function-configuration --function-name layers-function --query "{layers: Layers, revisionId: RevisionId}"
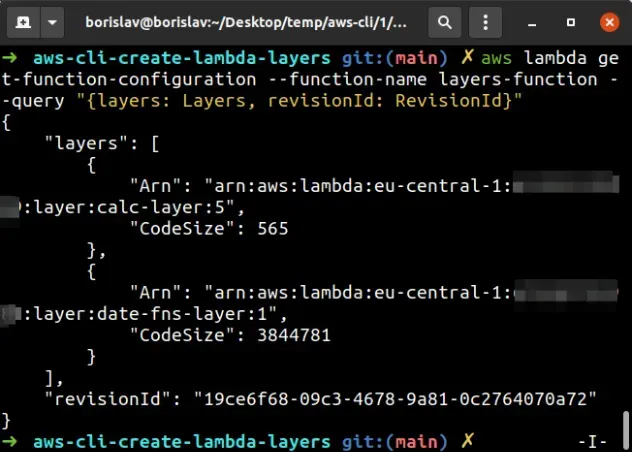
We used the --query parameter to limit the output to relevant to us
properties:
the ARNs of the layers
the
revisionId, which can be included in theupdate-function-configurationcommand and is only used when multiple people work on the same Lambda function.It allows us to be sure that no one of our colleagues updated the function in the time window we listed the function's layers and updated them. In other words, it helps us avoid race conditions.
In the case we wanted to add layers to the Lambda function and not replace the
existing layers, we would copy the existing function's layer ARNs and include it
in the update-function-configuration command.
# How to Create Lambda Environment Variables with AWS CLI
To create Environment Variables on a Lambda function using AWS CLI, run the
update-function-configuration command, passing in the --environment
parameter.
aws lambda update-function-configuration --function-name YourFunction --environment "Variables={COLOR=green,FRUIT=avocado}" --query "Environment"
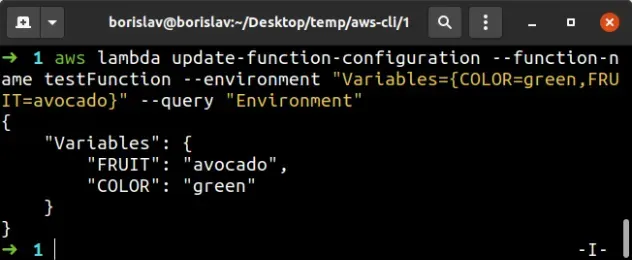
In the command above, we've set 2 environment variables on the function, using
the --environment parameter, COLOR=green and FRUIT=avocado.
The --query parameter is optional and filters the output from the command,
returning only the environment variables.
update-function-configuration command, all of the environment variables the Lambda previously had are replaced with the passed-in ones.When trying to add environment variables to a Lambda function with the AWS CLI,
and not necessarily replace them, it's best to first list the function's
environment variables, using the get-function-configuration command:
aws lambda get-function-configuration --function-name testFunction --query '{revisionId: RevisionId, env: Environment}'
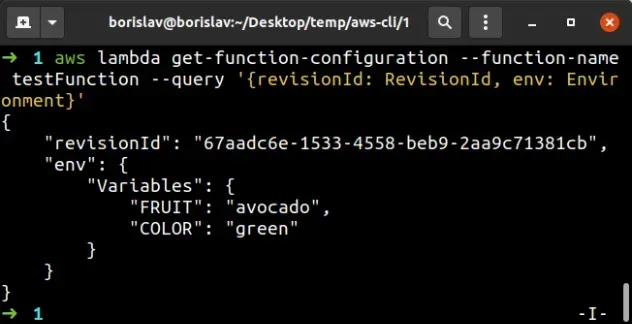
In the command above, we used the optional --query parameter to output only
the Lambda configuration properties that are relevant to us:
- the environment variables the function has.
- the
revisionId, which you can include when creating environment variables, to make sure no one of your colleagues has created any other environment variables on the function in the meantime.
Depending on how many environment variables your function has, it's often easier
to store them in a json file.
Copy and paste the value of the env property of the
get-function-configuration command and store it in a file called
environment.json, adding in any additional environment variables:
{ "Variables": { "FRUIT": "avocado", "COLOR": "green", "FOOD": "pizza" } }
Next, open your terminal in the directory where the environment.json file is
stored and run the update-function-configuration command, passing in the file
to the --environment parameter:
aws lambda update-function-configuration --function-name YourFunction --environment file://environment.json --revision-id "your-revision-id" --query "Environment"
--revision-id parameter if multiple people are working on the function and there is a risk that they can override the environment variables of the function in a short period of time between you list the function's environment variables and update them.
To verify the environment variables of the Lambda function have been updated, we
can run the get-function-configuration command again:
aws lambda get-function-configuration --function-name YourFunction --query '{revisionId: RevisionId, env: Environment}'
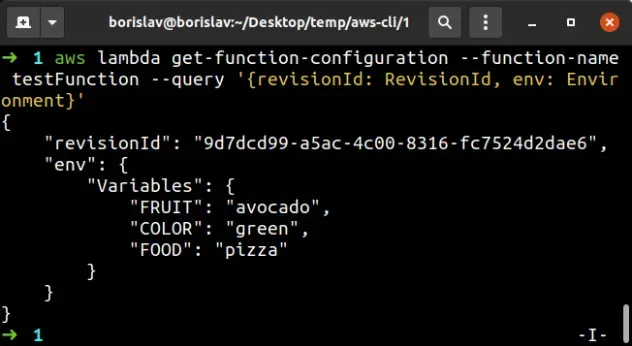
The output shows that the environment variables we stored in the json file
have been created on the Lambda function and after the update the revisionId
has changed.
# Additional Resources
You can learn more about the related topics by checking out the following tutorials:
- Create a Role with AWS CLI - Complete Guide
- Invoke Lambda Functions with AWS CLI - Complete Guide
- How to Get your Account Id with AWS CLI
- How to Get your Default Profile with AWS CLI
- Manage Multiple Accounts with the AWS CLI
- Set your Default Profile's Name in AWS CLI
- How to Clear your AWS CLI Credentials
- View your AWS CLI logs in Real Time (tail)
- How to turn off the Pager in AWS CLI
- Tag an S3 Bucket with AWS CLI
- AWS CDK Tutorial for Beginners - Step-by-Step Guide
- How to use Context in AWS CDK
- How to use Parameters in AWS CDK
- Could not Parse Request body into JSON Error - AWS CLI
- Cannot find module (AWS Lambda Error) [Solved]
- Download the Code of an AWS Lambda Function
- Making Http Requests in a Node.js Lambda Function
- How to use npm modules in AWS Lambda
- Ping an EC2 instance from your Local Machine
- How to create a Cloudwatch Alarm in AWS CDK

