AWS CDK Tutorial for Beginners - Step-by-Step Guide
Last updated: Jan 26, 2024
Reading time·13 min
# Table of Contents
- Introduction
- Creating a new CDK App
- File structure
- Constructs - introduction
- Creating Resources via Constructs
- Construct Parameters
- Printing diffs of Resources
- Listing CDK Stacks
- Generating CloudFormation templates with CDK Synth
- Deploying our CloudFormation Stack
- Updating a CDK Stack
- Identifiers in CDK
- Adding Outputs to a Stack
- Creating a second Stack in our CDK App
- Clean up
# Introduction
We're going to create a CDK app and go through a step-by-step explanation of the things we need to know to feel confident when using CDK to provision infrastructure.
# Creating a new CDK App
In order to create a new CDK App we have to use the cdk init command.
We can write our CDK code in many programming languages and init our CDK app
from multiple starter templates. To list the available options we can append the
--list flag to the command.
npx aws-cdk init --list
The output shows all the available programming languages we can use in our CDK app and all of the available starter templates.
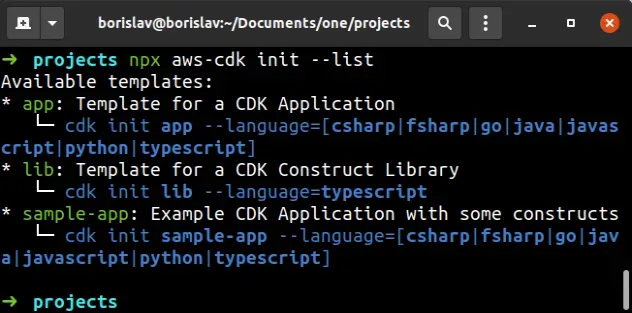
There are 3 templates we can start from:
app- a basic starter template.lib- a template for writing a CDK construct library.sample-app- a starter with some constructs included.
We'll use the app template with the TypeScript language.
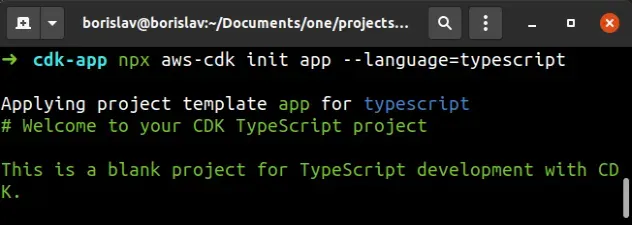
Note that cdk init cannot be run in a non-empty directory, so we first have to
create one.
mkdir cdk-app cd cdk-app npx aws-cdk init app --language=typescript
The output from the command looks as follows.
# File structure
At this point, we have an empty CDK project. Let's look at some of the more important files in the project.
In the root directory, we have some configuration files, most of which are language specific.
package.json- manages our node packages and scriptsjest.config.js- configuration for testing- tsconfig.json - TypeScript configuration
We also have a helpful README.md file with the most commonly used CDK
commands.
The first cdk specific file in the root directory is
cdk.json and it looks something similar to the
following.
{ "app": "npx ts-node --prefer-ts-exts bin/cdk-app.ts", "context": { "@aws-cdk/aws-apigateway:usagePlanKeyOrderInsensitiveId": true, // ...rest } }
The app key tells the
CDK CLI how to run our
code. We're using TypeScript, so our code has to be compiled down to JavaScript
and that's what the ts-node package does.
The command points to the location of our CDK App:
npx ts-node --prefer-ts-exts bin/cdk-app.ts
The feature flags in the context object give us the option to enable or
disable some breaking changes that have been made by the AWS CDK team outside of
major version releases.
In short, feature flags allow the AWS CDK team to push new features that cause
breaking changes without having to wait for a major version release. They can
just enable the new functionality for new projects, whereas old projects without
the flags will continue to work.
Next, let's take a look at the entry point of our CDK app in the
bin/cdk-app.ts file.
Every CDK App can consist of one or more Stacks. You can think of a stack as a unit of deployment.
For instance, we could have one stack for our dev environment and one for our
prod environment, and both can be created in the scope of the same CDK App. If
you're familiar with stacks in CloudFormation, it's the same thing.
Update the CdkAppStack class instantiation in the bin/cdk-app.ts file to
look as follows.
import * as cdk from 'aws-cdk-lib'; import 'source-map-support/register'; import {CdkAppStack} from '../lib/cdk-app-stack'; const app = new cdk.App(); new CdkAppStack(app, 'CdkAppStack', { env: { account: process.env.CDK_DEFAULT_ACCOUNT, region: process.env.CDK_DEFAULT_REGION, }, });
The env property allows us to specify the AWS environment (account and region) where our stack will be deployed.
The CDK_DEFAULT_ACCOUNT and CDK_DEFAULT_REGION environment variables are
made available in our CDK code and by default resolve to the
account and region of our default AWS CLI
profile.
# Constructs - introduction
In order to provision resources using CDK we have to define Constructs within our CDK stack.
Constructs are cloud components. They provide us with:
- sane defaults, so we don't have to dive deep into CloudFormation docs, unless we need to diverge from the default behavior
- helper methods that ease the service-to-service interactions, such as permission grants
- a very concise and maintainable way to define infrastructure, using higher level abstractions (than CloudFormation) and leveraging the power of our IDE by writing in a programming language rather than a configuration language (YAML or JSON)
# Creating Resources via Constructs
Next, let's instantiate our first constructs in the lib/cdk-app-stack.ts file.
We'll create an S3 bucket and a
DynamoDB table:
import * as dynamodb from 'aws-cdk-lib/aws-dynamodb'; import * as s3 from 'aws-cdk-lib/aws-s3'; import * as cdk from 'aws-cdk-lib'; export class CdkAppStack extends cdk.Stack { constructor(scope: cdk.App, id: string, props?: cdk.StackProps) { super(scope, id, props); // 👇 use the Bucket construct const bucket = new s3.Bucket(this, 'avatars-bucket', { removalPolicy: cdk.RemovalPolicy.DESTROY, }); // 👇 use the Table construct const table = new dynamodb.Table(this, 'todos-table', { partitionKey: {name: 'todoId', type: dynamodb.AttributeType.NUMBER}, billingMode: dynamodb.BillingMode.PAY_PER_REQUEST, removalPolicy: cdk.RemovalPolicy.DESTROY, }); } }
In the code sample we:
Used the Bucket construct to define an S3 bucket resource. We set the
removalPolicyprop toRemovalPolicy.DESTROY, which means that if the bucket is empty at the time we delete our stack, it will also get deleted.Used the Table construct to define a Dynamodb table resource. We set the
billingModeprop of the table toPAY_PER_REQUEST, to avoid incurring any charges, as we won't be making any requests. We also set theremovalPolicyof the table toREMOVALPolicy.DESTROY, so the table gets deleted when we delete our stack.
removalPolicy prop of stateful resources (S3 buckets, databases) is set to RETAIN, which means that when we delete our stack, the resources will remain in our account.# Construct Parameters
Looking at the code in the snippet, we can see a pattern - both the Bucket
and Table constructs receive the same 3 parameters:
The
scopeparameter specifies the parent construct within which the child construct is initialized. In JavaScript, we use thethiskeyword, in Pythonself, etc.The
idparameter - an identifier that must be unique within the scope. The combination of CDK identifiers for a resource builds the CloudFormation Logical ID of the resource. I've written an article that explains what AWS CDK identifiers are if you want to read more on the topic.The
propsparameter - key-value pairs used to set configuration options for the resources that the construct provisions. Note that the props of different constructs vary.
At this point we have defined 2 resources in our CDK Stack:
- an S3 bucket
- a Dynamodb table
Before we move on to provisioning our resources, it's very important to go over how CDK actually works.
CDK is just a wrapper around CloudFormation. CDK enables us to provision infrastructure using a programming language (TypeScript, Python, Java), rather than a configuration language (YAML, JSON).
The whole point of CDK is to improve developer experience, by providing a more maintainable approach to infrastructure provisioning than CloudFormation.
However, before we run a CDK deployment, our CDK code gets compiled down to CloudFormation code.
After we deploy the CloudFormation code, we can view the stack in the CloudFormation console.
# Printing diffs of Resources
Let's run the cdk diff command to see what changes would occur in case we
deployed our CDK code:
npx aws-cdk diff
The output from the command looks as follows:
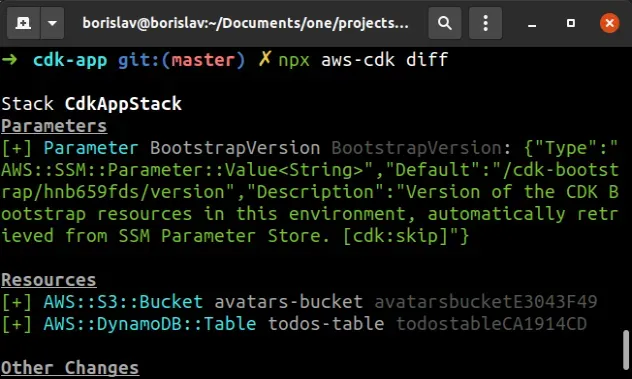
We can see that if we were to deploy our CDK stack at this point, we would provision 2 resources:
AWS::S3::BucketAWS::DynamoDB::Table
These are the resource type names from CloudFormation
The cdk diff command compares the deployed and local versions of our
stack. Since we have not deployed our stack yet, it just shows us that if we
were to deploy right now, we'd provision the 2 resources.
It's a very handy command when iterating and updating your infrastructure,
because if you make any changes that would delete or update a resource, you
would immediately see the change in the output of cdk diff.
# Listing CDK Stacks
The next command we'll use is cdk list:
npx aws-cdk list
The output looks as follows.
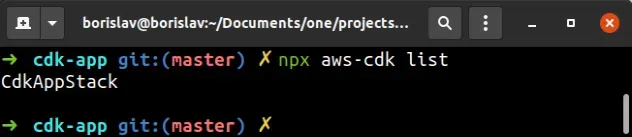
The cdk list command lists the names of all of the stacks in our CDK App.
The name of our stack is inferred from the id prop, passed when instantiating
the stack in bin/cdk-app.ts:
const app = new cdk.App(); // 👇 stack name inferred from here new CdkAppStack(app, 'CdkAppStack', { env: { account: process.env.CDK_DEFAULT_ACCOUNT, region: process.env.CDK_DEFAULT_REGION, }, });
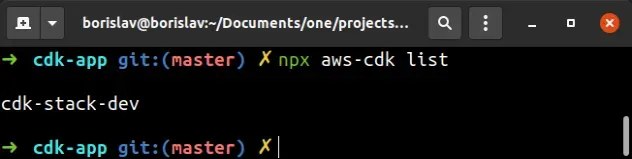
Let's update the name of our CDK stack to cdk-stack-dev.
Update the CdkAppStack instantiation to look as follows:
import * as cdk from 'aws-cdk-lib'; import 'source-map-support/register'; import {CdkAppStack} from '../lib/cdk-app-stack'; const app = new cdk.App(); new CdkAppStack(app, 'cdk-stack-dev', { stackName: 'cdk-stack-dev', env: { account: process.env.CDK_DEFAULT_ACCOUNT, region: process.env.CDK_DEFAULT_REGION, }, });
Let's run the list command again:
npx aws-cdk list
The output reflects the change we've made:
A very handy flag on the CDK list command is the --long flag. It includes
information about the environment(account, region) of our CDK application:
npx aws-cdk list --long
The output looks as follows:
- id: cdk-stack-dev name: cdk-stack-dev environment: account: '123456789012' region: us-east-1 name: aws://123456789012/us-east-1
# Generating CloudFormation templates with CDK Synth
Next, we're going to generate and print the CloudFormation equivalent of the CDK stack we've defined.
In other words, we're going to synthesize a CloudFormation template, based on
the stack we've written in lib/cdk-app-stack.ts.
To do that we have to use the synth command.
npx aws-cdk synth
After we run the synth command, we can see the CloudFormation equivalent of
our stack.
The synth command did a couple of things:
- ran our CDK code, so we'd see any syntax or type errors in case we had any.
The command knows how to run our code because of the
appkey in thecdk.jsonfile, located in the root directory of our project - generated the CloudFormation template we are going to deploy. The file is
located at
cdk.out/cdk-stack-dev.template.json
If you open the cdk.out directory, you should be able to see the
cdk-stack-dev.template.json CloudFormation template:
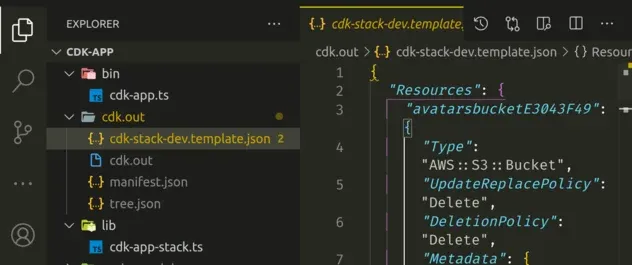
As expected, the CloudFormation template is equivalent to the stack we've defined and provisions both of our resources - the bucket and the table.
# Deploying our CloudFormation Stack
At this point, our template has been generated and stored in the cdk.out
directory. We're ready to deploy our CloudFormation stack.
Let's run the deploy command:
npx aws-cdk deploy
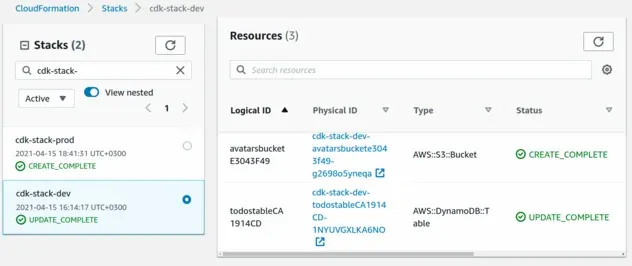
It shouldn't take long before our CloudFormation stack is deployed. You can visit the CloudFormation console to look at the details.
If we select cdk-stack-dev and click on Resources, we can see the resources
our stack has provisioned:
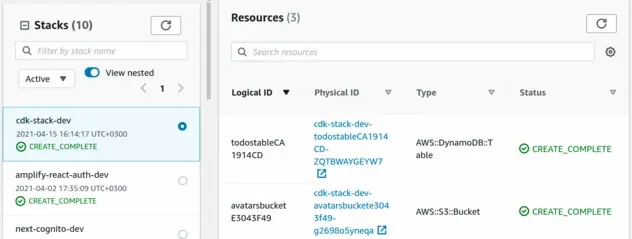
At this point, we've successfully deployed our CDK stack.
# Updating a CDK Stack
Let's perform an update. We've decided that the partition key name for our
Dynamodb table should be id, instead of todoId.
Let's make the change in lib/cdk-app-stack.ts:
const table = new dynamodb.Table(this, 'todos-table', { - partitionKey: {name: 'todoId', type: dynamodb.AttributeType.NUMBER}, + partitionKey: {name: 'id', type: dynamodb.AttributeType.NUMBER}, billingMode: dynamodb.BillingMode.PAY_PER_REQUEST, removalPolicy: cdk.RemovalPolicy.DESTROY, })
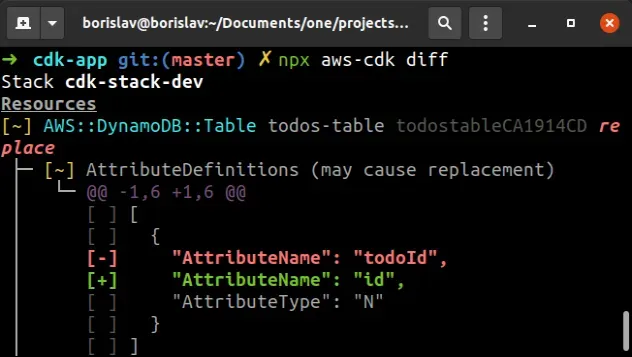
Changing the partition key of a DynamoDB table is an update that requires resource replacement. Our old table will be deleted and a new one with the new partition key will be created.
Let's run the diff command.
npx aws-cdk diff
The output of the command shows that if we were to deploy at this point, the table resource would get deleted and a new one with the new partition key would get created:
cdk diff command before deploying, especially when working with stateful resources (buckets, databases).In order to update a CDK stack we run the cdk deploy command.
Running the cdk synth command before deploying is optional. When we run
cdk deploy the CDK CLI automatically runs cdk synth before every deployment.
Let's deploy our stack.
npx aws-cdk deploy
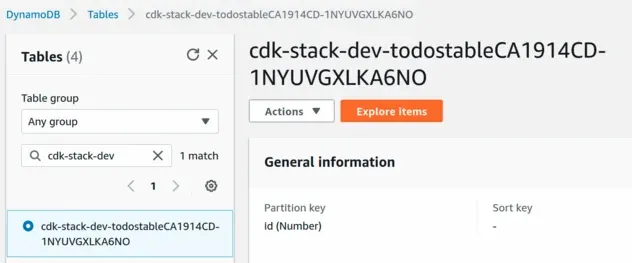
If we open the Dynamodb console, we
can see that the new table with the partition key of id has been provisioned
and the old one has been deleted:
# Identifiers in CDK
Next, I'll demonstrate a common source of confusion (it was for me), for CDK beginners.
I'll make a small change to the second parameter of my DynamoDB table. Don't make this change, I'll revert the code after.
- const table = new dynamodb.Table(this, 'todos-table', { + const table = new dynamodb.Table(this, 'table', { partitionKey: {name: 'id', type: dynamodb.AttributeType.NUMBER}, billingMode: dynamodb.BillingMode.PAY_PER_REQUEST, removalPolicy: cdk.RemovalPolicy.DESTROY, })
I've changed the second parameter I'm passing to the Table construct - the identifier.
I'll now run the diff command.
npx aws-cdk diff
The output is:
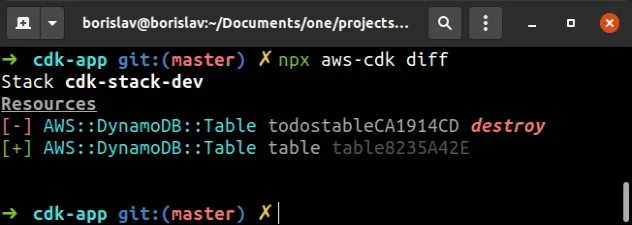
We can see that if I were to deploy after changing the id prop of the Table
construct, my old DynamoDB table would get deleted and a new one would get
created.
The reason is that by changing the id prop, I've changed the CloudFormation
Logical ID of the table resource. Changing a Logical ID of a resource in
CloudFormation deletes the old resource and creates a new resource with the new
Logical ID.
We can see the Logical IDs of the resources we've provisioned by opening the
CloudFormation console. The
Logical ID is visible in the first column:
You might be thinking, well then I'm never going to change the id prop I pass
to constructs, that's an easy fix.
However the CloudFormation logical id is constructed as a combination of the
id props of the different scopes (among other things). I've written another
article on this - What is an identifier in AWS CDK,
In short - if we were to extract the code that instantiates the Table
construct in another class, we would change the CloudFormation logical ID of
the table resource. If we then deploy these changes, the old table will get
deleted and a new one with the new logical id will get created.
The reason I've included this part is that when I first started provisioning my infrastructure using a programming language, I expected that I can refactor my code (extract classes, etc) in any way I want without any consequences for my infrastructure, however, that's not the case.
I've reverted the change:
- const table = new dynamodb.Table(this, 'table', { + const table = new dynamodb.Table(this, 'todos-table', { partitionKey: {name: 'id', type: dynamodb.AttributeType.NUMBER}, billingMode: dynamodb.BillingMode.PAY_PER_REQUEST, removalPolicy: cdk.RemovalPolicy.DESTROY, })
# Adding Outputs to a Stack
Let's add Outputs to our CDK stack. Outputs are values that we can import into
other stacks, or in our case redirect to a file on the local file system.
By redirecting the outputs to a json file on the file system, we enable our
frontend code to import the properties and use them.
Let's add Outputs to our stack in our
lib/cdk-app-stack.ts:
import * as dynamodb from 'aws-cdk-lib/aws-dynamodb'; import * as s3 from 'aws-cdk-lib/aws-s3'; import * as cdk from 'aws-cdk-lib'; export class CdkAppStack extends cdk.Stack { constructor(scope: cdk.App, id: string, props?: cdk.StackProps) { super(scope, id, props); // ... rest new cdk.CfnOutput(this, 'bucketName', { value: bucket.bucketName, }); new cdk.CfnOutput(this, 'tableName', {value: table.tableName}); } }
We used the CfnOutput construct to create an output for the names of our bucket and table.
Let's run the diff command:
npx aws-cdk diff
We can see that if we were to deploy at this point, 2 Output values would get
created:

This time we'll add a new flag to the cdk deploy command. The --outputs-file
flag allows us to write the outputs we've defined in our stack to a file on the
local filesystem.
npx aws-cdk deploy --outputs-file ./cdk-outputs.json
Let's take a look at the cdk-outputs.json file in the root directory of our
project:
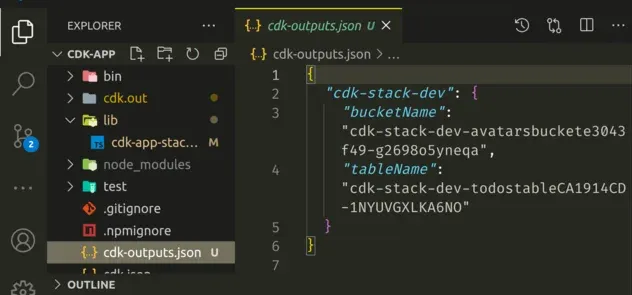
We can see that the bucket and table names have been written to the JSON file. Now our frontend (if we had one), would be able to import the file and use any of the values, such as an API URL.
# Creating a second Stack in our CDK App
The next thing we're going to do is create a second stack in our CDK app.
We have to instantiate the second stack in our bin/cdk-app.ts file:
import * as cdk from 'aws-cdk-lib'; import 'source-map-support/register'; import {CdkAppStack} from '../lib/cdk-app-stack'; const app = new cdk.App(); new CdkAppStack(app, 'cdk-stack-dev', { stackName: 'cdk-stack-dev', env: { account: process.env.CDK_DEFAULT_ACCOUNT, region: process.env.CDK_DEFAULT_REGION, }, }); new CdkAppStack(app, 'cdk-stack-prod', { stackName: 'cdk-stack-prod', env: { account: process.env.CDK_DEFAULT_ACCOUNT, region: process.env.CDK_DEFAULT_REGION, }, });
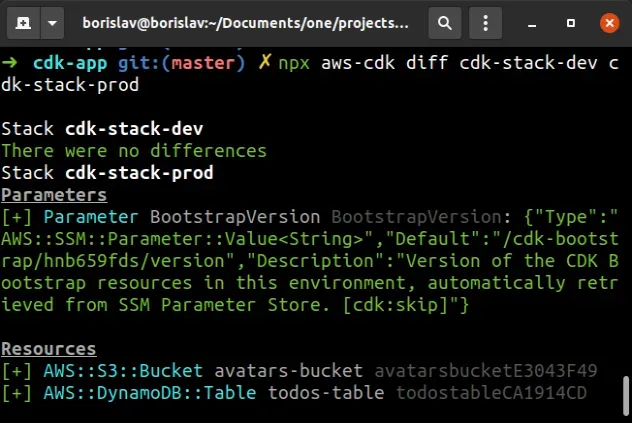
Let's run the diff command:
npx aws-cdk diff cdk-stack-dev cdk-stack-prod
The output shows that there aren't any differences in our cdk-stack-dev.
However, if we deploy the cdk-stack-prod, the Bucket and Table resources would
be created:
Let's synth the stacks to generate the CloudFormation templates:
npx aws-cdk synth cdk-stack-dev cdk-stack-prod
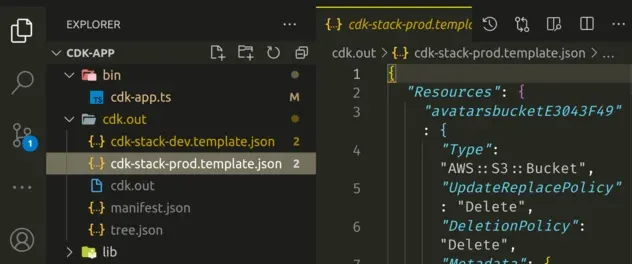
Now if we take a look at the cdk.out directory, we can see that we've
generated 2 CloudFormation templates. One for our cdk-stack-dev and one for
cdk-stack-prod:
In most real-world applications, you're going to have to manage more than one stack.
A couple of reasons are:
- you don't want to write to your production database while developing your application
- usually, you provision resources with lower capacity for your development
environment, i.e. an EC2 instance type
t3.microinstead ofm5n.xlarge.
Let's deploy our stacks. We haven't made any changes to the cdk-stack-dev, but
we'll deploy it anyway, to demo the syntax:
npx aws-cdk deploy cdk-stack-dev cdk-stack-prod
At this point we have both of our stacks deployed. If we open the CloudFormation console, we can see that both of our stacks provision a separate bucket and table:
To only deploy, synth, or diff a specific stack we just have to specify
the name in the command. For example, to only deploy the dev stack:
npx aws-cdk deploy cdk-stack-dev
# Clean up
In order to delete the stacks we've provisioned, we have to use the destroy
command:
npx aws-cdk destroy cdk-stack-dev cdk-stack-prod
# Additional Resources
You can learn more about the related topics by checking out the following tutorials:

