How to download a File in React.js (local or from URL)
Last updated: Apr 7, 2024
Reading time·7 min

# Table of Contents
- How to download a local File in React.js
- If you use the React Router Link component, set the to prop
- Downloading a file on button click using require() syntax
- Download a file that is stored in the public/ directory on button click
- Download a file by creating an
aelement programmatically - Download a file when clicking on a Material UI button in React
- Downloading a file from an external URL in React.js
# How to download a local File in React.js
To download a file in React.js:
- Import the file to be downloaded into your component.
- Wrap a button in an
<a>element. - Set the
hrefanddownloadprops on theaelement. - The file is downloaded when the button is clicked.
Here is a very minimal example.
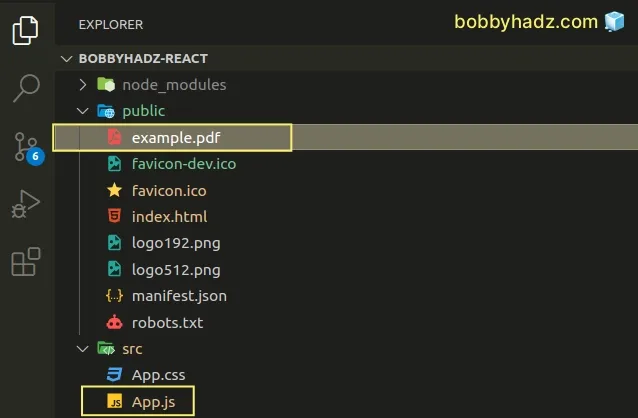
The code sample assumes that you have the following file structure.
my-project/ └── src └── example.pdf └── App.js
The example.pdf file is a sample pdf document but could be anything else.
Here is the code for the App.js file.
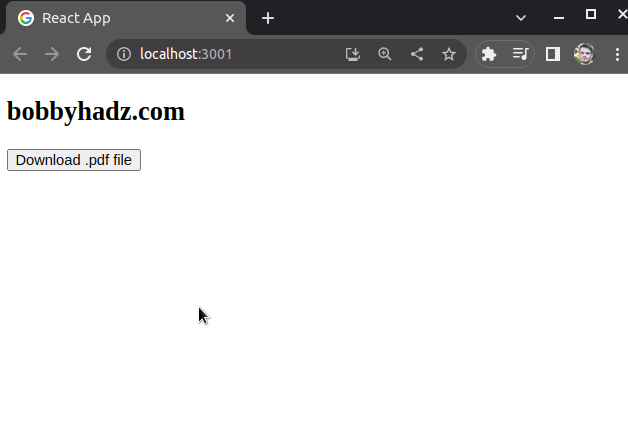
// 👇️ Import the pdf document import ExamplePdf from './example.pdf'; function App() { return ( <div> <h2>bobbyhadz.com</h2> <a href={ExamplePdf} download="Example-PDF-document" target="_blank" rel="noreferrer" > <button>Download .pdf file</button> </a> </div> ); } export default App;
Clicking on the button downloads a file named Example-PDF-document.pdf.
Here is a short clip that demonstrates how this works.
We first import the pdf document.
// 👇️ Import the pdf document import ExamplePdf from './example.pdf';
The code sample assumes that the .pdf document and the App.js file are
located in the same directory.
../ prefix, e.g. import ExamplePdf from '../example.pdf'.Similarly, if your file is located two directories up, you would use the ../
prefix twice, e.g. import ExamplePdf from '../../example.pdf'.
We set a couple of attributes on the a element.
<a href={ExamplePdf} download="Example-PDF-document" target="_blank" rel="noopener noreferrer" > <button>Download .pdf file</button> </a>
href- the URL that the link points to.download- causes the browser to treat the URL as a download. The attribute can be set to the name of the file that is stored on the user's filesystem.target- when set to_blank, the linked URL opens in a new tab.rel- used for security purposes.
This example shows how to download a file that is stored locally.
The last subheading in the article shows how to download a file that is hosted on a different domain.
# If you use the React Router Link component, set the to prop
If you use the React Router Link component instead of a regular a tag, you
have to set the to prop instead of the href attribute.
import ExamplePdf from './example.pdf'; import {Link} from 'react-router-dom'; function App() { return ( <div> <h2>bobbyhadz.com</h2> <Link to={ExamplePdf} download="Example-PDF-document" target="_blank" rel="noreferrer" > Download file </Link> </div> ); } export default App;
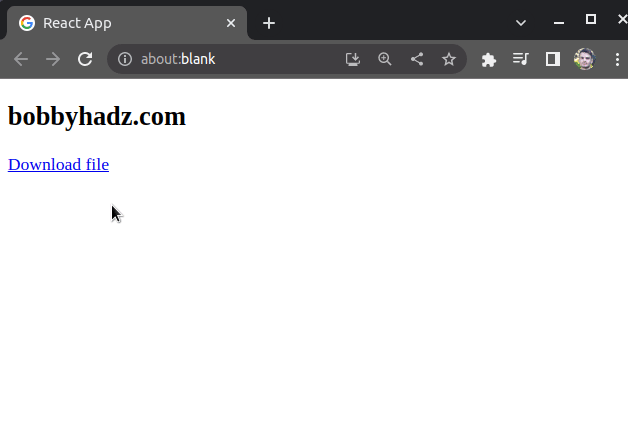
The code sample is very similar to the previous one. However, we imported and
used the Link component from React Router.
Notice that the Link component takes a to prop and not an href prop.
# Downloading a file on button click using require() syntax
If you run into issues when importing the file, try to use the require()
syntax inline.
function App() { return ( <div> <h2>bobbyhadz.com</h2> {/* 👇️ Using the require() syntax */} <a href={require('./example.pdf')} download="Example-PDF-document" target="_blank" rel="noreferrer" > <button>Download .pdf file</button> </a> </div> ); } export default App;
The code sample uses the require() syntax to import the file that is to be
downloaded inline.
I've also written a detailed guide on how to import and use an Image in a React component.
# Download a file that is stored in the public/ directory on button click
In some cases, your file might be stored in the public/ directory.
The example assumes that you have the following folder structure.
my-project/ └── public/ └── example.pdf └── src └── App.js
Here is how we can create a download button for the example.pdf file in
App.js.
function App() { return ( <div> <h2>bobbyhadz.com</h2> <a href="/example.pdf" download="Example-PDF-document" target="_blank" rel="noreferrer" > <button>Download .pdf file</button> </a> </div> ); } export default App;

We used a relative path of /example.pdf.
This assumes that you have an example.pdf file in the public/ directory of
your project.
However, the file you are downloading might be located in a nested directory
inside public/, e.g. a documents directory.
Here is the folder structure for the next example.
my-project/ └── public/ └── documents/ └── example.pdf └── src └── App.js
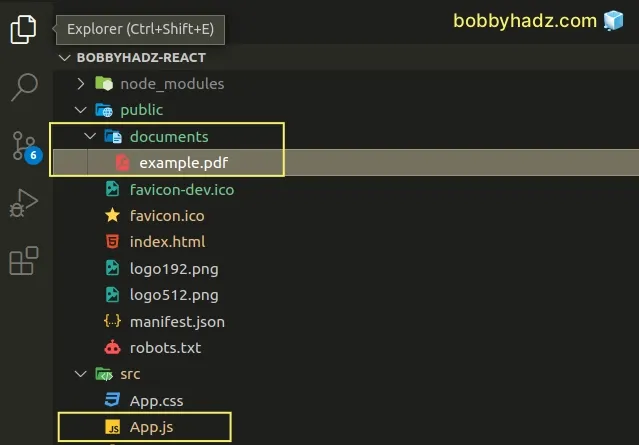
We have to use a path of /documents/example.pdf to download the
public/documents/example.pdf file.
function App() { return ( <div> <h2>bobbyhadz.com</h2> <a href="/documents/example.pdf" download="Example-PDF-document" target="_blank" rel="noreferrer" > <button>Download .pdf file</button> </a> </div> ); } export default App;
Notice that we updated the path to /documents/example.pdf to reflect the new
folder structure.
# Download a file by creating an a element programmatically
You can also download a file by creating an a element programmatically.
When a button is clicked.
- Create the
aelement using thedocument.createElement()method. - Set the element's
downloadandhrefattributes. - Use the
click()method to click the link element.
The code for the following example assumes that you have a file called
example.pdf that is located right next to your App.js file.
my-project/ └── src └── example.pdf └── App.js
Here is the code for the App.js file.
import ExamplePdf from './example.pdf'; function App() { const handleDownload = () => { const link = document.createElement('a'); link.download = 'Example-PDF-File'; link.href = ExamplePdf; link.click(); }; return ( <div> <h2>bobbyhadz.com</h2> <button onClick={handleDownload}>Download file</button> </div> ); } export default App;
We programmatically create the a element in the handleDownload function.
When the user clicks on the button, the a element is created and its
download and href attributes are set.
Lastly, we use the click() method to click on the link and initiate the
download.
If your file is located in the public/ folder, you would set the href
attribute to a relative path instead of importing the file.
const handleDownload = () => { const link = document.createElement('a'); link.download = 'Example-PDF-File'; // 👇️ Set to relative path link.href = '/example.pdf'; link.click(); };
The example above assumes that the following folder structure is used.
my-project/ └── public/ └── example.pdf └── src └── App.js
# Download a file when clicking on a Material UI button in React
You can use the Material UI module if you want to add styling to your download button.
Open your terminal in your project's root directory (where your package.json
file is) and run the following command to install the module.
# with NPM npm install @mui/material @emotion/react @emotion/styled # or with YARN yarn add @mui/material @emotion/react @emotion/styled
The commands install the @mui/material package and its dependencies.
The example assumes that you have a file called example.pdf right next to your
App.js file.
import ExamplePdf from './example.pdf'; import Button from '@mui/material/Button'; function App() { const handleDownload = () => { const link = document.createElement('a'); link.download = 'Example-PDF-File'; link.href = ExamplePdf; link.click(); }; return ( <div> <h2>bobbyhadz.com</h2> <Button onClick={handleDownload} variant="contained"> Download file </Button> </div> ); } export default App;
The code sample is very similar to the code from the previous subheading.
However, this time we used the Button component from the @mui/material
module.
You can also set the color prop if you want to customize the color of the
button.
<Button onClick={handleDownload} variant="contained" color="info" > Download file </Button>
The color prop can be set to one of error, info, inherit, primary,
secondary, success and warning.
# Downloading a file from an external URL in React.js
Here is an example that downloads a file from an external URL.
function App() { const downloadFile = ( filePath, fileName = 'Example-PDF-file.pdf', ) => { fetch('https://cors-anywhere.herokuapp.com/' + filePath, { method: 'GET', headers: { 'Content-Type': 'application/pdf', }, }) .then(response => response.blob()) .then(blob => { const url = window.URL.createObjectURL(new Blob([blob])); const link = document.createElement('a'); link.href = url; link.download = fileName; document.body.appendChild(link); link.click(); link.parentNode.removeChild(link); }); }; return ( <div> <h2>bobbyhadz.com</h2> <button onClick={() => downloadFile('example-pdf-file.pdf')} > Download file </button> </div> ); } export default App;
You have to make sure CORS is configured correctly when making an HTTP request to a different origin.
The downloadFile function
makes an HTTP request to a URL.
Notice that the URL must contain the path of the file that is to be downloaded (including the extension).
fetch('https://cors-anywhere.herokuapp.com/' + filePath, { method: 'GET', headers: { 'Content-Type': 'application/pdf', }, })
For example, the path could be https://example.com/my-pdf.pdf.
Make sure to set the correct Content-Type header depending on the type of file
that is being downloaded.
The next step is to use the response.blob() method to convert the fetch
response to a blob.
Once we have the blob, we can:
- Create the object URL.
- Create a link (
a) element. - Set the
hrefanddownloadattributes on the element. - Insert the link into the document.
- Use the
click()method to initiate the download. - Remove the link from the document.
.then(blob => { const url = window.URL.createObjectURL(new Blob([blob])); const link = document.createElement('a'); link.href = url; link.download = fileName; document.body.appendChild(link); link.click(); link.parentNode.removeChild(link); });
As previously noted, you have to make sure your server sends back the correct CORS headers that would enable your frontend to make an HTTP request.
You can read more about configuring CORS in this article.
# Additional Resources
You can learn more about the related topics by checking out the following tutorials:
- How to fetch Data on Button click in React
- Axios Network Error when making HTTP request [Solved]
- Fetch API cannot load localhost. URL scheme is not supported
- The value of the 'Access-Control-Allow-Origin' header in the response must not be the wildcard '*' when the request's credentials mode is 'include'
- CORS error: Request header field Authorization is not allowed by Access-Control-Allow-Headers in preflight response
- How to change the favicon in React.js [4 Ways]
- Error with Permissions-Policy header: Unrecognized feature
- How to set the Filename of a Blob in JavaScript
- How to set the PUBLIC_URL variable in Create-React-App
- How to download Files and Images using Axios
- How to generate unique IDs in React.js [3 Ways]
- How to get the MIME type of a File in JavaScript & Node.js
- File input change event not working in JavaScript [Solved]
- How to convert a Blob to an ArrayBuffer in JavaScript
- How to save an image to localStorage using JavaScript
- Fix React Warning: findDOMNode is deprecated in StrictMode

