How to bring an element to the Front using CSS
Last updated: Apr 5, 2024
Reading time·6 min

# How to bring an element to the Front using CSS
To bring an element to the front using CSS:
- Set the element's
z-indexCSS property to1. - Set the element's
positionCSS property torelative. - The
z-indexproperty only applies to positioned elements.
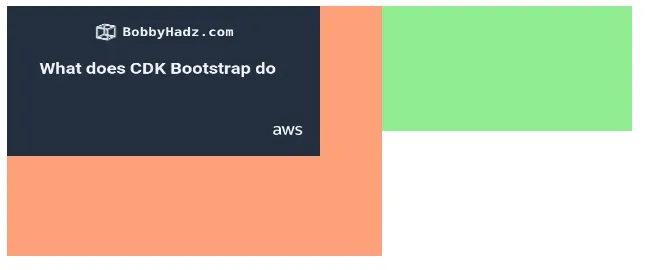
<!DOCTYPE html> <html lang="en"> <head> <meta charset="UTF-8" /> </head> <style> .box-1 { height: 200px; width: 300px; background-color: lightsalmon; position: absolute; z-index: 3; } .box-2 { height: 100px; width: 500px; background-color: lightgreen; position: absolute; z-index: 2; } .banner-img { height: 120px; width: 250px; position: relative; z-index: 1; } </style> <body> <div class="box-1">BOX 1</div> <div class="box-2">BOX 2</div> <img src="https://bobbyhadz.com/images/blog/what-aws-cdk-bootstrap-do/thumbnail.webp" alt="banner" class="banner-img" /> </body> </html>
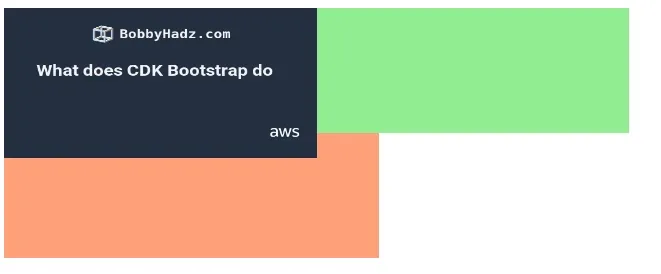
Notice that the image is positioned in front of the 2 div elements.
This is because:
.banner-img { height: 120px; width: 250px; position: relative; z-index: 1; }
The z-index CSS property sets the z-order of a positioned element and its
descendants or flex items.
Overlapping elements with a higher z-index cover those with a smaller one.
So if the div elements have a z-index of 1, the img element has to have
a z-index of at least two to be shown in front of the divs.
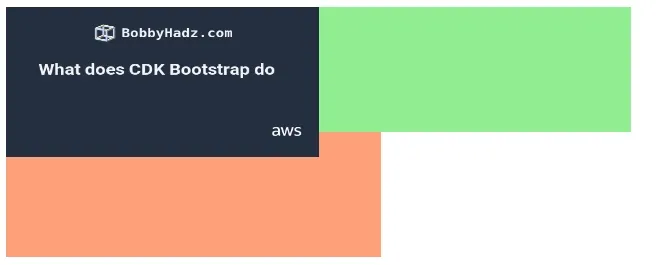
.box-1 { height: 200px; width: 300px; background-color: lightsalmon; position: absolute; /* has a z-index of 1 */ z-index: 1; } .box-2 { height: 100px; width: 300px; background-color: lightgreen; position: absolute; /* has a z-index of 1 */ z-index: 1; } .banner-img { height: 120px; width: 250px; position: relative; /* z-index set to 2 */ z-index: 2; }
position CSS property on the img element to relative is important because the element has to be positioned for the z-index CSS property to take effect.The relative position means that the element is positioned according to the
normal flow of the document.
Other values for the position CSS property include: absolute, relative,
fixed and sticky.
There is also a static value which is the default and should not be used when
setting the z-index CSS property.
z-index CSS property only affects elements that have a position value other than static or are flex items.Some things to note about the z-index CSS property:
- A
z-indexcan be set to a negative integer value, e.g.-1. - The default
z-indexvalue for an element is set to0. - Overlapping elements with a higher
z-indexcover those with a smaller one. - An element with a negative
z-indexvalue appears behind elements without a setz-indexvalue because the default is0.
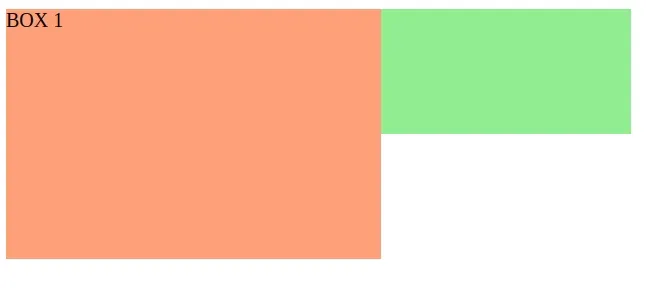
If I set the z-index of one of the boxes to a higher value than the z-index
of the image, the corresponding div appears in front of the image.
.box-1 { height: 200px; width: 300px; background-color: lightsalmon; position: absolute; /* display box-1 in front of the image */ z-index: 3; } .box-2 { height: 100px; width: 500px; background-color: lightgreen; position: absolute; } .banner-img { height: 120px; width: 250px; position: relative; z-index: 2; }
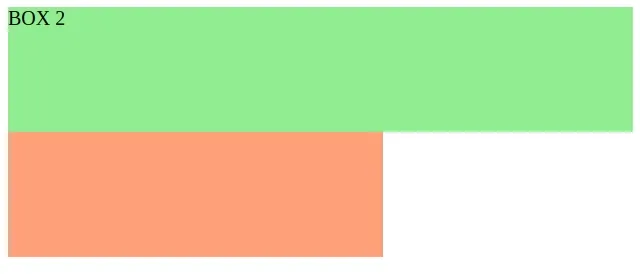
I can also move the image behind the boxes by setting its z-index to a
negative value, e.g. -1.
.box-1 { height: 200px; width: 300px; background-color: lightsalmon; position: absolute; } .box-2 { height: 100px; width: 500px; background-color: lightgreen; position: absolute; } .banner-img { height: 120px; width: 250px; position: relative; /* hide image behind div elements */ z-index: -1; }
This approach can also be used to bring an element to the front.
You can set a z-index of -1 on the overlapping elements and they will be
moved to the back.
# In some cases, you might have to use a very high z-index value
In some cases, you might have to use a very high z-index value to bring an
element to the front.
For example, if you use a third-party CSS library that has set a high z-index
on an element, you have to use a higher value to move an element to the front.
To view the z-index of an element:
- Right-click on it and select Inspect.

- Make sure the Elements tab is selected and click on Computed.
- View the
z-indexof the element.
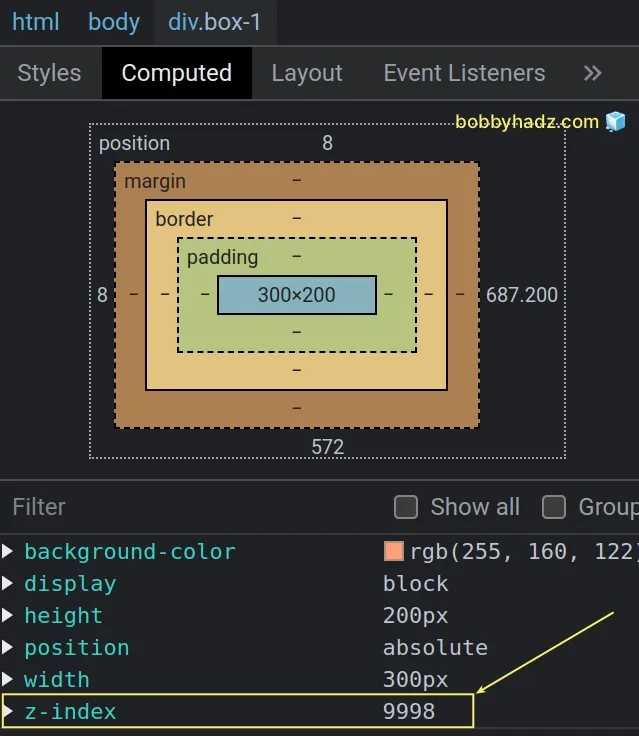
The z-index of the element in the example is 9998, so I have to use a
z-index of at least 9999 to move another element in front of it.
<!DOCTYPE html> <html lang="en"> <head> <meta charset="UTF-8" /> </head> <style> .box-1 { height: 200px; width: 300px; background-color: lightsalmon; position: absolute; z-index: 9998; } .box-2 { height: 100px; width: 500px; background-color: lightgreen; position: absolute; } .banner-img { height: 120px; width: 250px; position: relative; z-index: 9999; } </style> <body> <div class="box-1">BOX 1</div> <div class="box-2">BOX 2</div> <img src="https://bobbyhadz.com/images/blog/what-aws-cdk-bootstrap-do/thumbnail.webp" alt="banner" class="banner-img" /> </body> </html>
The img element in the example has a higher z-index value than the div, so
it is positioned in front of it.
In some cases, you might have to overwrite the z-index of an element that has
its z-index property set inline.
If you don't have access to the inline style, you have to use the !important flag.
<!DOCTYPE html> <html lang="en"> <head> <meta charset="UTF-8" /> </head> <style> .box-1 { height: 200px; width: 300px; background-color: lightsalmon; position: absolute; } .box-2 { height: 100px; width: 500px; background-color: lightgreen; position: absolute; } .banner-img { height: 120px; width: 250px; position: relative; z-index: 9999 !important; } </style> <body> <div class="box-1">BOX 1</div> <div class="box-2">BOX 2</div> <img src="https://bobbyhadz.com/images/blog/what-aws-cdk-bootstrap-do/thumbnail.webp" alt="banner" class="banner-img" style="z-index: -100" /> </body> </html>
Notice that the img element has its z-index CSS property set to -100
inline.
<img src="https://bobbyhadz.com/images/blog/what-aws-cdk-bootstrap-do/thumbnail.webp" alt="banner" class="banner-img" style="z-index: -100" />
Inline styles have higher precedence than global styles so in order to overwrite
the element's z-index, I used the !important flag.
.banner-img { height: 120px; width: 250px; position: relative; z-index: 9999 !important; }
# You can also set the z-index property on flex items
As previously noted, the z-index CSS property only affects elements that have
a position value other than static or are flex items.
Flex items are the direct children of an element that has display set to
flex or inline-flex.
Here is an example of how you can move the img element to the front without
setting its position CSS property.
<!DOCTYPE html> <html lang="en"> <head> <meta charset="UTF-8" /> </head> <style> .container { display: flex; } .box-1 { height: 200px; width: 300px; background-color: lightsalmon; position: absolute; } .box-2 { height: 100px; width: 500px; background-color: lightgreen; position: absolute; } .banner-img { height: 120px; width: 250px; z-index: 1; } </style> <body> <div class="container"> <div class="box-1">BOX 1</div> <div class="box-2">BOX 2</div> <img src="https://bobbyhadz.com/images/blog/what-aws-cdk-bootstrap-do/thumbnail.webp" alt="banner" class="banner-img" /> </div> </body> </html>
We directly set the z-index CSS property on the img element and it moved the
image to the front.
.banner-img { height: 120px; width: 250px; z-index: 1; }
Notice that we didn't set the position property on the element.
This worked because the direct parent of the image has its display property
set to flex.
.container { display: flex; }
# Additional Resources
You can learn more about the related topics by checking out the following tutorials:
- How to adjust a Button's width to fit the Text in CSS
- Hide element when clicked outside using JavaScript
- Set min-margin, max-margin, min-padding & max-padding in CSS
- How to Apply a CSS Hover effect to multiple Elements
- How to set a Max Character length in CSS
- Changing Bold Text into Normal (Unbold Text) in HTML
- Force the text in a Div to stay in one Line in HTML & CSS
- CSS text-align: center; not working issue [Solved]
- focus() not working in JavaScript issue [Solved]
- Remove the Header, Footer & URL when Printing in JavaScript
- How to change the Style of the
titleAttribute using CSS - Tailwind CSS classes not working in Vanilla or React project
- Remove whitespace between inline-block elements using CSS

