Cognito User Pool Example in AWS CDK - Complete Guide
Last updated: Jan 26, 2024
Reading time·10 min
# Table of Contents
- Cognito User Pool & User Pool Client Example in CDK
- Integrating SES with Cognito User Pools in CDK
- Deleting a Cognito User Pool on CDK Stack Deletion
- Cognito Identity Pool Example in CDK
Note if you want to provision a Cognito Identity Pool, click on the last subheading.
# Cognito User Pool & User Pool Client Example in CDK
We're going to use CDK to provision a Cognito User Pool and a User Pool Client.
We'll go through a step-by-step explanation of the different configuration options and things we should be aware of.
In order to provision a Cognito User Pool in CDK we have to use the UserPool construct.
A User pool is a directory where we store and manage users in AWS Cognito. A User Pool allows our users to register and sign in and allows us to manage their user profiles.
# Cognito User Pool in AWS CDK - Example
I'll post a snippet of a User Pool with some common configuration properties and we are going to go over the code.
import * as cognito from 'aws-cdk-lib/aws-cognito'; import * as cdk from 'aws-cdk-lib'; export class CdkStarterStack extends cdk.Stack { constructor(scope: cdk.App, id: string, props?: cdk.StackProps) { super(scope, id, props); // 👇 User Pool const userPool = new cognito.UserPool(this, 'userpool', { userPoolName: 'my-user-pool', selfSignUpEnabled: true, signInAliases: { email: true, }, autoVerify: { email: true, }, standardAttributes: { givenName: { required: true, mutable: true, }, familyName: { required: true, mutable: true, }, }, customAttributes: { country: new cognito.StringAttribute({mutable: true}), city: new cognito.StringAttribute({mutable: true}), isAdmin: new cognito.StringAttribute({mutable: true}), }, passwordPolicy: { minLength: 6, requireLowercase: true, requireDigits: true, requireUppercase: false, requireSymbols: false, }, accountRecovery: cognito.AccountRecovery.EMAIL_ONLY, removalPolicy: cdk.RemovalPolicy.RETAIN, }); } }
Let's go over the configuration properties we've passed to the User Pool:
- selfSignUpEnabled - whether users are allowed to sign up.
- signInAliases - whether users should sign in via email, phone number or username.
- autoVerify -
specify attributes that Cognito will automatically request verification for,
when a user signs up. Allowed values are
emailorphone. - standardAttributes - specify required standard attributes that users must provide when signing up.
- customAttributes - specify a map of non-standard attributes that allow you to store user profile information - i.e. shipping address, billing information, etc.
- passwordPolicy - set a password policy to force users to sign up with secure passwords.
- accountRecovery - specify how users should recover their account in case they forget their password.
- removalPolicy - specify whether the User Pool should be retained in the account after the stack is deleted. The default behavior is for the User Pool to be retained in the account (in an orphaned state).
Cognito sends emails to users when they register, forget their password, etc.
By default, the emails are sent from no-reply@verificationemail.com. For
production you're more than likely going to have to integrate with SES and
configure your own email address.
At the time of writing in order to set our own Email configuration, we have to
use an escape hatch and update the emailConfiguration property on the Level 1
CfnUserPool
construct.
If you have to update the email Cognito uses when sending emails to users, you can use the following snippet:
const userPool = new cognito.UserPool(this, 'userpool', { //...rest }) // 👇 OPTIONALLY update Email sender for Cognito Emails const cfnUserPool = userPool.node.defaultChild as cognito.CfnUserPool; cfnUserPool.emailConfiguration = { emailSendingAccount: 'DEVELOPER', replyToEmailAddress: 'YOUR_EMAIL@example.com', sourceArn: `arn:aws:ses:YOUR_COGNITO_SES_REGION:${ cdk.Stack.of(this).account }:identity/YOUR_EMAIL@example.com`, };
Let's go over the configuration properties in the code sample:
- emailSendingAccount
specifies whether Cognito uses the default emails or our own SES email
configuration.
DEVELOPERmeans that we have to provide our own SES configuration. - replyToEmailAddress specifies the email that will receive replies from users
- sourceArn
specifies the ARN of a verified SES email address.
However, note that Cognito only supports SES in 3 regions -
us-east-1,us-west-2andeu-west-1.
us-east-1, us-west-2, eu-west-1 regions.I'll now run the deployment command (without the SES configuration code):
npx aws-cdk deploy
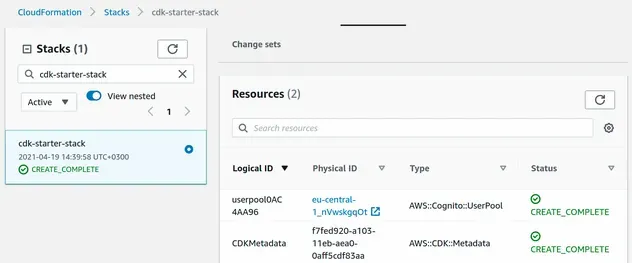
The CloudFormation console shows that the User Pool resource has been provisioned.
# Cognito User Pool Client in AWS CDK - Example
Next, we're going to add a User Pool client to our Cognito User Pool.
The User Pool Client is the part of the User Pool that enables unauthenticated operations like registering, signing in and restoring forgotten passwords.
You can't call these operations without an app client ID, which you get by
creating a User Pool Client.
I'll post a complete User Pool Client snippet and then we're going to go over the configuration options. The code should be placed right below the User Pool code.
// 👇 User Pool Client attributes const standardCognitoAttributes = { givenName: true, familyName: true, email: true, emailVerified: true, address: true, birthdate: true, gender: true, locale: true, middleName: true, fullname: true, nickname: true, phoneNumber: true, phoneNumberVerified: true, profilePicture: true, preferredUsername: true, profilePage: true, timezone: true, lastUpdateTime: true, website: true, }; const clientReadAttributes = new cognito.ClientAttributes() .withStandardAttributes(standardCognitoAttributes) .withCustomAttributes(...['country', 'city', 'isAdmin']); const clientWriteAttributes = new cognito.ClientAttributes() .withStandardAttributes({ ...standardCognitoAttributes, emailVerified: false, phoneNumberVerified: false, }) .withCustomAttributes(...['country', 'city']); // 👇 User Pool Client const userPoolClient = new cognito.UserPoolClient(this, 'userpool-client', { userPool, authFlows: { adminUserPassword: true, custom: true, userSrp: true, }, supportedIdentityProviders: [ cognito.UserPoolClientIdentityProvider.COGNITO, ], readAttributes: clientReadAttributes, writeAttributes: clientWriteAttributes, });
Let's go over the code snippet.
the
clientReadAttributesvariable represents the standard and custom attributes our application is going to be able to read on Cognito users. For a reference, I've included all of the standard attributes that Cognito supports and 3 custom attributes -country,cityandisAdmin.the
clientWriteAttributesvariable represents the attributes the User Pool Client will be able to write. We've removed theemailVerifiedandphoneNumberVerifiedproperties from the write attributes, as users shouldn't be able to verify their own email or phone number. Note that the custom attributes don't includeisAdmin, since we don't want users to be able to set theirisAdminproperty.
emailVerified or phoneNumberVerified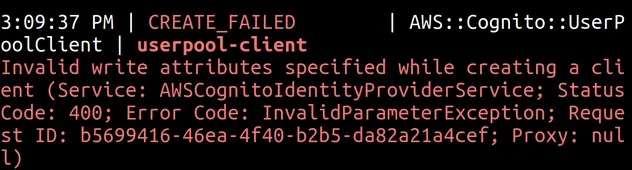
Moving on to the User Pool Client, the configuration properties are:
- userPool - the User Pool this client will be able to access
- authFlows - the types of authentication flows enabled for the client.
- supportedIdentityProviders -
the identity providers the client supports. This is where we'd add
Facebook IDPandGoogle IDPif we were to use OAuth. - readAttributes - the attributes the client is able to read
- writeAttributes - the attributes the client is able to write
I'll now run a deployment to provision the User Pool Client.
npx aws-cdk deploy
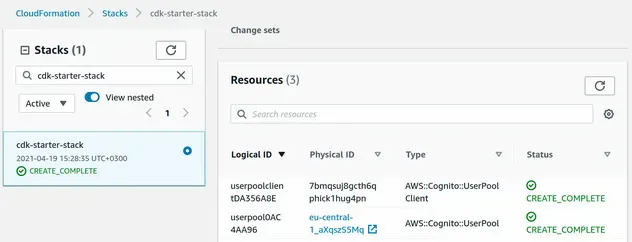
The CloudFormation console shows that our User Pool Client has been provisioned as well:
Next, I'll add Output values for the userPoolId and
userPoolClientId, so we can test our Cognito resources using the AWS CLI:
// 👇 Outputs new cdk.CfnOutput(this, 'userPoolId', { value: userPool.userPoolId, }); new cdk.CfnOutput(this, 'userPoolClientId', { value: userPoolClient.userPoolClientId, });
I'll write the Outputs to a file by providing the --outputs-file to the
deploy command:
npx aws-cdk deploy --outputs-file ./cdk-outputs.json
After I've run the command, a cdk-outputs.json file has been generated in the
root directory of my project.
{ "cdk-starter-stack": { "userPoolClientId": "7bmqsuj8gcth6qphick1hug4pn", "userPoolId": "eu-central-1_aXqszS5Mq" } }
These are the identifiers I'll use to test the provisioned Cognito resources.
# Testing our Cognito User Pool and User Pool Client
cdk-outputs.json- Creating a Cognito User:
aws cognito-idp admin-create-user \ --user-pool-id YOUR_USER_POOL_ID \ --username john@example.com \ --user-attributes Name="given_name",Value="john" \ Name="family_name",Value="smith"
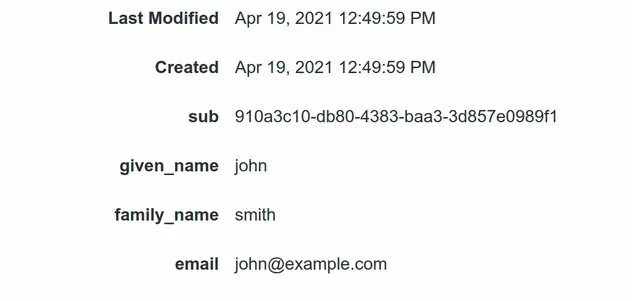
After running the command, the user is created successfully:

The given and family name standard attributes that we set to required when creating the User Pool have also been updated.
- Updating Standard User attributes:
aws cognito-idp admin-update-user-attributes \ --user-pool-id YOUR_USER_POOL_ID \ --username john@example.com \ --user-attributes Name="gender",Value="m" Name="name",Value="john smith"
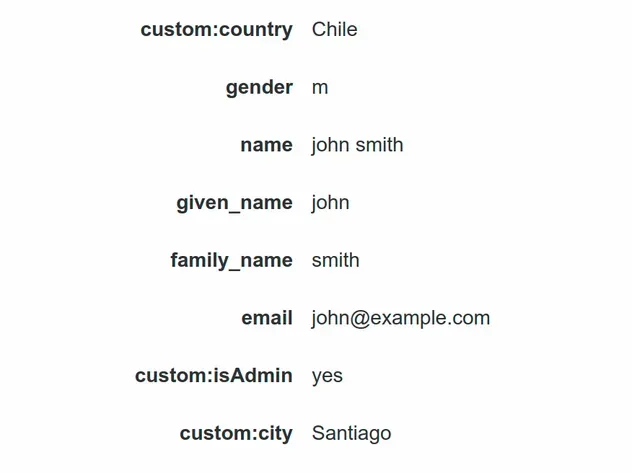
- Updating Custom User attributes:
aws cognito-idp admin-update-user-attributes \ --user-pool-id YOUR_USER_POOL_ID \ --username john@example.com \ --user-attributes Name="custom:country",Value="Chile" \ Name="custom:city",Value="Santiago" \ Name="custom:isAdmin",Value="yes"
If I refresh the Cognito console and open the User's profile I can see that all of the attributes have been updated:
At this point, we have a working User Pool and User Pool Client, provisioned by AWS CDK.
# Clean up
To delete the resources we've provisioned we have to issue the destroy command
and manually delete the User Pool because its retention policy is defaulted to
RETAIN.
npx aws-cdk destroy
# Table of Contents
- Integrating SES with Cognito User Pools in CDK
- Deleting a Cognito User Pool on CDK Stack Deletion
- Cognito Identity Pool Example in CDK
# Integrating SES with Cognito User Pools in CDK
Every time a user signs up for our application or requests a password recovery,
AWS Cognito sends them an email. By default, Cognito sends emails from
no-reply@verificationemail.com.
The default email configuration has many restrictions and quotas, for example - we can only send 50 emails per day and the subject of the email has to be less than 140 characters long.
Since the Level 2 UserPool construct doesn't expose a property for integrating with SES, we have to use an escape hatch to update the email configuration.
In order to configure SES for a Cognito User Pool in CDK, we have to get access to the CfnUserPool construct and update its emailConfiguration property.
const userPool = new cognito.UserPool(this, 'user-pool-id', { //...rest }); // 👇 update Email sender for Cognito Emails const cfnUserPool = userPool.node.defaultChild as cognito.CfnUserPool; cfnUserPool.emailConfiguration = { emailSendingAccount: 'DEVELOPER', replyToEmailAddress: 'YOUR_EMAIL@example.com', sourceArn: `arn:aws:ses:YOUR_COGNITO_SES_REGION:${ cdk.Stack.of(this).account }:identity/YOUR_FROM_EMAIL@example.com`, };
Let's go over the properties we've set for email configuration:
- emailSendingAccount
specifies whether Cognito should use the default email provider or our custom
SES configuration. The
DEVELOPERsetting indicates that we'll provide our custom SES config. - replyToEmailAddress specifies the email address users will be replying to
- sourceArn
specifies the ARN of a verified email address. Note that Cognito only
integrates with SES in 3 regions:
us-east-1,us-west-2,eu-west-1. The SESfrom-emailhas to be verified in the specific region, and your SES account must be out of the sandbox.
us-east-1, us-west-2 and eu-west-1 - Cognito Docs# Table of Contents
# Deleting a Cognito User Pool on CDK Stack Deletion
In order to delete a Cognito User Pool when our CDK stack is deleted, we need
to override theremovalPolicy prop of the user pool and set it to DESTROY.
const userPool = new cognito.UserPool(this, 'user-pool', { // ...rest // 👇 set to DESTROY removalPolicy: cdk.RemovalPolicy.DESTROY, });
If we run the cdk destroy command after we've updated the removalPolicy
prop, our Cognito User Pool will get deleted along with the stack.
# Default Behavior is to Retain Stateful Resources
By default stateful resources (databases, tables, user pools) in AWS CDK have
their removalPolicy set to RETAIN -
docs.
const userPool = new cognito.UserPool(this, 'user-pool', { // ... // 👇 default is RETAIN removalPolicy: cdk.RemovalPolicy.RETAIN, });
When the removalPolicy is set to RETAIN, the Cognito User Pool will not get
deleted when the stack gets deleted. Instead, it will remain in the account in
an orphaned state.
The same is the default behavior when we delete Dynamodb tables, S3 Buckets, and other stateful resources.
# Cognito Identity Pool Example in CDK
We're going to use CDK to provision a Cognito Identity Pool. We'll go through a step-by-step explanation of the different configuration options and things we should be aware of.
In order to provision a Cognito identity pool in CDK, we have to use the CfnIdentityPool construct.
The Identity Pool's purpose is to grant temporary credentials to authenticated and unauthenticated users, to access AWS services.
# Cognito Identity Pool in AWS CDK - Example
I'll post a snippet of an identity pool with some common configuration properties and we are going to go over the code:
import * as cognito from 'aws-cdk-lib/aws-cognito'; import * as iam from 'aws-cdk-lib/aws-iam'; import * as cdk from 'aws-cdk-lib'; export class CdkStarterStack extends cdk.Stack { constructor(scope: cdk.App, id: string, props?: cdk.StackProps) { super(scope, id, props); const identityPool = new cognito.CfnIdentityPool(this, 'identity-pool', { identityPoolName: 'my-identity-pool', allowUnauthenticatedIdentities: true, cognitoIdentityProviders: [ { clientId: userPoolClient.userPoolClientId, providerName: userPool.userPoolProviderName, }, ], }); } }
We used the CfnIdentityPool level 1 construct to define a Cognito identity pool.
The props we used are:
- identityPoolName - the name of the identity pool
- allowUnauthenticatedIdentities - whether users who haven't logged in should be able to access our application
- cognitoIdentityProviders - an auth provider, represented by the name of a Cognito user pool and the ID of a user pool client.
Next, we are going to define 2 roles for the Identity Pool - one for
authenticated and one for unauthenticated users.
The roles in this example provide the same permissions - just a Lambda logging policy.
const isAnonymousCognitoGroupRole = new iam.Role( this, 'anonymous-group-role', { description: 'Default role for anonymous users', assumedBy: new iam.FederatedPrincipal( 'cognito-identity.amazonaws.com', { StringEquals: { 'cognito-identity.amazonaws.com:aud': identityPool.ref, }, 'ForAnyValue:StringLike': { 'cognito-identity.amazonaws.com:amr': 'unauthenticated', }, }, 'sts:AssumeRoleWithWebIdentity', ), managedPolicies: [ iam.ManagedPolicy.fromAwsManagedPolicyName( 'service-role/AWSLambdaBasicExecutionRole', ), ], }, ); const isUserCognitoGroupRole = new iam.Role(this, 'users-group-role', { description: 'Default role for authenticated users', assumedBy: new iam.FederatedPrincipal( 'cognito-identity.amazonaws.com', { StringEquals: { 'cognito-identity.amazonaws.com:aud': identityPool.ref, }, 'ForAnyValue:StringLike': { 'cognito-identity.amazonaws.com:amr': 'authenticated', }, }, 'sts:AssumeRoleWithWebIdentity', ), managedPolicies: [ iam.ManagedPolicy.fromAwsManagedPolicyName( 'service-role/AWSLambdaBasicExecutionRole', ), ], });
We defined 2 IAM roles that we're going to attach to the identity pool. In this example, the roles have the same permissions, so you would have to tweak them for your use case.
Now we are going to attach the roles, we just defined, to the identity pool:
new cognito.CfnIdentityPoolRoleAttachment( this, 'identity-pool-role-attachment', { identityPoolId: identityPool.ref, roles: { authenticated: isUserCognitoGroupRole.roleArn, unauthenticated: isAnonymousCognitoGroupRole.roleArn, }, roleMappings: { mapping: { type: 'Token', ambiguousRoleResolution: 'AuthenticatedRole', identityProvider: `cognito-idp.${ cdk.Stack.of(this).region }.amazonaws.com/${userPool.userPoolId}:${ userPoolClient.userPoolClientId }`, }, }, }, );
Let's go over the configuration properties of the CfnIdentityPoolRoleAttachment construct:
- identityPoolId - the ID of the identity pool we're attaching IAM roles to
- roles - the IAM roles we want to associate to the identity pool
- roleMappings - specifies how authenticated users are mapped to roles
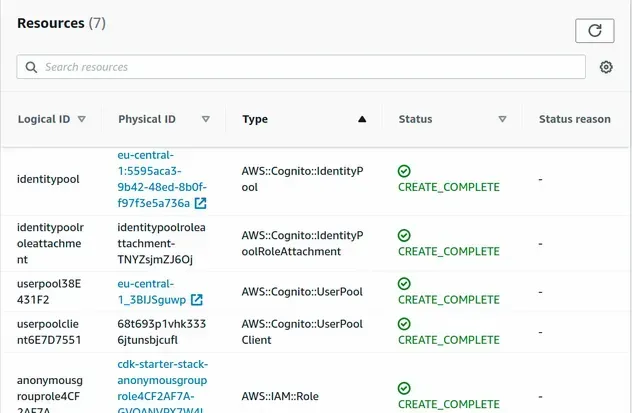
I'll provision the resources with the cdk deploy command.
npx aws-cdk deploy
If I open my CloudFormation console, I can see that the resources are provisioned:
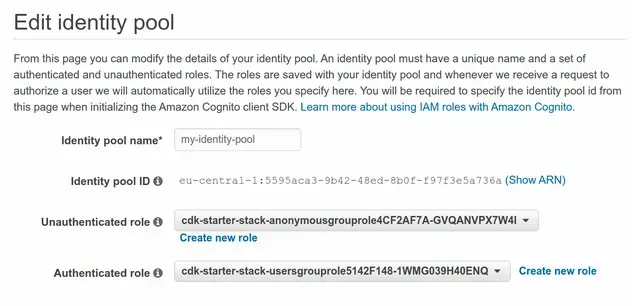
And if I go to the Cognito console, I can see that the identity pool was provisioned successfully.
# Further Reading
- AWS Cognito & Amplify Auth - Bad, Bugged, Baffling
- Add SES Support to a Cognito User Pool in CDK
- AWS CDK Tutorial for Beginners - Step-by-Step Guide
- How to use Context in AWS CDK
- How to use Parameters in AWS CDK
- The Config Profile could not be Found AWS CLI Error
- Email Address is not Verified AWS SES Error [Solved]
- How to send emails with SES in AWS CDK
- Unable to verify Secret Hash For Client AWS Error

