S3 Bucket Example in AWS CDK - Complete Guide
Last updated: Jan 26, 2024
Reading time·5 min

# Table of Contents
# Creating an S3 Bucket in AWS CDK
We are going to cover some of the most commonly used properties when creating and configuring an S3 bucket in AWS CDK.
To create an S3 bucket in CDK, we have to instantiate and configure the Bucket class.
Note that all of the props we are going to pass to the bucket in the second example are optional.
You could create an S3 bucket in CDK with a simple one-liner:
import * as s3 from 'aws-cdk-lib/aws-s3'; import * as cdk from 'aws-cdk-lib'; export class CdkStarterStack extends cdk.Stack { constructor(scope: cdk.App, id: string, props?: cdk.StackProps) { super(scope, id, props); const s3Bucket = new s3.Bucket(this, 's3-bucket') } }
I'll post the complete code snippet of configuring an S3 bucket and then we'll go over the details.
import * as s3 from 'aws-cdk-lib/aws-s3'; import * as cdk from 'aws-cdk-lib'; import * as iam from 'aws-cdk-lib/aws-iam'; export class CdkStarterStack extends cdk.Stack { constructor(scope: cdk.App, id: string, props?: cdk.StackProps) { super(scope, id, props); // 👇 create bucket const s3Bucket = new s3.Bucket(this, 's3-bucket', { // bucketName: 'my-bucket', removalPolicy: cdk.RemovalPolicy.DESTROY, autoDeleteObjects: true, versioned: false, publicReadAccess: false, encryption: s3.BucketEncryption.S3_MANAGED, cors: [ { allowedMethods: [ s3.HttpMethods.GET, s3.HttpMethods.POST, s3.HttpMethods.PUT, ], allowedOrigins: ['http://localhost:3000'], allowedHeaders: ['*'], }, ], lifecycleRules: [ { abortIncompleteMultipartUploadAfter: cdk.Duration.days(90), expiration: cdk.Duration.days(365), transitions: [ { storageClass: s3.StorageClass.INFREQUENT_ACCESS, transitionAfter: cdk.Duration.days(30), }, ], }, ], }); // 👇 grant access to bucket s3Bucket.grantRead(new iam.AccountRootPrincipal()); } }
Let's go over what we did in the code sample:
We created a bucket by instantiating the
Bucketclass.The props we passed to the constructor are:
| Name | Description |
|---|---|
bucketName | it's commented out in the example. It's not recommended to hard code a name for the bucket because they must be globally unique. If we leave the prop out, CloudFormation auto-generates a name |
removalPolicy | specify what should happen to the bucket if the CDK stack is deleted. We've set the removal policy to DESTROY (bucket gets deleted). By default, the bucket is retained in an orphaned state. |
autoDeleteObjects | automatically empty the bucket's contents when our stack is deleted, which enables us to delete the bucket. |
versioned | whether versioning should be enabled for the S3 bucket |
publicReadAccess | whether all objects in the bucket should be publicly accessible |
encryption | optionally specify the type of server-side encryption for the stored objects |
cors | allows HTTP requests from other domains. For example, when making a request from website.com to amazonaws.com to upload an object to the bucket |
lifecycleRules | allows us to transition infrequently accessed into different storage categories in an attempt to save money |
- We used the
grantReadmethod on the bucket instance to grant read access to the owner of the account in which the stack was created.
The service-to-service interaction methods that are exposed by CDK constructs are the main selling point of the service. To grant write permissions on an S3 bucket to a lambda function is as simple as:
s3Bucket.grantWrite(lambda);
autoDeleteObjects prop, which empties a bucket before deleting it on stack deletion, is a one-liner. The prop creates a CloudFormation custom resource for us. The custom resource is a Lambda function that takes care of emptying the bucket for us.All these abstractions, provided by CDK make our code much easier to read and understand (than CloudFormation).
To deploy the bucket, you'd have to run the deploy command:
npx aws-cdk deploy
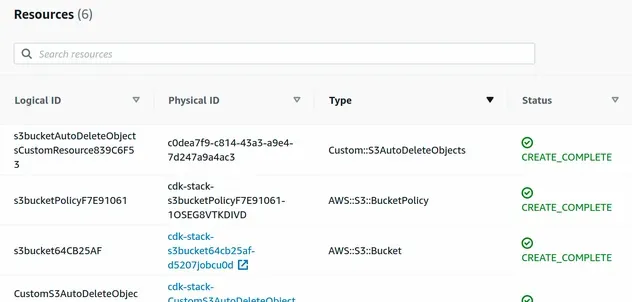
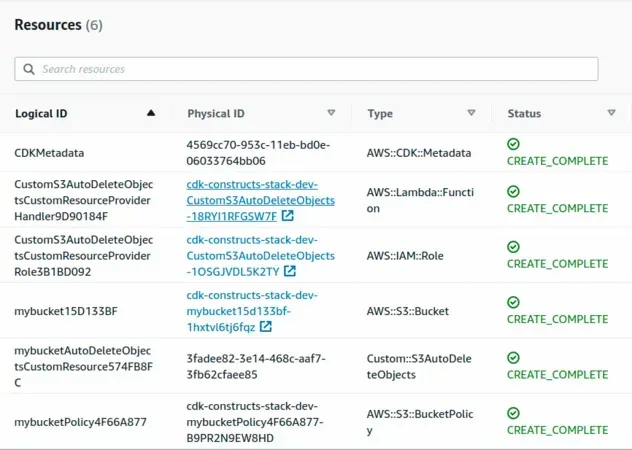
If we take a look at the CloudFormation management console, after the deployment, we can see that CDK has provisioned a total of 6 resources for us.

# Clean up
To delete the stack and the provisioned resources,
issue the destroy command.
npx aws-cdk destroy
# Deleting S3 Buckets on CDK Destroy
In order to delete an S3 bucket on CDK destroy, we have to set its
RemovalPolicy to DESTROY.
const s3Bucket = new s3.Bucket(this, 'my-bucket', { removalPolicy: cdk.RemovalPolicy.DESTROY, });
With this configuration the bucket will be deleted as long as it is empty.
If we try to delete a bucket that's not empty, we would get an error:
The automated way to empty the bucket before deleting it is to set the
autoDeleteObjects property to true:
const s3Bucket = new s3.Bucket(this, 'my-bucket', { removalPolicy: cdk.RemovalPolicy.DESTROY, autoDeleteObjects: true, });
Using the autoDeleteObjects property, we specify if all of the objects stored in
our S3 bucket should automatically get deleted when the bucket is removed from
our stack or when the stack itself is destroyed.
autoDeleteObjects property to true, if the removalPolicy property is set to DESTROY.By setting the autoDeleteObjects property to true, CDK will provision a
Lambda function for us that will automatically delete all of the bucket's
objects prior to deleting the bucket.

The second resource in the screenshot is the Lambda function that CDK automatically provisioned for us. It simply empties the bucket's contents.
# Discussion
When we delete a CDK stack by issuing the
npx aws-cdk destroy my-stack command any stateful resources, i.e. S3 buckets
and databases are left orphaned.
It's the same if we remove an S3 bucket resource from a CDK stack, it will still remain in our account(in an orphaned state).
The default behavior for the
AWS S3 construct
is that the removalPolicy property is set to RETAIN:
const s3Bucket = new s3.Bucket(this, 'my-bucket', { removalPolicy: cdk.RemovalPolicy.RETAIN, });
The default behavior of retaining S3 buckets and databases on stack deletion is what we want most of the time, however, it's nice of the CDK team to supply us with an easy way to opt-out.
By setting the bucket's removalPolicy to DESTROY and setting the
autoDeleteObjects property to true we were able to empty a bucket's contents
and delete it when the stack is deleted.
# Additional Resources
You can learn more about the related topics by checking out the following tutorials:
- Using S3 Event Notifications in AWS CDK - Complete Guide
- S3 Bucket Policy Example in AWS CDK
- Import an Existing S3 Bucket in AWS CDK
- AWS CDK Tutorial for Beginners - Step-by-Step Guide
- CDK Constructs - Complete Guide
- What is an identifier (id) in AWS CDK
- How to use Context in AWS CDK
- How to use Parameters in AWS CDK

