Dynamodb Table Example in AWS CDK - Complete Guide
Last updated: Jan 26, 2024
Reading time·6 min

# Table of Contents
- Creating a Dynamodb Table in AWS CDK
- Granting Dynamodb table Permissions in AWS CDK
- Configuring Auto Scaling for a Dynamodb Table in AWS CDK
- Deleting Dynamodb Tables on CDK Destroy
- Add a Dynamodb Global Secondary Index in AWS CDK
# Creating a Dynamodb Table in AWS CDK
In order to create a DynamoDB table in AWS CDK, we have to instantiate the Table class.
Let's look at a simple example where we create a DynamoDB table and add a local secondary index to it.
import * as dynamodb from 'aws-cdk-lib/aws-dynamodb'; import * as iam from 'aws-cdk-lib/aws-iam'; import * as cdk from 'aws-cdk-lib'; export class CdkStarterStack extends cdk.Stack { constructor(scope: cdk.App, id: string, props?: cdk.StackProps) { super(scope, id, props); // 👇 create Dynamodb table const table = new dynamodb.Table(this, id, { billingMode: dynamodb.BillingMode.PROVISIONED, readCapacity: 1, writeCapacity: 1, removalPolicy: cdk.RemovalPolicy.DESTROY, partitionKey: {name: 'id', type: dynamodb.AttributeType.STRING}, sortKey: {name: 'createdAt', type: dynamodb.AttributeType.NUMBER}, pointInTimeRecovery: true, }); console.log('table name 👉', table.tableName); console.log('table arn 👉', table.tableArn); // 👇 add local secondary index table.addLocalSecondaryIndex({ indexName: 'statusIndex', sortKey: {name: 'status', type: dynamodb.AttributeType.STRING}, projectionType: dynamodb.ProjectionType.ALL, }); } }
Let's go over what we did in the code sample.
- We created a Dynamodb table. The configuration props we passed to the
Tableclass are:
billingMode- we set it asPROVISIONED. The alternative isPAY_PER_REQUEST, where the table will automatically scale with the traffic.readCapacityandwriteCapacity- the provisioned throughput for the tableremovalPolicy- specify what should happen to the table if we delete the CDK stack or the table resource itself.The default
removalPolicyfor stateful resources (databases, S3 buckets, Cognito User Pools, etc) isRETAIN, which means that the resource will remain in an orphaned state in the account, even after the CDK stack is deleted.partitionKeyandsortKey- the primary key for our Dynamodb tablepointInTimeRecovery- when set totrue- enables continuous backups for our Dynamodb table
- We added a local secondary index to the DynamoDB table. Note that we can only add local secondary indexes to a DynamoDB table at table creation time.
Let's issue the deployment command.
npx aws-cdk deploy
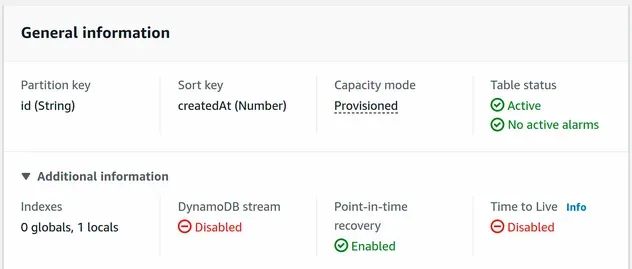
If we take a look at the DynamoDB management console, we can see that the table has been created.
# Table of Contents
- Granting Dynamodb table Permissions in AWS CDK
- Configuring Auto Scaling for a Dynamodb Table in AWS CDK
- Deleting Dynamodb Tables on CDK Destroy
- Add a Dynamodb Global Secondary Index in AWS CDK
# Granting Dynamodb table Permissions in AWS CDK
In order to grant permissions on a Dynamodb table in CDK, we have to use the
grant* methods on an instance of the
Table
class, for example:
- grantWriteData - permits an IAM principal to execute all write operations on a DynamoDB table
- grantReadData - permits an IAM principal to execute all read operations on a DynamoDB table
- grant - allows for a more fine-grained approach, where we pick which actions a principal can execute on a DynamoDB table
Let's look at an example of using grantReadData:
import * as dynamodb from 'aws-cdk-lib/aws-dynamodb'; import * as iam from 'aws-cdk-lib/aws-iam'; import * as cdk from 'aws-cdk-lib'; export class CdkStarterStack extends cdk.Stack { constructor(scope: cdk.App, id: string, props?: cdk.StackProps) { super(scope, id, props); // ... rest // 👇 grant permissions on table table.grantReadData(new iam.AccountRootPrincipal()); } }
We allowed the AWS account, into which the stack was deployed, to execute read operations on the DynamoDB table.
A very common scenario is to use the grant* methods to grant permissions to a
Lambda function. For example, this line
grants permission to a lambda to execute all read operations on the table:
table.grantReadData(lambda);
A more fine-grained approach would be to use the grant method and specify the
action:
table.grant(lambda, ['dynamodb:Query']);
By using the grant method, we can follow the IAM best practice of granting
only the permissions that are required to perform a task.
# Table of Contents
- Configuring Auto Scaling for a Dynamodb Table in AWS CDK
- Deleting Dynamodb Tables on CDK Destroy
- Add a Dynamodb Global Secondary Index in AWS CDK
# Configuring Auto Scaling for a Dynamodb Table in AWS CDK
In order to configure auto-scaling for a DynamoDB table in CDK, we have to use the autoScaleReadCapacity and autoScaleWriteCapacity methods on an instance of the Table class.
Let's look at an example where we configure auto-scaling for the write capacity of our table.
import * as appautoscaling from 'aws-cdk-lib/aws-applicationautoscaling'; import * as dynamodb from 'aws-cdk-lib/aws-dynamodb'; import * as iam from 'aws-cdk-lib/aws-iam'; import * as cdk from 'aws-cdk-lib'; export class CdkStarterStack extends cdk.Stack { constructor(scope: cdk.App, id: string, props?: cdk.StackProps) { super(scope, id, props); // ... rest // 👇 configure auto scaling on table const writeAutoScaling = table.autoScaleWriteCapacity({ minCapacity: 1, maxCapacity: 2, }); // 👇 scale up when write capacity hits 75% writeAutoScaling.scaleOnUtilization({ targetUtilizationPercent: 75, }); // 👇 scale up at 9 o'clock in the morning writeAutoScaling.scaleOnSchedule('scale-up', { schedule: appautoscaling.Schedule.cron({hour: '9', minute: '0'}), minCapacity: 2, }); // 👇 scale down in the afternoon writeAutoScaling.scaleOnSchedule('scale-down', { schedule: appautoscaling.Schedule.cron({hour: '14', minute: '0'}), maxCapacity: 2, }); } }
In the code sample:
- We used the autoScaleWriteCapacity method to enable auto-scaling for the write capacity of our Dynamodb table.
- We used the scaleOnUtilization method to scale our Dynamodb table up, in the event that the table's utilization reaches 75%.
- We used the scaleOnSchedule method to scale our table up and down depending on the time of the day.
Let's deploy the changes.
npx aws-cdk deploy
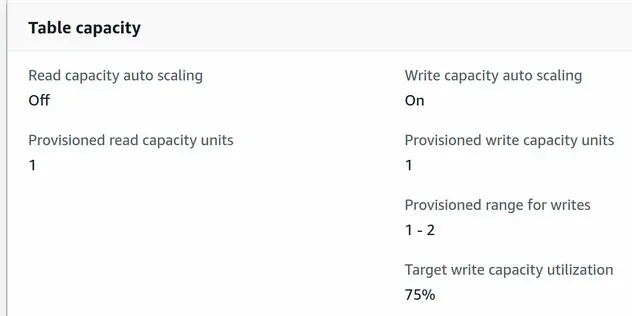
If we take a look at the Dynamodb management console, we can see that the write capacity auto-scaling configuration of the table has been updated:
# Clean up
To delete the resources we've provisioned, issue the destroy command:
npx aws-cdk destroy
# Table of Contents
# Deleting Dynamodb Tables on CDK Destroy
In order to delete a Dynamodb table on CDK destroy we need to override the
table's removalPolicy property and set it to DESTROY.
const table = new dynamodb.Table(this, 'my-table', { // 👇 set RemovalPolicy to DESTROY removalPolicy: cdk.RemovalPolicy.DESTROY, partitionKey: {name: 'date', type: dynamodb.AttributeType.STRING}, });
If we were to run cdk destroy after we've updated the table's removalPolicy,
our table would get deleted along with the stack.
# Default Behavior is to Retain Stateful Resources
By default when we provision a Dynamodb table using AWS CDK its removalPolicy
property is set to RETAIN -
docs.
const table = new dynamodb.Table(this, 'my-table', { removalPolicy: cdk.RemovalPolicy.RETAIN, partitionKey: {name: 'date', type: dynamodb.AttributeType.STRING}, });
The same counts for any stateful resources we provision, i.e. s3 buckets.
The default behavior is that the Dynamodb table will not get deleted, instead it will remain in our account as an orphaned resource from the stack.
The same counts in the case that we delete the Dynamodb table resource from the stack, it will still remain in our account.
# Add a Dynamodb Global Secondary Index in AWS CDK
To add a Global Secondary Index to a Dynamodb Table in AWS CDK, we have to use the addGlobalSecondaryIndex method on an instance of the Table class.
Let's look at a simple example where we create a DynamoDB table and add a global secondary index to it.
import * as dynamodb from 'aws-cdk-lib/aws-dynamodb'; import * as cdk from 'aws-cdk-lib'; export class CdkStarterStack extends cdk.Stack { constructor(scope: cdk.App, id: string, props?: cdk.StackProps) { super(scope, id, props); // 👇 create Dynamodb table const table = new dynamodb.Table(this, id, { partitionKey: {name: 'todoId', type: dynamodb.AttributeType.STRING}, sortKey: {name: 'createdAt', type: dynamodb.AttributeType.NUMBER}, billingMode: dynamodb.BillingMode.PROVISIONED, readCapacity: 1, writeCapacity: 1, removalPolicy: cdk.RemovalPolicy.DESTROY, }); // 👇 add global secondary index table.addGlobalSecondaryIndex({ indexName: 'userIdIndex', partitionKey: {name: 'userId', type: dynamodb.AttributeType.STRING}, sortKey: {name: 'status', type: dynamodb.AttributeType.STRING}, readCapacity: 1, writeCapacity: 1, projectionType: dynamodb.ProjectionType.ALL, }); } }
Let's go over the code snippet.
- We created a DynamoDB table with provisioned capacity.
- We created a Global secondary index on the table using the
addGlobalSecondaryIndexmethod. The props we have passed to the method are:
indexName- the name of the global secondary indexpartitionKey- the partition key attribute for the global secondary indexsortKey- the sort key attribute for the global secondary indexreadCapacityandwriteCapacity- the capacity for the global secondary index. These properties can only be provided if the table is configured withPROVISIONEDcapacity. By defaultreadCapacityandwriteCapacityare set to5.projectionType- which attributes should be projected into the global secondary index. By default all attributes are projected into the GSI, so we could have omitted this property.
I'll deploy the stack.
npx aws-cdk deploy
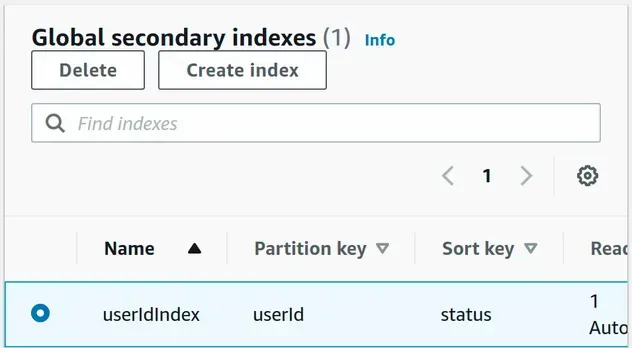
After deployment, the DynamoDB table has been provisioned and the global secondary index has been added to the table.
# Additional Resources
You can learn more about the related topics by checking out the following tutorials:
- Get the Item Count of a Dynamodb Table
- API Gateway Example in AWS CDK - Complete Guide
- Lambda Function Example in AWS CDK - Complete Guide
- Write TypeScript Lambda functions in AWS CDK - Complete Guide
- AWS CDK Tutorial for Beginners - Step-by-Step Guide
- What is an identifier (id) in AWS CDK
- How to use Context in AWS CDK
- How to use Parameters in AWS CDK
- Get the Item Count of a Dynamodb Table

