What are Constructs in AWS CDK - Complete Guide
Last updated: Jan 27, 2024
Reading time·9 min

# Table of Contents
- Constructs Definition
- CDK Constructs Library
- Cfn Resources (Level 1)
- Level 2 Constructs
- Level 3 Constructs
- Benefits of having different levels of Constructs
- Writing our own Constructs
# Constructs Definition
CDK constructs are cloud components. We use constructs to encapsulate logic, which we can reuse throughout our infrastructure code.
Constructs allow us to remove some of the duplication associated with provisioning resources and providing a higher level of abstraction.
A construct can provision one or more AWS resources and serves a specific purpose. For instance, we can have a construct that provisions a single Dynamodb table or we can have a construct that provisions an Identity Pool with the associated User Pool Groups.
# CDK Constructs Library
AWS provides a constructs library, which we can use to provision resources via CDK.
Since CDK serves as a replacement for CloudFormation, the Constructs Library covers all of the resources you can provision using CloudFormation, i.e. an s3 bucket or a lambda function.
CDK provides a more developer-friendly interface with a higher level of abstraction compared to CloudFormation. When writing code using CloudFormation, we have to specify most, if not all of the properties of a resource.
Other than the opinionated defaults, CDK constructs often implement commonly used glue logic between services, i.e. for granting permissions from service A to service B, it's often as simple as:
s3Bucket.grantPut(lambda); s3Bucket.grantPutAcl(lambda);
There are 3 levels of Constructs we can use in CDK. The different construct levels represent different abstraction levels. From Level 1 (the least opinionated, with the least assumptions) to Level 3 (the most opinionated, with the most defaults and logic in place).
# Cfn Resources (Level 1)
Cfn (Level 1) resources are 1x1 mappings with how you would provision the resource using CloudFormation. When using Cfn Resources we often have to refer to the cloudformation docs.
We only use Cfn resources as a last resort - in case we need flexibility. They are low-level and don't provide any opinionated defaults or any of the glue logic for service-to-service interactions.
An example of a Cfn Resource is a
CfnBucket.
You can see the naming convention is Cfn + the name of the resource, i.e.
CfnBucket, CfnBucketPolicy, CfnFunction, CfnTable (for a dynamodb table).
import * as s3 from 'aws-cdk-lib/aws-s3'; import * as cdk from 'aws-cdk-lib'; export class CdkConstructsStack extends cdk.Stack { constructor(scope: cdk.App, id: string, props?: cdk.StackProps) { super(scope, id, props); // 👇 using CfnBucket const bucket = new s3.CfnBucket(this, 'uploads-bucket'); } } const app = new cdk.App(); new CdkConstructsStack(app, `cdk-constructs-stack-dev`, { stackName: `cdk-constructs-stack-dev`, env: {region: process.env.CDK_DEFAULT_REGION}, tags: {env: 'dev'}, });
We used the s3.CfnBucket Cfn Resource inside our root stack.
# Level 2 Constructs
Level 2 Constructs are higher-level constructs, defined in the AWS Constructs library. They provide sane defaults and helper methods for service-to-service interactions.
The higher level of abstraction they provide makes it easier to focus on the bigger picture and not as much on the details of the resources we have to provision. An example would be the s3 bucket construct.
After we define the S3 bucket, we can use a method to grant permissions to a Lambda function.
export class CdkConstructsStack extends cdk.Stack { constructor(scope: cdk.App, id: string, props?: cdk.StackProps) { super(scope, id, props); // 👇 using Level 2 Bucket construct const bucket = new s3.Bucket(this, 'uploads-bucket'); // 👇 using level 2 Function construct const lambdaFunction = new lambda.Function(this, 'uploads-function', { // ... }); // 👇 using utility methods exposed by the Level 2 Bucket Construct bucket.grantPut(lambdaFunction); bucket.grantPutAcl(lambdaFunction); } }
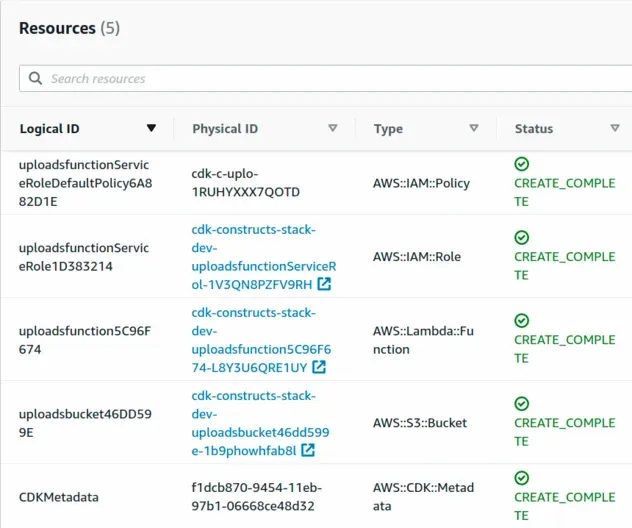
By using these two Level 2 Constructs we were able to provision the following resources in our CloudFormation stack.

With just 2 lines of code, we created a policy that follows the best practices
of least privilege and grants our lambda permissions for the s3:PutObject and
s3:PutObjectAcl actions.
// 👇 using helper methods exposed from Level 2 Constructs bucket.grantPut(lambdaFunction); bucket.grantPutAcl(lambdaFunction);
Another example of using Level 2 constructs would be the VPC construct.
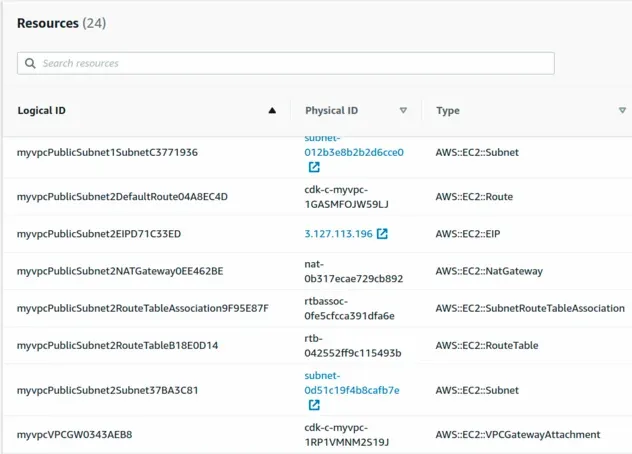
Let's use the level 2 construct for creating a VPC and look at the amount of CloudFormation resources we end up provisioning with just 3 lines of code.
import * as ec2 from 'aws-cdk-lib/aws-ec2'; import * as cdk from 'aws-cdk-lib'; export class CdkConstructsStack extends cdk.Stack { constructor(scope: cdk.App, id: string, props?: cdk.StackProps) { super(scope, id, props); // 👇 use Vpc construct const myVpc = new ec2.Vpc(this, 'my-vpc', { ipAddresses: ec2.IpAddresses.cidr('10.0.0.0/16'), }); } }
Vpc construct provisions one NAT gateway per Availability Zone. NAT Gateways are priced at an hourly rate.With our 3 lines of Vpc definition using the level 2 construct we ended up
provisioning a CloudFormation template that's 282 lines long.
I would definitely rather manage the 3 lines of CDK code than the 282 lines of CloudFormation.
Not only that but the 3 lines of CDK code provision 24 resources, which would be very complex to do with just plain CloudFormation.

These are the main selling points of CDK - the higher level of abstraction with sane defaults, where you only have to dig into specific resource properties if you need to change the default behavior.
Whereas, the CloudFormation way is - learn about all of the resource properties to set the behavior and connect the resources together.
It's important to note that we can't pass Cfn Resource properties to a Level 2 Construct or pass Level 2 Construct props to the Cfn resources.
# Level 3 Constructs
Level 3 constructs provide an even higher level of abstraction. These are even more specific and opinionated than level 2 constructs and serve a very specific use case.
For example, the LambdaRestApi construct, which defines an API Gateway with a Lambda proxy integration.
import * as apigateway from 'aws-cdk-lib/aws-apigateway'; import * as lambda from 'aws-cdk-lib/aws-lambda'; import * as cdk from 'aws-cdk-lib'; import * as path from 'path'; export class CdkConstructsStack extends cdk.Stack { constructor(scope: cdk.App, id: string, props?: cdk.StackProps) { super(scope, id, props); const lambdaFunction = new lambda.Function(this, 'lambda-function', { runtime: lambda.Runtime.NODEJS_18_X, handler: 'main', code: lambda.Code.fromAsset(path.join(__dirname, '../src/my-function')), }); // use the Level 3 LambdaRestApi construct const lambdaRestApi = new apigateway.LambdaRestApi( this, 'lambda-rest-api', { handler: lambdaFunction, }, ); } }
Using the LambdaRestApi level 3 construct allows us to create a Rest API with
a lambda proxy integration.
Notice how as the levels of constructs get higher, more assumptions are made as to how these constructs are going to be used, which allows us to provide interfaces with sane defaults for very specific use cases.
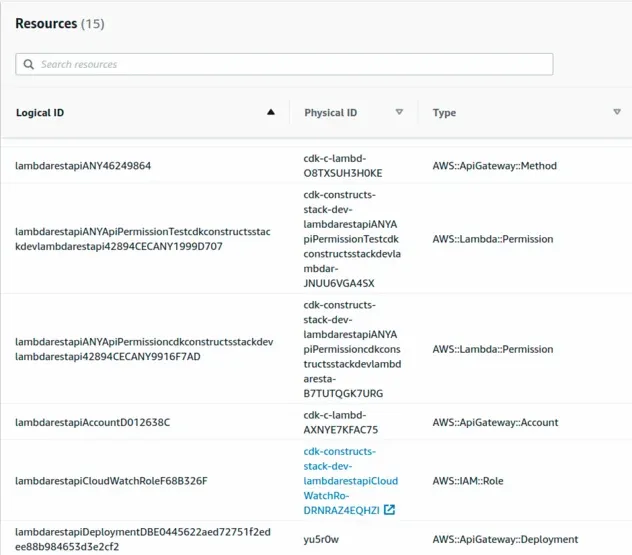
The LambdaRestApi level 3 construct ended up provisioning 15 resources in just
about 15 lines of code.

You can also write your own Level 3 constructs, i.e. an Endpoint construct, which creates a Lambda function, grants DynamoDB permissions to it and adds the lambda function as an integration to an API Gateway.
# Benefits of having different levels of Constructs
Some of the benefits of having different Construct levels are:
- ability to wrap the lower level constructs, i.e. the Cfn Resources and provide defaults that suit our use case.
- implementing very specific patterns, i.e. an API with a Lambda integration with a Serverless Aurora database. If we know that that's what we're trying to provision in advance, we can pre-set many of the properties of these resources and implement some of the glue logic between the services.
That's the whole point of being able to define your infrastructure as code - the ability to use logic, assumptions, abstractions and provide specific utilities.
Being too generic and un-opinionated (CloudFormation style) allows for customization, however, the drawback is you have to manage thousands of lines of YAML, until it gets out of hand.
# Writing our own Constructs
When defining our own constructs, we have to follow a specific approach. All
constructs extend the Construct class. The Construct class is the building
block of the construct tree.
import * as s3 from 'aws-cdk-lib/aws-s3'; import {Construct} from 'constructs'; export class UploadsBucketConstruct extends Construct { public readonly s3Bucket: s3.Bucket; constructor(scope: Construct, id: string) { super(scope, id); this.s3Bucket = new s3.Bucket(this, id); } }
Notice how our UploadsBucketConstruct extends the Construct class. It then
defines a constructor method. All constructs take 2 required and a third
optional parameters.
The first parameter is the scope. All constructs but the root one (the one
where we initialize our CDK app) must be defined within the scope of another
construct. The scope parameter specifies the parent construct, within which
the child construct is initialized. In Javascript, we use the this keyword
to denote the scope, in Python self, etc.
The second parameter is the identifier and it must be unique within the scope. The combination of CDK identifiers for a resource builds the CloudFormation Logical ID of that resource. I have written a whole article on identifiers in CDK as the implementation is quite confusing.
The third optional parameter, which we are not passing in the
UploadsBucketConstruct is the props parameter. Props are key-value pairs,
used to specify some of the configuration options of the resources we are
defining with our construct.
Notice that we have added an s3Bucket property to our class because we want to
expose the created s3Bucket to the consumer of the construct, so they can grant
permissions and run other utility methods on the resource.
Let's look at a complete example, starting at the CDK App, defining our Stack and using a Construct we've written.
import * as s3 from 'aws-cdk-lib/aws-s3'; import * as cdk from 'aws-cdk-lib'; import {Construct} from 'constructs'; // 👇 Construct we've written export class UploadsBucketConstruct extends Construct { public readonly s3Bucket: s3.Bucket; constructor(scope: Construct, id: string) { super(scope, id); this.s3Bucket = new s3.Bucket(this, id); } } // 👇 Stack Definition export class CdkConstructsStack extends cdk.Stack { constructor(scope: cdk.App, id: string, props?: cdk.StackProps) { super(scope, id, props); const {s3Bucket} = new UploadsBucketConstruct(this, 'new-s3-bucket'); } } // 👇 App initialization const app = new cdk.App(); // 👇 Stack instantiation new CdkConstructsStack(app, `cdk-constructs-stack-dev`, { stackName: `cdk-constructs-stack-dev`, env: {region: process.env.CDK_DEFAULT_REGION}, tags: {env: 'dev'}, });
The App represents an entire CDK application, which is composed of one or more Stacks. We define all of the other constructs inside of our App, which is the entry point of our CDK application.
Since AWS CDK gets compiled down to CloudFormation, we have to define our constructs within the scope of a Stack. The stack construct represents a single CloudFormation stack and takes the exact same arguments like any other construct (scope, id, props).
scope, the id and the props.Let's now look at a different example where we create our own construct for a Dynamodb Table. This time the construct is going to take 3 parameters - the scope, id and props:
import * as dynamodb from 'aws-cdk-lib/aws-dynamodb'; import * as cdk from 'aws-cdk-lib'; import {Construct} from 'constructs'; type DynamodbTableProps = { removalPolicy?: cdk.RemovalPolicy; partitionKey: dynamodb.Attribute; sortKey?: dynamodb.Attribute | undefined; }; // 👇 Custom Construct definition export class DynamodbTableConstruct extends Construct { public readonly table: dynamodb.Table; constructor(scope: Construct, id: string, props: DynamodbTableProps) { super(scope, id); const {removalPolicy, partitionKey, sortKey} = props; this.table = new dynamodb.Table(this, id, { billingMode: dynamodb.BillingMode.PROVISIONED, readCapacity: 1, writeCapacity: 1, removalPolicy: removalPolicy ?? cdk.RemovalPolicy.DESTROY, partitionKey, sortKey, }); } } // 👇 Stack definition export class CdkConstructsStack extends cdk.Stack { constructor(scope: cdk.App, id: string, props?: cdk.StackProps) { super(scope, id, props); // 👇 Using our custom construct const {table: todosTable} = new DynamodbTableConstruct( this, 'todos-table', { partitionKey: {name: 'date', type: dynamodb.AttributeType.STRING}, sortKey: {name: 'createdAt', type: dynamodb.AttributeType.NUMBER}, }, ); } } // 👇 App instantiation const app = new cdk.App(); // 👇 Stack instantiation new CdkConstructsStack(app, `cdk-constructs-stack-dev`, { stackName: `cdk-constructs-stack-dev`, env: {region: process.env.CDK_DEFAULT_REGION}, tags: {env: 'dev'}, });
Notice how our DynamodbTableConstruct takes props this time. We used the props,
the consumer passes in, to set the removalPolicy, partitionKey and the
sortKey of the table.
Our second example follows the same pattern, at the top level we have our App.
In the scope of the App, we create our root Stack, within which we create our constructs.
# Summary
Our CDK application starts with the CDK App. In the scope of the App, we define our CDK Stacks and in our CDK Stacks we make use of different (abstraction) levels of Constructs.
There is a consistent signature to all constructs - they all extend the
Construct class and take 2 required and a third optional parameters - scope,
id, props.
All throughout our CDK application we compose constructs to provide a more maintainable code base for our infrastructure.
# Additional Resources
You can learn more about the related topics by checking out the following tutorials:

