Change the indentation in VS Code (2 or 4 spaces, Tab size)
Last updated: Apr 6, 2024
Reading time·7 min
# Table of Contents
- Change the indentation in VS Code (2 or 4 spaces, Tab size)
- Changing the indentation level with the Tab Size setting
- Changing the indentation level based on a programming language
- Changing the indentation level in settings.json
- Changing the indentation level for Prettier in VS Code
- Convert Tabs to Spaces or Spaces to Tabs in Visual Studio Code
# Change the indentation in VS Code (2 or 4 spaces, Tab size)
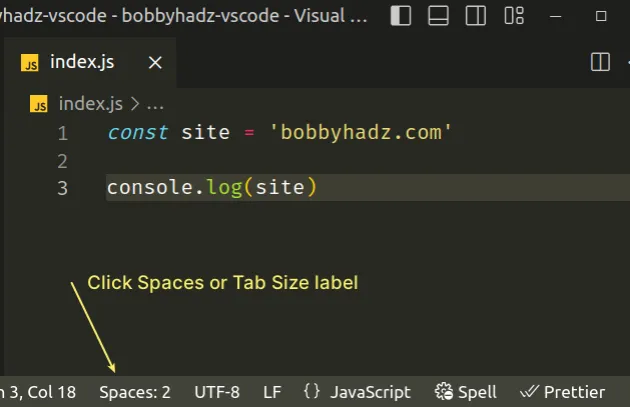
To change the indentation in VS Code:
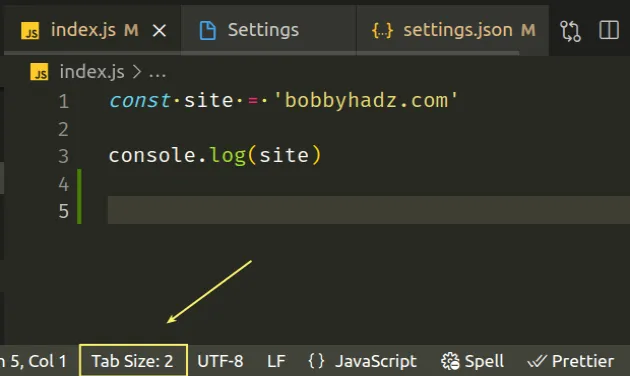
- Click on the Spaces or Tab Size label in the Status bar at the bottom.
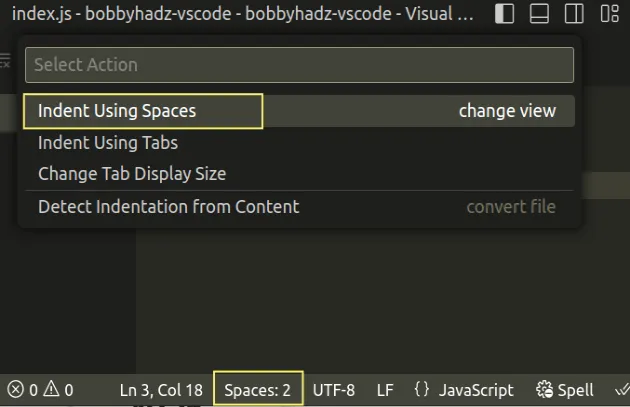
- Select Indent Using Spaces or Indent Using Tabs in the next menu.
- Select your preferred indentation level, e.g. 2, 4 or 8 spaces.
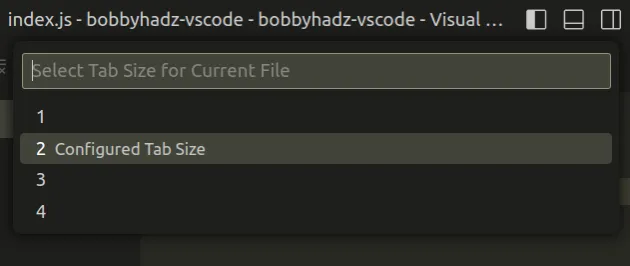
I've set my indentation level to 2 spaces in the example, so each indent is 2 spaces.
If I set my indentation level to 4 spaces, each indent is 4 spaces.
I've also written an article on how to render whitespace characters in VS Code.
If you select Ident Using Tabs from the menu, then the label in the status bar at the bottom shows Tab Size:.
This approach only changes the indentation for the current file, not for the entire project.
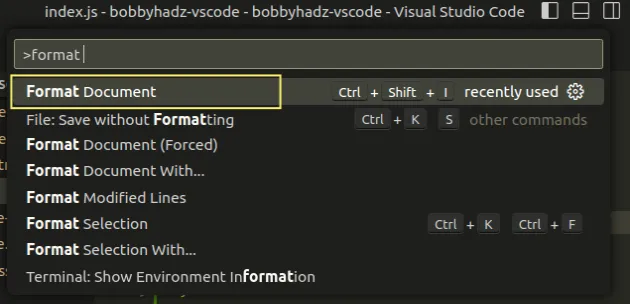
You might have to format your file after you change the indentation level:
- Press:
Ctrl+Shift+Pon Windows and Linux.Command+Shift+Pon macOS.
F1 to open the Command Palette.- Type format and select Format Document.
You can also use the keyboard shortcut:
- on Windows:
Shift+Alt+F - on macOS:
Shift+Option+F - on Linux:
Ctrl+Shift+I(I, notL)
# Changing the indentation level with the Tab Size setting
You can also use the tab size setting to change the indentation level.
The setting is applied globally and sets the indentation level for all newly created files.
- Press
Ctrl+Shift+P(orCommand+Shift+Pon macOS).
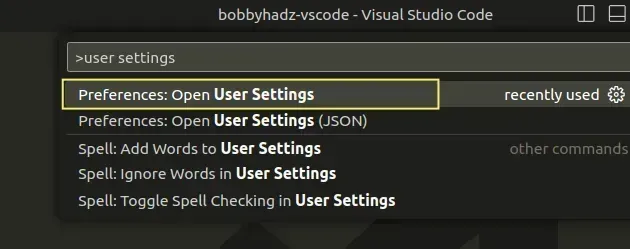
F1 to open the Command Palette.- Type user settings and select Preferences: Open User Settings.
You can also open the settings screen by pressing Ctrl + , on Windows and
Linux or Cmd + , on macOS.
- Search for tab size and set your preferred number of spaces in the Editor: Tab Size field.
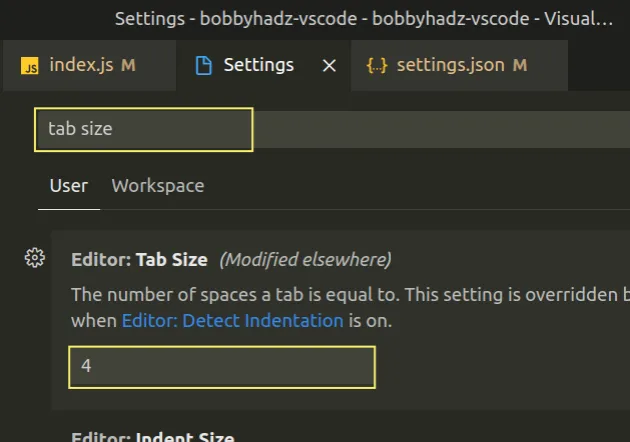
The Tab Size setting determines the number of spaces a tab is equal to.
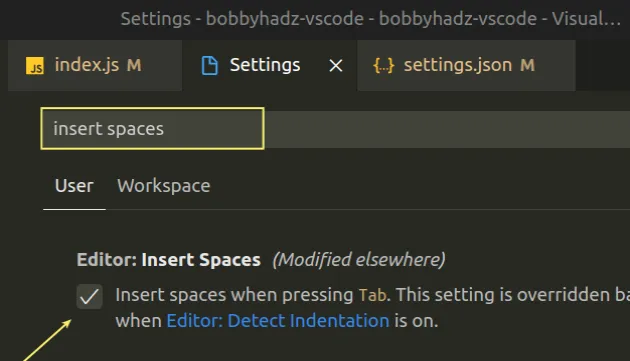
- Now search for insert spaces and make sure the Editor: Insert Spaces checkbox is checked.
- Search for detect indentation and take a look at the value of the Editor: Detect Indentation setting.

The Editor: Detect Indentation setting controls whether VS Code tries to automatically detect the tab size when a file is opened based on the contents of the file.
In other words, if you have the Tab Size property set to 4 spaces, but you open a file that uses 2 spaces for indentation and Detect Indentation is enabled, VS Code will automatically override your Tab Size and will use 2 spaces for indentation.
You can disable Detect Indentation if you want to use the same indentation level for all files.
For example, if you add an existing Python file that is indented using 2 spaces
for indentation to your project and Detect Indentation is set to true, VS
Code will set the indentation level of the file to 2 spaces even if your Tab
Size is set to 4 spaces.
When the Tab Size property is set, it applies the specified indentation level for all newly created files.
If you want to override the indentation size for your specific project and not globally, click on the Workspace tab and update the specific property.
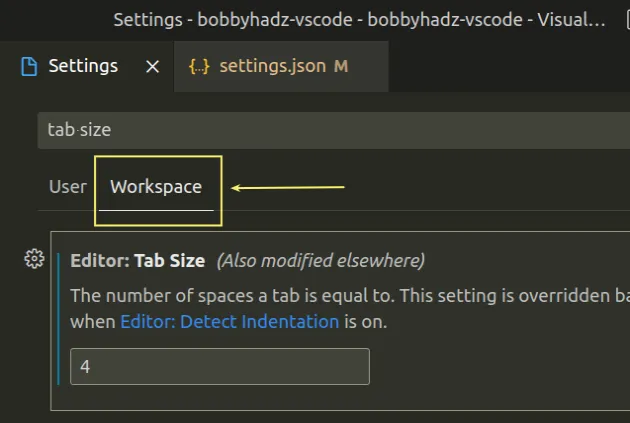
The changes get applied in your .vscode/settings.json file.
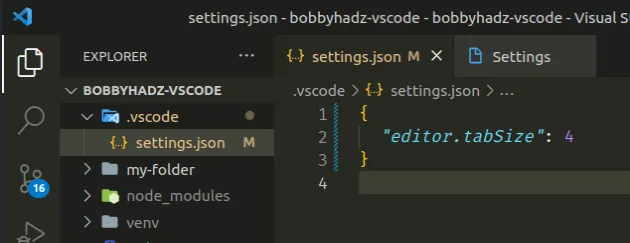
The workspace configuration overrides any global configuration and only applies to the current project.
# Changing the indentation level based on a programming language
Another thing you might often have to do is change the indentation for a specific programming language.
For example, you might want to indent your Python files using 4 spaces and your JavaScript files using 2.
- Press
Ctrl+Shift+P(orCommand+Shift+Pon macOS).
F1 to open the Command Palette.Type user settings json.
Click on Preferences: Open User Settings (JSON)

- Use the following format to change the indentation level based on a programming language.
"[python]": { "editor.tabSize": 4 }, "[javascript]": { "editor.tabSize": 2 }, "[typescript]": { "editor.tabSize": 2 },
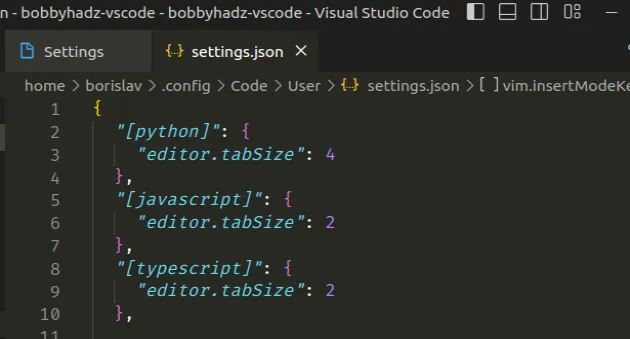
The text between the square brackets is the language identifier.
The example sets the indentation level for Python to 4 spaces and the indentation level for JavaScript and TypeScript to 2 spaces.
You can view all language identifiers in this table in the official documentation.
The values in the Identifier column are what you should specify between the square brackets.
If the configuration isn't applied as expected, you can use a
.vscode/settings.json file.
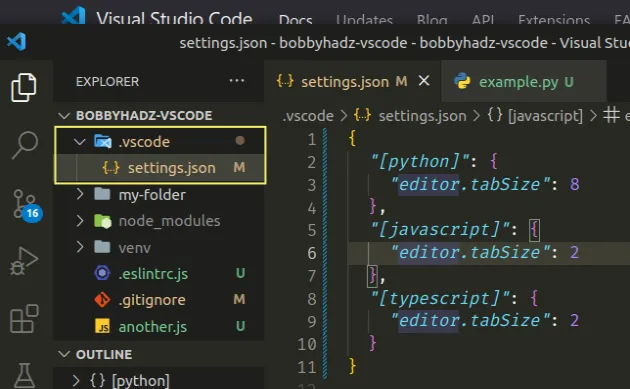
In the root directory of your project, create a .vscode folder.
Create a
settings.jsonfile in the.vscodefolder.Add the following code to your
settings.jsonfile.
{ "[python]": { "editor.tabSize": 4 }, "[javascript]": { "editor.tabSize": 2 }, "[typescript]": { "editor.tabSize": 2 } }
Your local .vscode/settings.json file overrides any global configuration and
only applies to the current project.
The list of all language identifiers is available in this table in the docs.
# Changing the indentation level in settings.json
All of the previously mentioned settings can also be updated directly in your settings.json file.
- Press
Ctrl+Shift+P(orCommand+Shift+Pon macOS).
F1 to open the Command Palette.Type user settings json.
Click on Preferences: Open User Settings (JSON)
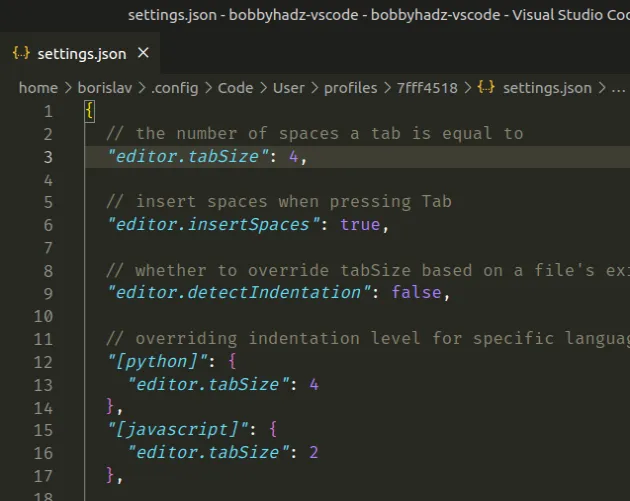
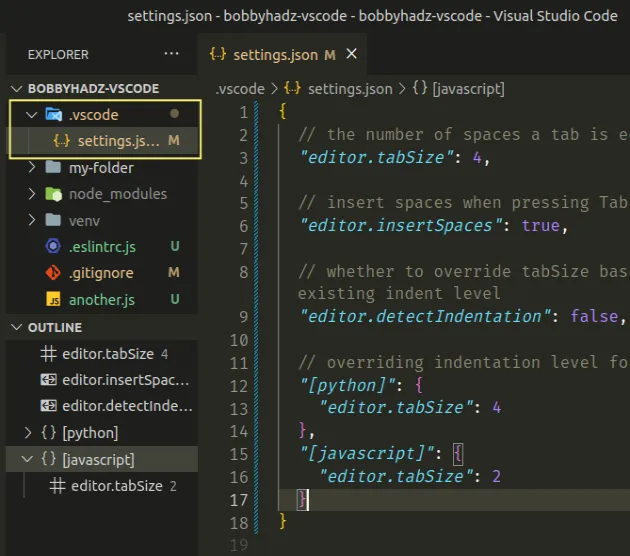
- Set your preferred properties and values.
// The number of spaces a tab is equal to "editor.tabSize": 4, // insert spaces when pressing Tab "editor.insertSpaces": true, // whether to override tabSize based on a file's existing indent level "editor.detectIndentation": false, // overriding indentation level for specific languages "[python]": { "editor.tabSize": 4 }, "[javascript]": { "editor.tabSize": 2 }
If you only want to change the indentation in your current project (workspace),
add the properties to your .vscode/settings.json file.
In the root directory of your project, create a
.vscodefolder.Create a
settings.jsonfile in the.vscodefolder.Add the following code to your
settings.jsonfile.
{ // The number of spaces a tab is equal to "editor.tabSize": 4, // insert spaces when pressing Tab "editor.insertSpaces": true, // whether to override tabSize based on a file's existing indent level "editor.detectIndentation": false, // overriding indentation level for specific languages "[python]": { "editor.tabSize": 4 }, "[javascript]": { "editor.tabSize": 2 } }
The configuration in your local .vscode/settings.json overrides any global
configuration and only applies to your current project (workspace).
# Changing the indentation level for Prettier in VS Code
If you already have a prettier configuration file, set the tabWidth property
to change your configuration level.
For example, if you have a .prettierrc, file you can set the indentation level
as follows.
{ "tabWidth": 2, "prettier.useTabs": true }
If you don't have a local configuration file, you can set the tabWidth
property globally, directly in VS Code.
- Press
Ctrl+Shift+P(orCommand+Shift+Pon macOS).
F1 to open the Command Palette.- Type user settings and select Preferences: Open User Settings.
You can also open the settings screen by pressing Ctrl + , on Windows and
Linux or Cmd + , on macOS.
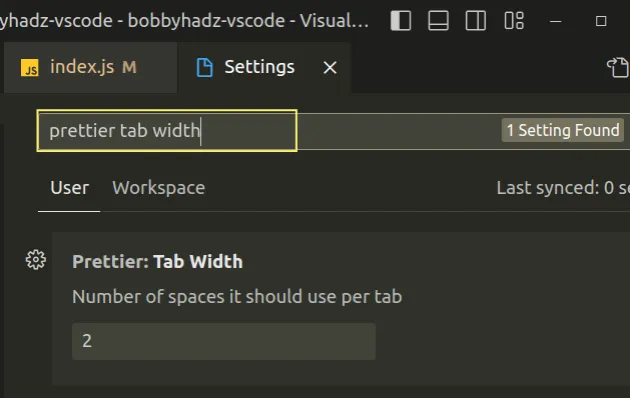
- Type prettier tab width in the search field and set your preferred indentation level.
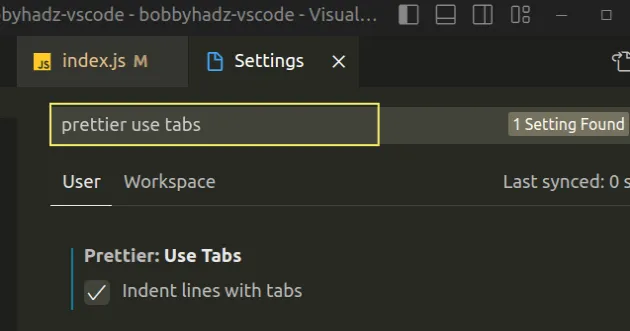
- Then type prettier use tabs and enable the setting.
# Convert Tabs to Spaces or Spaces to Tabs in Visual Studio Code
Something you might often have to do is convert tabs to spaces or spaces to tabs in an existing file.
This is supported in VS Code out of the box.
Open a file.
Press:
Ctrl+Shift+Pon Windows and Linux.Command+Shift+Pon macOS.
F1 to open the Command Palette.- Type convert and select:
- Convert indentation to spaces - if you need to convert tabs to spaces.
- Convert indentation to tabs - if you need to convert spaces to tabs.

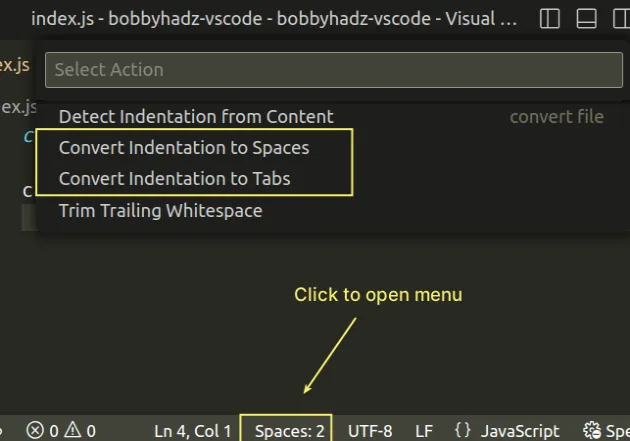
You can also click on the Spaces: or Tab Size: label in the Status Bar at the bottom and select:
- Convert indentation to Spaces
- Convert indentation to Tabs
The two examples above only convert the leading spaces or tabs.
If you want to convert all tabs in a file to spaces, you have to use the find and replace functionality.
- Open a file.
- Press
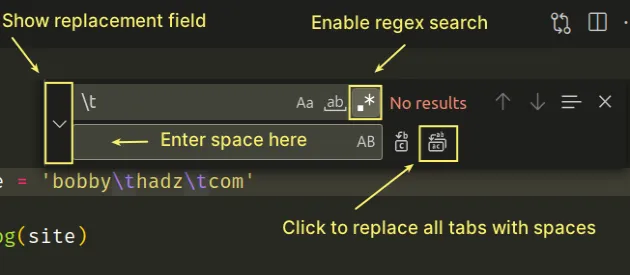
Ctrl+F(orCmd+Fon macOS) to show the search field. - Expand the replacement field.
- Click on the
.*to enable regular expression search. - Use a
\tin the search field and a space in the replacement field. - Click on the Replace All button to replace all occurrences.
If you want to replace literal \t characters with spaces, then disable the
regular expression.
I've also written an article on how to shift a block of code left or right in VS Code.
# Additional Resources
You can learn more about the related topics by checking out the following tutorials:

