RDS Example in AWS CDK - Complete Guide
Last updated: Jan 26, 2024
Reading time·7 min
# Creating an RDS Instance in AWS CDK
We are going to create an RDS instance and connect to it from an EC2 instance.
We will also create a VPC as RDS databases and EC2 instances must be launched in
a VPC. The RDS instance will be in an ISOLATED subnet, whereas the EC2
instance will be in a PUBLIC subnet.
Let's start by creating the VPC and the EC2 instance:
import * as ec2 from 'aws-cdk-lib/aws-ec2'; import * as rds from 'aws-cdk-lib/aws-rds'; import * as cdk from 'aws-cdk-lib'; export class CdkStarterStack extends cdk.Stack { constructor(scope: cdk.App, id: string, props?: cdk.StackProps) { super(scope, id, props); // 👇 create the VPC const vpc = new ec2.Vpc(this, 'my-cdk-vpc', { ipAddresses: ec2.IpAddresses.cidr('10.0.0.0/16'), natGateways: 0, maxAzs: 3, subnetConfiguration: [ { name: 'public-subnet-1', subnetType: ec2.SubnetType.PUBLIC, cidrMask: 24, }, { name: 'isolated-subnet-1', subnetType: ec2.SubnetType.PRIVATE_ISOLATED, cidrMask: 28, }, ], }); // 👇 create a security group for the EC2 instance const ec2InstanceSG = new ec2.SecurityGroup(this, 'ec2-instance-sg', { vpc, }); ec2InstanceSG.addIngressRule( ec2.Peer.anyIpv4(), ec2.Port.tcp(22), 'allow SSH connections from anywhere', ); // 👇️ Importing your SSH key const keyPair = ec2.KeyPair.fromKeyPairName( this, 'key-pair', 'ec2-key-pair', ); // 👇 create the EC2 instance const ec2Instance = new ec2.Instance(this, 'ec2-instance', { vpc, vpcSubnets: { subnetType: ec2.SubnetType.PUBLIC, }, securityGroup: ec2InstanceSG, instanceType: ec2.InstanceType.of( ec2.InstanceClass.BURSTABLE2, ec2.InstanceSize.MICRO, ), machineImage: new ec2.AmazonLinuxImage({ generation: ec2.AmazonLinuxGeneration.AMAZON_LINUX_2, }), keyPair, }); } }
Let's go over the code snippet.
We created a VPC with
PUBLICandISOLATEDsubnet groups.An instance launched in a
PUBLICsubnet has access to the internet and can be accessed from the internet via an internet gateway. Our EC2 instance will be launched in aPUBLICsubnet.Whereas an instance launched in an
ISOLATEDsubnet has no access to the internet and can't be accessed from the internet. Isolated subnets are used mostly for intra-VPC communication.Our RDS instance will be launched in an
ISOLATEDsubnet because we will be connecting to it from our EC2 instance, which is in the same VPC.We created a Security Group for our EC2 instance. The security group has a single inbound rule, which allows SSH connections from anywhere.
We created a
t2.microEC2 instance withAmazon Linux 2AMI and placed it in aPUBLICsubnet.Note that we passed the
keyPairprop to the EC2 instance. We will SSH into the instance to interact with our RDS database. A key pair with the specified name has to exist in your default AWS region in order for the deployment to succeed.
ec2-key-pair exists in your default AWS region.Let's create a key pair in your default AWS region with the name of
ec2-key-pair. Alternatively, you could replace the value of the SSH key pair
with one that already exists in your account.
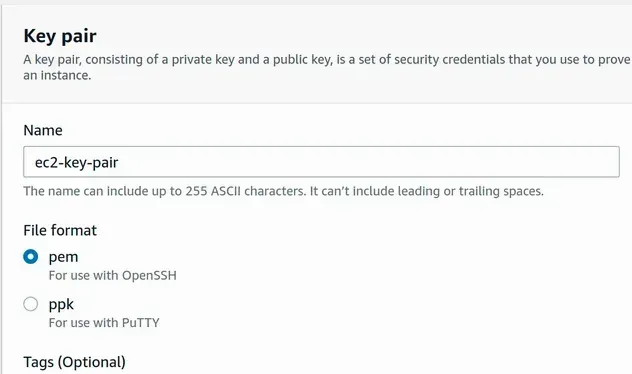
To create a key pair, open the EC2 Management console and click on Key Pairs >
Create key Pair.
Depending on your operating system you can choose between pem (Mac, Linux) and
ppk (Windows). I'm on Linux, so I've selected pem:
After the key pair has been created, navigate to the directory it was downloaded in and change its permissions:
chmod 400 ec2-key-pair.pem
Let's add the RDS instance to our code, right below the EC2 instance definition:
import * as ec2 from 'aws-cdk-lib/aws-ec2'; import * as rds from 'aws-cdk-lib/aws-rds'; import * as cdk from 'aws-cdk-lib'; export class CdkStarterStack extends cdk.Stack { constructor(scope: cdk.App, id: string, props?: cdk.StackProps) { super(scope, id, props); // ... rest // 👇 create RDS instance const dbInstance = new rds.DatabaseInstance(this, 'db-instance', { vpc, vpcSubnets: { subnetType: ec2.SubnetType.PRIVATE_ISOLATED, }, engine: rds.DatabaseInstanceEngine.postgres({ version: rds.PostgresEngineVersion.VER_14, }), instanceType: ec2.InstanceType.of( ec2.InstanceClass.BURSTABLE3, ec2.InstanceSize.MICRO, ), credentials: rds.Credentials.fromGeneratedSecret('postgres'), multiAz: false, allocatedStorage: 100, maxAllocatedStorage: 120, allowMajorVersionUpgrade: false, autoMinorVersionUpgrade: true, backupRetention: cdk.Duration.days(0), deleteAutomatedBackups: true, removalPolicy: cdk.RemovalPolicy.DESTROY, deletionProtection: false, databaseName: 'todosdb', publiclyAccessible: false, }); dbInstance.connections.allowFrom(ec2Instance, ec2.Port.tcp(5432)); new cdk.CfnOutput(this, 'dbEndpoint', { value: dbInstance.instanceEndpoint.hostname, }); new cdk.CfnOutput(this, 'secretName', { // eslint-disable-next-line @typescript-eslint/no-non-null-asserted-optional-chain value: dbInstance.secret?.secretName!, }); } }
Let's go over what we did in the code sample:
- We created an RDS instance, by instantiating the DatabaseInstance class.
- The props we passed to the constructor are:
| name | Description |
|---|---|
vpc | The VPC in which the DB subnet group will be created |
vpcSubnets | The type of subnets the DB subnet group should consist of. In our case - ISOLATED subnets. |
engine | The engine for the database. In our case - Postgres, version 13 |
instanceType | The class and size for the instance, in our case t3.micro |
credentials | The credentials for the admin user of the database. We've used the fromGeneratedSecret method and passed it a username of postgres, the password will be auto-generated and stored in secrets manager. |
multiAz | Whether the rds instance is a multi-AZ deployment, in our case we've set it to false, which is also the default value. For production workloads, you would most likely use a standby instance for high availability. |
allocatedStorage | The allocated storage size of the database, in gigabytes. We set the value to 100 gigabytes, which is also the default |
maxAllocatedStorage | The upper limit for storage auto scaling. In our case, we've set it to 105 gigabytes. By default, there is no storage auto-scaling |
backupRetention | For how many days automatic database snapshots should be kept. We've turned automated snapshots off, by setting the value to 0 days. The default value is 1 day. |
deleteAutmtdBackups | Specify whether automated backups should be deleted or retained when the rds instance is deleted. By default, automated backups are retained on instance deletion. |
removalPolicy | The policy that should be applied if the resource is deleted from the stack or replaced during an update. By default the instance is deleted, but a snapshot of the data is retained. |
deletionProtection | Specify whether the DB instance should have termination protection enabled. By default it's set to true if removalPolicy is RETAIN, otherwise - false |
databaseName | Specify the name of the database |
publiclyAccessible | Specify whether the rds instance should be publicly accessible. Set to true by default for instances launched in PUBLIC subnet groups, false otherwise. |
Next, we allowed connections to our RDS instance, on port
5432, from the security group of the EC2 instanceWe created 2 outputs:
- the database hostname that we'll use to connect to our RDS instance
- the name of the secret that stores the password of the
postgresuser
# Deploying our RDS Instance in AWS CDK
Let's deploy the stack and test our RDS instance:
npx aws-cdk deploy --outputs-file ./cdk-outputs.json
We redirected the Outputs to a file named cdk-outputs.json located in the
root directory.
After about 5 minutes, the resources are created.
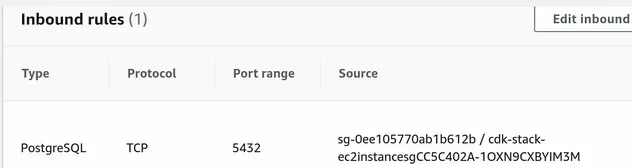
If we look at the security group of the RDS instance, we can see that it
allows connections on port 5432 from the security group of our EC2 instance.
This will allow us to connect to the database once we SSH into the EC2 instance:
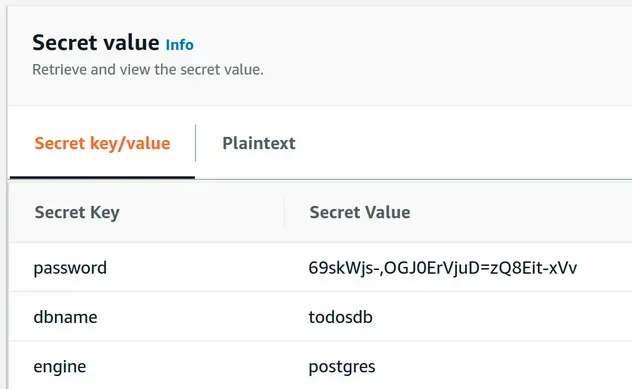
Before we SSH into the EC2 instance, let's grab the value of the secret, storing the password for our DB user.
The easiest way is to open Secrets Manager in the AWS management console and
click on Retrieve Secret Value.
Alternatively, replace YOUR_SECRET_NAME with the value of the secretName
output from cdk-outputs.json, run the following command, and copy the
password.
aws secretsmanager get-secret-value \ --secret-id YOUR_SECRET_NAME --output yaml
# Connecting to an RDS instance from EC2
Let's SSH into our EC2 instance and connect to the RDS instance.
Navigate to the directory where you stored the ec2-key-pair key and ssh into
the instance:
ssh -i "ec2-key-pair.pem" \ ec2-user@YOUR_EC2_PUBLIC_IPV4_ADDRESS
Once we're in, we first need to install postgres:
sudo amazon-linux-extras install epel -y sudo amazon-linux-extras install postgresql10 -y sudo yum install postgresql postgresql-server -y
Now we can connect to the RDS instance. Replace YOUR_DB_ENDPOINT with the
value of dbEndpoint from the cdk-outputs.json file, alternatively grab the
Endpoint value from the RDS management console.
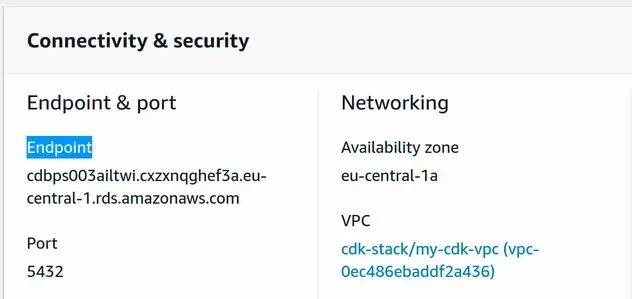
psql -p 5432 -h YOUR_DB_ENDPOINT -U postgres
You will be prompted for the password of the postgres user. Paste the value
you grabbed from Secrets Manager and you should be connected to the RDS
instance.
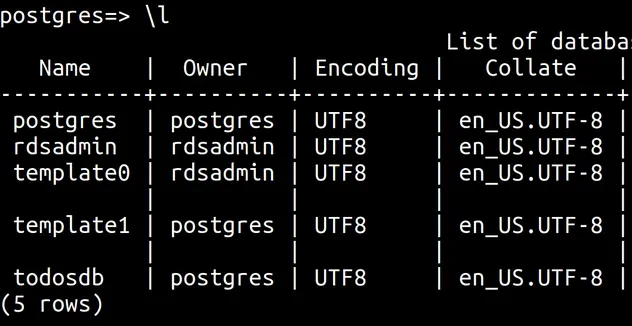
Let's list the databases:
\l
We can see that rds has created our database with the name todosdb.
Let's connect to it.
# 👇 print current database SELECT current_database(); # 👇 connect to todosdb \c todosdb
Let's create a table and insert a few rows in it.
CREATE TABLE IF NOT EXISTS todos (todoid SERIAL PRIMARY KEY, text TEXT NOT NULL); INSERT INTO todos (text) VALUES ('Walk the dog'); INSERT INTO todos (text) VALUES ('Buy groceries');
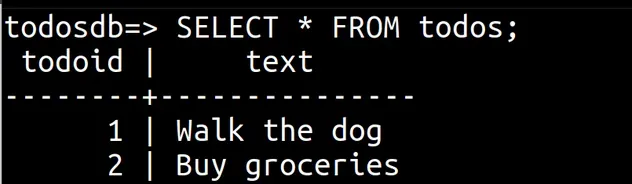
Finally, let's print the records from the todos table of our RDS instance.
SELECT * FROM todos;
We were able to successfully connect and interact with our RDS instance from an EC2 instance.
# Clean up
To delete the resources we have provisioned, issue the destroy command.
npx aws-cdk destroy
# Additional Resources
You can learn more about the related topics by checking out the following tutorials:
- EC2 Instance Example in AWS CDK - Complete Guide
- VPC Example in AWS CDK - Complete Guide
- Security Group Example in AWS CDK - Complete Guide
- Subnet Selection Example in AWS CDK
- Create Lambda Functions in a VPC in AWS CDK
- AWS CDK Tutorial for Beginners - Step-by-Step Guide
- How to use Context in AWS CDK
- How to use Parameters in AWS CDK
- KMS Key Example in AWS CDK - Complete Guide
- Grant AWS Lambda Access to Secrets Manager
- AWS SSH Permission denied (PublicKey) Error [Solved]
- How to set a Deletion Policy on a Resource in AWS CDK
- How to enable Termination Protection on a CDK stack

