Subnet Selection Example in AWS CDK
Last updated: Jan 26, 2024
Reading time·5 min
# Table of Contents
- Selecting a Subnet by Type in AWS CDK
- Selecting a Subnet by Group Name in AWS CDK
- Selecting a Subnet by Availability Zones in AWS CDK
- Tagging Subnets in AWS CDK
# Selecting a Subnet by Type in AWS CDK
To specify what subnet we want to provision our resources in, we have to use one of the following 3 props that achieve the same goal:
subnetSelectionsubnetsvpcSubnets
If we don't explicitly select a subnet to launch our instances in, the default behavior is for them to be launched in private subnets.
Let's look at a complete example where we create:
- a VPC
- a security group
- an EC2 instance, for which we explicitly select a subnet
import * as ec2 from 'aws-cdk-lib/aws-ec2'; import * as cdk from 'aws-cdk-lib'; export class CdkStarterStack extends cdk.Stack { constructor(scope: cdk.App, id: string, props?: cdk.StackProps) { super(scope, id, props); const vpc = new ec2.Vpc(this, 'my-cdk-vpc', { ipAddresses: ec2.IpAddresses.cidr('10.0.0.0/16'), natGateways: 0, maxAzs: 3, subnetConfiguration: [ { name: 'public-subnet-1', subnetType: ec2.SubnetType.PUBLIC, cidrMask: 24, }, { name: 'isolated-subnet-1', subnetType: ec2.SubnetType.PRIVATE_ISOLATED, cidrMask: 28, }, ], }); const securityGroup = new ec2.SecurityGroup(this, 'security-group-id', { vpc, }); const webServer = new ec2.Instance(this, 'web-server', { instanceType: ec2.InstanceType.of( ec2.InstanceClass.BURSTABLE2, ec2.InstanceSize.MICRO, ), machineImage: ec2.MachineImage.latestAmazonLinux2(), vpc, securityGroup, // 👇 set the subnet type to PUBLIC vpcSubnets: {subnetType: ec2.SubnetType.PUBLIC}, }); } }
Let's go over what we did in the code sample.
We created a VPC that has a
PUBLICand aPRIVATE_ISOLATEDsubnet groups. ThissubnetConfigurationwill create a total of 6 subnets because we've set themaxAzsprop to3. Each subnet group creates a subnet in every availability zone.We created a Security Group, which we will associate with our EC2 instance
We created an EC2 instance, for which we explicitly selected a subnet type by passing the
vpcSubnetsprop. The EC2 instance will be launched in one of the 3PUBLICsubnets we created (becausemaxAzsof the VPC is 3).The
subnetTypeprop selects all subnets of the given type, in our case allPUBLICsubnets.
I'll deploy the stack by running:
npx aws-cdk deploy
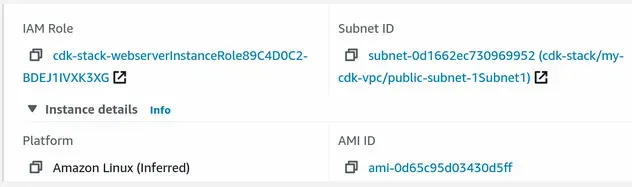
If we take a look at the provisioned EC2 instance in the EC2 management console,
we can see that it was provisioned in one of the PUBLIC subnets:
# Selecting a Subnet by Group Name in AWS CDK
If we had more than 1 subnet group of type PUBLIC, we would have to narrow
them down using the subnetGroupName property.
const webServer = new ec2.Instance(this, 'web-server', { instanceType: ec2.InstanceType.of( ec2.InstanceClass.BURSTABLE2, ec2.InstanceSize.MICRO, ), machineImage: ec2.MachineImage.latestAmazonLinux2(), vpc, securityGroup, // 👇 launch in subnet with a specific Group Name vpcSubnets: {subnetGroupName: 'public-subnet-1'}, })
By using the subnetGroupName property, we are able to select a specific subnet
group by name, in case we have provisioned a VPC with multiple subnet groups of
the same type.
# Selecting a Subnet by Availability Zones in AWS CDK
We are also able to select a subnet in a specific availability zone.
Subnet groups create the specific subnet type in multiple availability zones, so we also have the option to select a specific subnet in a specific availability zone:
const webServer = new ec2.Instance(this, 'web-server', { instanceType: ec2.InstanceType.of( ec2.InstanceClass.BURSTABLE2, ec2.InstanceSize.MICRO, ), machineImage: ec2.MachineImage.latestAmazonLinux2(), vpc, securityGroup, // 👇 explicitly pick availability zones of the subnet vpcSubnets: { subnetType: ec2.SubnetType.PUBLIC, availabilityZones: [cdk.Stack.of(this).availabilityZones[0]], }, });
We selected a PUBLIC subnet in one particular availability zone for our EC2
instance to be launched in.
Selecting the specific availability zone of the subnet only works for stacks that aren't environment-agnostic (account and region are explicitly set).
# Clean up
To delete the provisioned resources, issue the destroy command:
npx aws-cdk destroy
I've also written an article on how to provision and configure an EC2 instance.
# Tagging Subnets in AWS CDK
We'll look at an example of how we can add tags to subnets in AWS CDK.
Especially useful is the Name tag, which helps us distinguish between
resources in the VPC management console.
Let's look at an example where we:
- create a VPC with 2 subnet groups -
PUBLICandPRIVATE_ISOLATED - define a reusable function for tagging subnets
- tag the subnets
import * as ec2 from 'aws-cdk-lib/aws-ec2'; import * as cdk from 'aws-cdk-lib'; export class CdkStarterStack extends cdk.Stack { constructor(scope: cdk.App, id: string, props?: cdk.StackProps) { super(scope, id, props); // 👇 create VPC const vpc = new ec2.Vpc(this, 'my-cdk-vpc', { ipAddresses: ec2.IpAddresses.cidr('10.0.0.0/16'), natGateways: 0, maxAzs: 3, subnetConfiguration: [ { name: 'public-subnet-1', subnetType: ec2.SubnetType.PUBLIC, cidrMask: 24, }, { name: 'isolated-subnet-1', subnetType: ec2.SubnetType.PRIVATE_ISOLATED, cidrMask: 28, }, ], }); // 👇 define function that tags subnets const tagAllSubnets = ( subnets: ec2.ISubnet[], tagName: string, tagValue: string, ) => { for (const subnet of subnets) { cdk.Tags.of(subnet).add( tagName, `${tagValue}-${subnet.availabilityZone}`, ); } }; // 👇 tag subnets const {stackName} = cdk.Stack.of(this); tagAllSubnets(vpc.publicSubnets, 'Name', `${stackName}/public`); tagAllSubnets(vpc.isolatedSubnets, 'Name', `${stackName}/isolated`); tagAllSubnets(vpc.publicSubnets, 'env', 'staging'); tagAllSubnets(vpc.isolatedSubnets, 'env', 'dev'); } }
Let's go over the code snippet.
- We created a VPC that has 2 subnet groups - 1
PUBLICand 1PRIVATE_ISOLATED. Because we set themaxAzsprop to 3, this configuration will create a total of 6 subnets. Each subnet group creates a subnet in every availability zone. - We defined a
tagAllSubnetsfunction that takes 3 parameters:
subnets- an array of subnets to tagtagName- the name of the tag to apply on the subnets in the arraytagValue- the value of the tagYou would have to customize this function to the tagging conventions your organization follows.
- We used the
tagAllSubnetsfunction to addNameandenvtags to our subnets. TheNameof a subnet is now going to look likecdk-stack/public-us-east-1a.
Let's provision the resources:
npx aws-cdk deploy
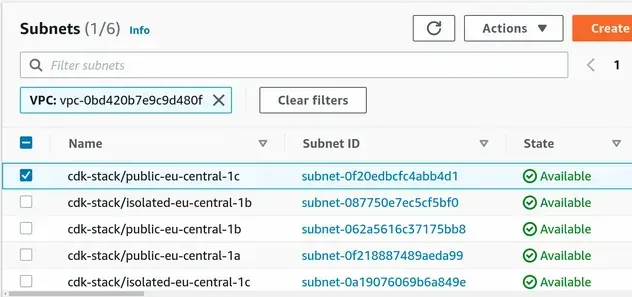
After a successful deployment, we can see that the Name tags have been applied
to the subnets.
Each subnet is associated with a route table, so the subnet tags also got applied to the route tables:
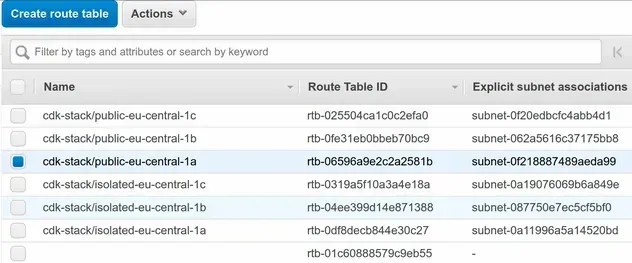
The only route table that didn't get tagged is the main one, which has no subnet associations.
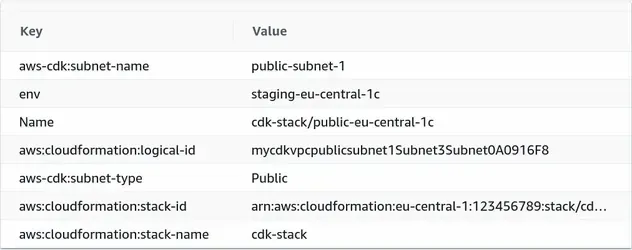
The complete tag section of a subnet shows both of the tags we have added -
Name and env:
# Clean up
To delete the resources we have provisioned, run the destroy command:
npx aws-cdk destroy
If you'd like to read more on using tags in AWS CDK, check out the following article.
# Additional Resources
You can learn more about the related topics by checking out the following tutorials:

