How to use Lambda Layers in AWS CDK - Complete Guide
Last updated: Jan 27, 2024
Reading time·5 min
# Using Lambda Layers in AWS CDK
To provision Lambda Layers in AWS CDK, we have to use the LayerVersion construct.
We are going to provision a Lambda function that has 2 layers:
- a layer in which we use a 3rd party library.
- a layer with some helper functions that we have written ourselves.
# Project setup
Clone the github repository.
Install the dependencies:
cd aws-cdk-lambda-layers npm install && npm install --prefix src/layers/yup-utils/nodejs
- Provision the CDK stack.
npx aws-cdk deploy
# Provisioning Lambda Layers with CDK
The lambda function, we have provisioned uses two layers:
- the yup library.
- our own
calclayer, which exports a simple helper function.
This is the code that provisions the 2 Lambda layers:
import * as lambda from 'aws-cdk-lib/aws-lambda'; import {NodejsFunction} from 'aws-cdk-lib/aws-lambda-nodejs'; import * as cdk from 'aws-cdk-lib'; import * as path from 'path'; export class CdkStarterStack extends cdk.Stack { constructor(scope: cdk.App, id: string, props?: cdk.StackProps) { super(scope, id, props); // 👇 layer we've written const calcLayer = new lambda.LayerVersion(this, 'calc-layer', { compatibleRuntimes: [ lambda.Runtime.NODEJS_16_X, lambda.Runtime.NODEJS_18_X, lambda.Runtime.NODEJS_20_X, ], code: lambda.Code.fromAsset('src/layers/calc'), description: 'multiplies a number by 2', }); // 👇 3rd party library layer const yupLayer = new lambda.LayerVersion(this, 'yup-layer', { compatibleRuntimes: [ lambda.Runtime.NODEJS_16_X, lambda.Runtime.NODEJS_18_X, lambda.Runtime.NODEJS_20_X, ], code: lambda.Code.fromAsset('src/layers/yup-utils'), description: 'Uses a 3rd party library called yup', }); } }
Let's go over the code snippet:
- We've defined 2 layers using the LayerVersion construct.
- The layers take 3 parameters:
compatibleRuntimes- the runtimes the layer supports. The Lambda function'sruntimemust be one of the Layer'scompatibleRuntimes, otherwise an error is thrown.code- the content of the layer. We've called theCode.fromAssetmethod with a path that leads to the layer directory, which has anodejsdirectory. Thenodejspart is different for every Lambda runtime.description- a short description of the layer
The code that provisions the Lambda function which uses layers is as follows.
new NodejsFunction(this, 'my-function', { memorySize: 1024, timeout: cdk.Duration.seconds(5), runtime: lambda.Runtime.NODEJS_18_X, handler: 'main', entry: path.join(__dirname, `/../src/my-lambda/index.ts`), bundling: { minify: false, // 👇 don't bundle `yup` layer // layers are already available in the lambda env externalModules: ['aws-sdk', 'yup'], }, layers: [calcLayer, yupLayer], });
Let's go over the snippet:
- We use the NodejsFunction construct to provision a Lambda function. This construct allows us to transpile and bundle our lambda code automatically, regardless if we use JavaScript or TypeScript.
- The lambda's
runtimeis one of the layer'scompatibleRuntimes. - We've added the
bundling.externalModulesprop - it allows us to specify packages that shouldn't be bundled with the lambda code. Since layers and theaws-sdkare already available in the lambda environment, we don't want to bundle them. In this case, we've excluded theyupandaws-sdklibraries from being bundled with our lambda code.
# File structure of Lambda Layers in CDK Projects
The folder structure of our local src directory looks as follows.
src/ my-lambda/ index.ts layers/ calc/ nodejs/ calc.ts yup-utils nodejs/ node_modules/ package-lock.json package.json yup-utils.ts
However, when the layers get ported inside the lambda function, they are
placed in the /opt directory. The folder structure inside the lambda will
look like so.
/opt nodejs/ calc.js yup-utils.js
So, the way we would import a helper method from the calc layer looks as
follows.
import {double} from '/opt/nodejs/calc';
# Code for the Lambda Layers and the Lambda Function
Let's take a quick look at the code for our layer functions, starting with the calc layer:
export function double(a: number): number { return a * 2; }
And the code for the yup layer:
export * from 'yup';
Notice that we can just write typescript without having to worry about managing
any Webpack configuration because esbuild handles all the heavy lifting.
Let's look at the code of our Lambda function at src/my-lambda/index.ts.
import {APIGatewayProxyEventV2, APIGatewayProxyResultV2} from 'aws-lambda'; /* eslint-disable import/extensions, import/no-absolute-path */ import {double} from '/opt/nodejs/calc'; /* eslint-disable import/extensions, import/no-absolute-path */ import {number, object, string} from '/opt/nodejs/yup-utils'; // 👇 using yup layer const schema = object().shape({ name: string().required(), age: number().required(), }); export async function main( event: APIGatewayProxyEventV2, ): Promise<APIGatewayProxyResultV2> { console.log(event); await schema.isValid({name: 'Tom', age: 24}); return { // 👇 using calc layer body: JSON.stringify({num: double(15)}), statusCode: 200, }; }
We've made use of both of our layers in the lambda code.
Notice how we import the layers using an absolute path.
/* eslint-disable import/extensions, import/no-absolute-path */ import {double} from '/opt/nodejs/calc'; /* eslint-disable import/extensions, import/no-absolute-path */ import {Asserts, number, object, string} from '/opt/nodejs/yup-utils';
Since the layers are not located under /opt/nodejs on our local path, we end
up getting a lot of linting and typescript warnings.
It's important to mention that in order to please TypeScript, we have to
specify the local paths to the layers in our tsconfig.json file:
{ "baseUrl": "./", "paths": { "/opt/nodejs/yup-utils": ["src/layers/yup-utils/nodejs/yup-utils"], "/opt/nodejs/calc": ["src/layers/calc/nodejs/calc"] } }
# Testing the Lambda Function and Layers
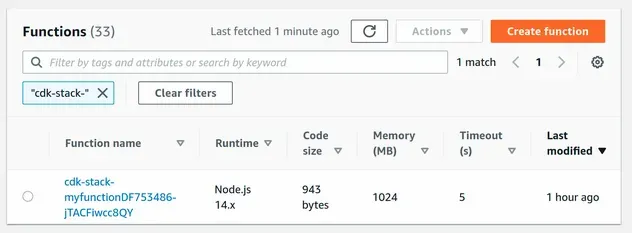
Let's test the lambda function and layers with the Lambda console.
After running a test with an empty event object I got the following response:

The test shows that the lambda function successfully invoked our calc layer to
double the integer 15 and it also validated an object using the 3rd party
yup library.
The bundle size of the lambda function is only 943 bytes because we've
specified the 3rd party library yup in the externalModules array when
defining our NodejsFunction.
# Cleanup
To delete the stack, you can run the following command:
npx aws-cdk destroy
# Discussion
Being able to write all our lambda, layer and infrastructure code using TypeScript is quite nice.
esbuild to transpile and bundle our code, minify our lambda code, and exclude the layer code by specifying the layer package as an external module.The layers are already available in the Lambda runtime so we don't have to bundle them alongside the lambda code.
The way we have to import the lambda layers by specifying an absolute path is unfortunate.
It leads to many Eslint warnings because the layers are not under the same path on the local file system.
We also have to explicitly install the third-party libraries that our layers use before a deployment.
# Additional Resources
You can learn more about the related topics by checking out the following tutorials:
- How to add permissions to Lambda Functions in AWS CDK
- Lambda Function Example in AWS CDK - Complete Guide
- Write TypeScript Lambda functions in AWS CDK - Complete Guide
- Configure Lambda Log Retention in AWS CDK
- Create Lambda Functions in a VPC in AWS CDK
- AWS CDK Tutorial for Beginners - Step-by-Step Guide
- AWS CDK Tutorial for Beginners - Step-by-Step Guide
- How to use Parameters in AWS CDK
- Cannot find module (AWS Lambda Error) [Solved]
- How to handle Errors in AWS Lambda using Typescript
- Making Http Requests in a Node.js Lambda Function
- AWS Lambda Task timed out error [Solved]
- How to use npm modules in AWS Lambda
- Ping an EC2 instance from your Local Machine
- botocore.exceptions.NoRegionError: You must specify a region

