Create an Element with Classes or ID in JavaScript
Last updated: Mar 5, 2024
Reading time·5 min

# Table of Contents
# Create an Element with Classes using JavaScript
To create an element with classes:
- Use the
document.createElement()method to create the element. - Use the
classList.add()method to add one or more classes to the element. - Add the element to the page using the
appendChild()method.
Here is the HTML for the example.
<!DOCTYPE html> <html lang="en"> <head> <title>bobbyhadz.com</title> <meta charset="UTF-8" /> <style> .bg-yellow { background-color: yellow; } .text-lg { font-size: 2rem; } </style> </head> <body> <div id="box"></div> <script src="index.js"></script> </body> </html>
And here is the related JavaScript code.
// ✅ Create element const el = document.createElement('div'); // ✅ Add classes to element el.classList.add('bg-yellow', 'text-lg'); // ✅ Set ID attribute on the element el.setAttribute('id', 'my-id'); // ✅ Add text content to the element el.textContent = 'Hello world'; // ✅ Or set the innerHTML of the element // el.innerHTML = `<span>One, two, three</span>`; // ✅ add element to DOM const box = document.getElementById('box'); box.appendChild(el);
We used the document.createElement() method to create the element.
const el = document.createElement('div');
createElement method is the type of element to be created (div in the example).The createElement() method returns the newly created element.
We used the classList.add() method to add two classes to the element.
const el = document.createElement('div'); el.classList.add('bg-yellow', 'text-lg');
If a class is already present on the element, the add() method omits the
class.
You can use the textContent property to set the element's text content.
const el = document.createElement('div'); el.classList.add('bg-yellow', 'text-lg'); el.textContent = 'Hello world';
The innerHTML property can be used to set the element's inner HTML markup.
const el = document.createElement('div'); el.classList.add('bg-yellow', 'text-lg'); el.innerHTML = `<span>One, two, three</span>`;
innerHTML property with user-provided data without escaping it. This would leave your application open to cross-site scripting attacks.Lastly, use the appendChild method to add the element to the page.
const el = document.createElement('div'); el.classList.add('bg-yellow', 'text-lg'); el.textContent = 'Hello world'; const box = document.getElementById('box'); box.appendChild(el);
The method adds a node to the end of the list of children of the element it was called on.
If I load the page from the example, I can see that the classes have been applied successfully.

# Create an Element with Classes using the className property
You can also use the className property to set the element's classes after you
create it.
// ✅ Create element const el = document.createElement('div'); // ✅ Add classes to element el.className = 'bg-yellow text-lg'; // ✅ Add text content to element el.textContent = 'Hello world'; // ✅ Or set the innerHTML of the element // el.innerHTML = `<span>One, two, three</span>`; // ✅ add element to DOM const box = document.getElementById('box'); box.appendChild(el);
The el.className = 'bg-yellow text-lg'; line directly sets the bg-yellow and
text-lg classes on the element by updating its className property.
This approach is not as clean as the classList.add() method because you could
potentially add the same class to the element multiple times.
When you set the className property on the element, all existing classes are
removed and replaced by the supplied classes.
Appending classes is also tricky because you have to be aware of leaving an empty space between the class names.
const el = document.createElement('div'); el.className = 'bg-yellow text-lg'; el.className += ' italic';
You might also see the setAttribute method used in a similar way.
const el = document.createElement('div'); // ✅ Add classes to element el.setAttribute('class', 'bg-yellow text-lg'); // ✅ Add text content to element el.textContent = 'Bobby Hadz tutorial'; // ✅ Or set the innerHTML of the element // el.innerHTML = `<span>One, two, three</span>`; // ✅ add element to DOM const box = document.getElementById('box'); box.appendChild(el);
The Element.setAttribute method sets the value of an attribute on the specified element.
If the attribute already exists, its value is updated, otherwise, a new attribute with the specified value is added.
# Create an Element with Classes using insertAdjacentHTML
You can also use the insertAdjacentHTML() method to create an element with
classes.
<!DOCTYPE html> <html lang="en"> <head> <title>bobbyhadz.com</title> <meta charset="UTF-8" /> <style> .bg-yellow { background-color: yellow; } .text-lg { font-size: 2rem; } </style> </head> <body> <div id="box"></div> <script src="index.js"></script> </body> </html>
And here is the related JavaScript code.
const el = ` <div class="bg-yellow text-lg"> bobby hadz tutorial </div> `; // ✅ add element to DOM const box = document.getElementById('box'); box.insertAdjacentHTML('beforeend', el);
Notice that we used backticks when declaring the el variable and not single
quotes.
We placed the div tag right before the closing div that has an id of
box.
The insertAdjacentHTML() method takes the following 2 parameters:
position- the position relative to the element where the HTML should be inserted. Can be one of the following:beforebegin- before the element itself.afterbegin- just inside the element, before its first child.beforeend- just inside the element, after its last child.afterend- after the element itself.
text- the string to be parsed as HTML and inserted into the DOM.
Note that this approach should not be used to append HTML from user-generated input without escaping it.
# Create an element with an ID attribute in JavaScript
To create an element with an id attribute:
- Use the
document.createElement()method to create the element. - Use the
setAttribute()method to set theidattribute on the element. - Add the element to the page using the
appendChild()method.
Here is the HTML for the example.
<!DOCTYPE html> <html lang="en"> <head> <title>bobbyhadz.com</title> <meta charset="UTF-8" /> </head> <style> #my-id { background-color: tomato; color: aliceblue; width: 150px; height: 150px; } </style> <body> <div id="box"></div> <script src="index.js"></script> </body> </html>
And here is the related JavaScript code.
// ✅ Create element const el = document.createElement('div'); // ✅ Set ID attribute on the element el.setAttribute('id', 'my-id'); // ✅ Add text content to the element el.textContent = 'Hello world'; // ✅ Or set the innerHTML of the element // el.innerHTML = `<span>Hello world</span>`; // ✅ add element to DOM const box = document.getElementById('box'); box.appendChild(el);
We used the document.createElement method to create the element.
div in the example).The createElement method returns the newly created element.
We used the setAttribute() method to set
the id attribute on the element.
The setAttribute method takes 2 parameters:
name- the name of the attribute whose value is to be set.value- the value to assign to the attribute.
In the example, we set the value of the element's id attribute to my-id.
You can use the textContent property to set the element's text content or the innerHTML property to set the element's inner HTML markup.
innerHTML property with user-provided data without escaping it. This would leave your application open to cross-site scripting attacks.You can use the appendChild() method to add the element to the page.
The method adds a node to the end of the list of children of the element it was called on.
If I load the page from the example, I can see that the id attribute has been
set on the newly created element.
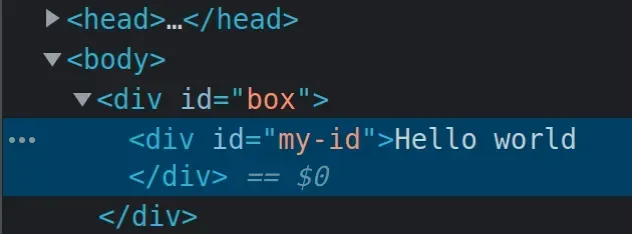
And the page shows that the styles from the style tag that are scoped to the
specified id have been applied.

# Additional Resources
You can learn more about the related topics by checking out the following tutorials:

