How to Create a Video element using JavaScript
Last updated: Mar 5, 2024
Reading time·3 min
# Create a Video element using JavaScript
To create a video element:
- Use the
document.createElement()method to create thevideoelement. - Set the
srcattribute on the element to a local or remote video file. - Add the element to the page using the
appendChild()method.
Here is the HTML for the examples.
<!DOCTYPE html> <html lang="en"> <head> <meta charset="UTF-8" /> </head> <body> <div id="box"></div> <script src="index.js"></script> </body> </html>
And here is the related JavaScript code.
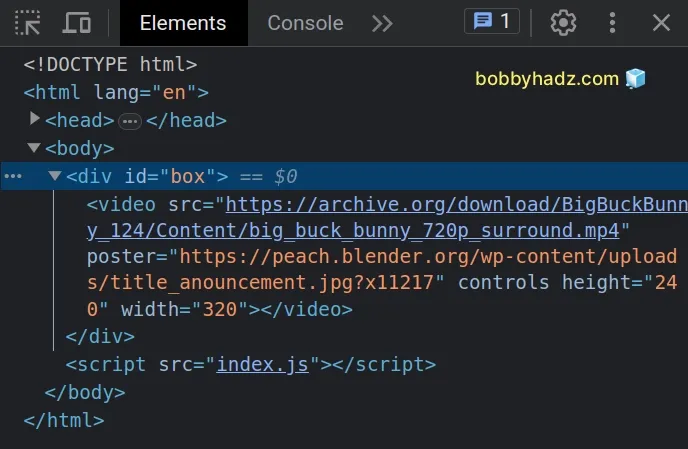
const video = document.createElement('video'); // 👇️ Local file // video.src = 'video.mp4'; // 👇️ Remote file video.src = 'https://archive.org/download/BigBuckBunny_124/Content/big_buck_bunny_720p_surround.mp4'; video.poster = 'https://peach.blender.org/wp-content/uploads/title_anouncement.jpg?x11217'; video.autoplay = false; video.controls = true; video.muted = false; video.height = 240; // 👈️ in px video.width = 320; // 👈️ in px const box = document.getElementById('box'); box.appendChild(video);
We used the document.createElement() method to create the video element.
video in the example).The createElement method returns the newly created element.
We set the element's src attribute to a remotely hosted video file.
src attribute to the path pointing to the video.Not all browsers support the same video formats, so you can check if the user's
browser supports the format before setting the element's src attribute.
const video = document.createElement('video'); video.poster = 'https://peach.blender.org/wp-content/uploads/title_anouncement.jpg?x11217'; video.autoplay = false; video.controls = true; video.muted = false; video.height = 240; // 👈️ in px video.width = 320; // 👈️ in px if (video.canPlayType('video/mp4')) { console.log('set src to mp4 video'); video.src = 'my-video.mp4' } else if (video.canPlayType('video/ogg')) { console.log('set src to ogg video'); video.src = 'my-video.ogg' } else { console.log('provide link to user'); } const box = document.getElementById('box'); box.appendChild(video);
The video element supports many
attributes.
These are the attributes we used:
poster- a URL for an image to be shown while the video is downloading.autoplay- whether the video should automatically start playing as soon as it can do so without stopping to finish loading the datacontrols- allows the user to control video playback, e.g. volume, pause and resume the video.muted- indicates if thevideoshould be muted by default.heightandwidth- can be set to numbers and represent the height and width of the video's display area in pixels
There are many more attributes you might need to set depending on your use case, for a complete list, check out the MDN video docs.
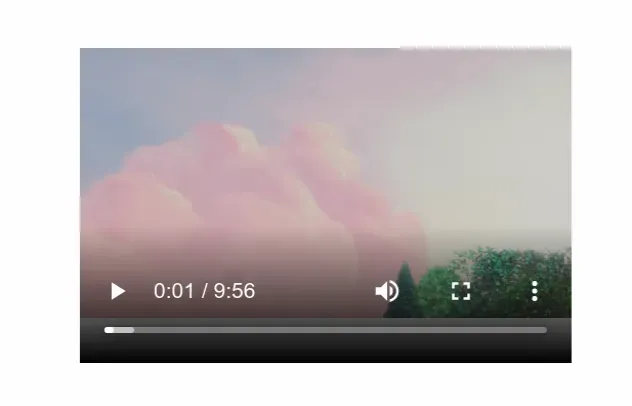
If I load the page from the example above, I can see that the video element was created successfully.
The last step is to use the Node.appendChild() method to add the video element to the end of the list of the div's children.
Notice that we used the HTMLMediaElement.canPlayType() method in the example.
const video = document.createElement('video'); video.poster = 'https://peach.blender.org/wp-content/uploads/title_anouncement.jpg?x11217'; video.autoplay = false; video.controls = true; video.muted = false; video.height = 240; // 👈️ in px video.width = 320; // 👈️ in px if (video.canPlayType('video/mp4')) { console.log('set src to mp4 video'); video.src = 'my-video.mp4' } else if (video.canPlayType('video/ogg')) { console.log('set src to ogg video'); video.src = 'my-video.ogg' } else { console.log('provide link to user'); } const box = document.getElementById('box'); box.appendChild(video);
The method returns a string that indicates how likely it is that the media can be played.
The canPlayType() method returns a string that has 3 possible values:
- "" (empty string) - the media cannot be played on the current device
- "probably" - the media is probably playable on the current device
- "maybe" - there is not enough information to determine whether the media can play on the current device
# Additional Resources
You can learn more about the related topics by checking out the following tutorials:

