How to Link User Accounts in AWS Cognito - Complete Guide
Last updated: Jan 27, 2024
Reading time·15 min
# Table of Contents
- Linking OAuth to Email Accounts in AWS Cognito
- Automatically Adding Cognito Users to a Group on Sign up
- Verify a Cognito User's Email
- Verify a Facebook OAuth Email in AWS Cognito
- Verifying a Google OAuth Email in AWS Cognito
- Customizing Emails in AWS Cognito
# Linking OAuth to Email Accounts in AWS Cognito
Cognito doesn't link the Federated (Facebook and Google) and the native Cognito (Email account) identities by default, even though they have the same email.
Let's say you have an e-commerce site and you provide multiple ways to register - users can register with both Facebook and email.
If the user initially registers with their email, adds some products to their cart, then visits the site on their phone and logs in via Facebook, the cart will be empty. That is because the default behavior is to create two separate accounts, even though they have the same email.
In order to link the Google / Facebook OAuth accounts to the Cognito Email account, we have to add a pre-sign-up lambda trigger, which runs before a user's registration event and links the accounts that have the same email.
The lambda function will be set as a pre sign up trigger and it needs
permissions for the following cognito-idp actions:
cognito-idp:AdminAddUserToGroupcognito-idp:AdminUpdateUserAttributescognito-idp:ListUserscognito-idp:AdminLinkProviderForUsercognito-idp:AdminCreateUsercognito-idp:AdminSetUserPassword
It's quite a long list of permissions, however, we have to handle multiple flows in our pre-sign-up trigger.
# Implementation of the Pre-Sign-up Trigger
First, we'll take a look at the event object the function is invoked with, for
Cognito Native users, who registered with an email.
{ version: "1", region: "eu-central-1", userPoolId: "eu-central-1_7HPNLvT", userName: "c8302f6d-4469-b31e-36ee6239e267", callerContext: { awsSdkVersion: "aws-sdk-unknown-unknown", clientId: "741igvddli8mdl2v0bpsqc" }, triggerSource: "PreSignUp_SignUp", request: { userAttributes: { given_name: "Test", family_name: "User", email: "test@gmail.com" }, validationData: null }, response: { autoConfirmUser: false, autoVerifyEmail: false, autoVerifyPhone: false } }
Note that the request.userAttributes vary between User Pool implementations,
these are the attributes you require the
user to provide when they register.
Let's now look at an event that comes from a user who registered with Google OAuth:
{ version: "1", region: "eu-central-1", userPoolId: "eu-central-1_7HLvRT", userName: "Google_1147527301736", callerContext: { awsSdkVersion: "aws-sdk-unknown-unknown", clientId: "741if0rmdidv0bpsqc" }, triggerSource: "PreSignUp_ExternalProvider", request: { userAttributes: { email_verified: "false", cognito:email_alias: "", cognito:phone_number_alias: "", given_name: "test", family_name: "user", email: "test@gmail.com" }, validationData: {} }, response: { autoConfirmUser: false, autoVerifyEmail: false, autoVerifyPhone: false } }
Note how the triggerSource property is PreSignUp_ExternalProvider for the
google user, whereas it is PreSignUp_SignUp for the native cognito user.
Now let's move on to the implementation of the function.
I'll post the entry point of the function that links the accounts and then we'll go over the code.
import {Callback, Context, PreSignUpTriggerEvent} from 'aws-lambda'; export async function main( event: PreSignUpTriggerEvent, _context: Context, callback: Callback, ): Promise<void> { try { const { triggerSource, userPoolId, userName, request: { // You won't have given_name and family_name attributes // if you haven't specified them as required when the user registers userAttributes: {email, given_name, family_name}, }, } = event; const EXTERNAL_AUTHENTICATION_PROVIDER = 'PreSignUp_ExternalProvider'; if (triggerSource === EXTERNAL_AUTHENTICATION_PROVIDER) { // --> User has registered with Google/Facebook external providers const usersFilteredByEmail = await listUsersByEmail({ userPoolId, email, }); // userName example: "Facebook_12324325436" or "Google_1237823478" const [providerNameValue, providerUserId] = userName.split('_'); // Uppercase the first letter because the event sometimes // has it as google_1234 or facebook_1234. In the call to `adminLinkProviderForUser` // the provider name has to be Google or Facebook (first letter capitalized) const providerName = providerNameValue.charAt(0).toUpperCase() + providerNameValue.slice(1); if (usersFilteredByEmail.Users && usersFilteredByEmail.Users.length > 0) { // user already has cognito account const cognitoUsername = usersFilteredByEmail.Users[0].Username || 'username-not-found'; // if they have access to the Google / Facebook account of email X, verify their email. // even if their cognito native account is not verified await adminLinkUserAccounts({ username: cognitoUsername, userPoolId, providerName, providerUserId, }); } else { /* --> user does not have a cognito native account -> 1. create a native cognito account 2. change the password, to change status from FORCE_CHANGE_PASSWORD to CONFIRMED 3. merge the social and the native accounts 4. add the user to a group - OPTIONAL */ const createdCognitoUser = await adminCreateUser({ userPoolId, email, // these are attributes that you require upon registration givenName: given_name, familyName: family_name, }); await adminSetUserPassword({userPoolId, email}); const cognitoNativeUsername = createdCognitoUser.User?.Username || 'username-not-found'; await adminLinkUserAccounts({ username: cognitoNativeUsername, userPoolId, providerName, providerUserId, }); // OPTIONALLY add the user to a group await adminAddUserToGroup({ userPoolId, username: cognitoNativeUsername, groupName: 'Users', }); event.response.autoVerifyEmail = true; event.response.autoConfirmUser = true; } } return callback(null, event); } catch (err) { return callback(err, event); } }
Let's go over the code because it's a quite long function and we have not added the helper functions yet.
We first check if the user who is signing up for an account is an External user (i.e. Facebook / Google), if that's not the case and it's a Cognito native user registering with email, we simply return.
If the user is an external user:
- We list all the users in the user pool with the same email.
- If we get any results, then there is already a Cognito native account in our User Pool that has the same email as the external user.
- In that case we want to link the accounts to one another.
If the user is an external user, but there aren't any other users in our User Pool with the same email:
- Create a native Cognito account.
- Change the password, to change the status from
FORCE_CHANGE_PASSWORDtoCONFIRMED. - Merge the social and the native accounts.
- Optionally add the user to a group.
Creating a native account if they don't have one is useful for a couple of reasons, the main one being - we are able to store user attributes that we can't access from their facebook/google account, i.e. shipping address, country, city, etc.
Let's now implement the helper functions, we have used. We'll start with the function that lists all users filtered by email.
import AWS from 'aws-sdk'; export const listUsersByEmail = async ({ userPoolId, email, }: { userPoolId: string; email: string; }): Promise<AWS.CognitoIdentityServiceProvider.ListUsersResponse> => { const params = { UserPoolId: userPoolId, Filter: `email = "${email}"`, }; const cognitoIdp = new AWS.CognitoIdentityServiceProvider(); return cognitoIdp.listUsers(params).promise(); };
Next we'll take care of the function that links the accounts to one another:
import AWS from 'aws-sdk'; export const adminLinkUserAccounts = async ({ username, userPoolId, providerName, providerUserId, }: { username: string; userPoolId: string; providerName: string; providerUserId: string; }): Promise<AWS.CognitoIdentityServiceProvider.AdminLinkProviderForUserResponse> => { const params = { DestinationUser: { ProviderAttributeValue: username, ProviderName: 'Cognito', }, SourceUser: { ProviderAttributeName: 'Cognito_Subject', ProviderAttributeValue: providerUserId, ProviderName: providerName, }, UserPoolId: userPoolId, }; const cognitoIdp = new AWS.CognitoIdentityServiceProvider(); return new Promise((resolve, reject) => { cognitoIdp.adminLinkProviderForUser(params, (err, data) => { if (err) { reject(err); return; } resolve(data); }); }); };
Next, we have the function that is used to create a native Cognito user, in case the registration is of an external user, who doesn't yet have a native email account.
import AWS from 'aws-sdk'; export const adminCreateUser = async ({ userPoolId, email, givenName, familyName, }: { userPoolId: string; email: string; givenName: string; familyName: string; }): Promise<AWS.CognitoIdentityServiceProvider.AdminCreateUserResponse> => { const params = { UserPoolId: userPoolId, // SUPRESS prevents sending an email with the temporary password // to the user on account creation MessageAction: 'SUPPRESS', Username: email, UserAttributes: [ { Name: 'given_name', Value: givenName, }, { Name: 'family_name', Value: familyName, }, { Name: 'email', Value: email, }, { Name: 'email_verified', Value: 'true', }, ], }; const cognitoIdp = new AWS.CognitoIdentityServiceProvider(); return cognitoIdp.adminCreateUser(params).promise(); };
Next is the adminSetUserPassword function, which we use to change the user
status from
FORCE_CHANGE_PASSWORD to
CONFIRMED.
import AWS from 'aws-sdk'; export const adminSetUserPassword = async ({ userPoolId, email, }: { userPoolId: string; email: string; }): Promise<AWS.CognitoIdentityServiceProvider.AdminSetUserPasswordResponse> => { const params = { Password: generatePassword(), UserPoolId: userPoolId, Username: email, Permanent: true, }; const cognitoIdp = new AWS.CognitoIdentityServiceProvider(); return cognitoIdp.adminSetUserPassword(params).promise(); }; function generatePassword() { return `${Math.random() // Generate random number, eg: 0.123456 .toString(36) // Convert to base-36 : "0.4fzyo82mvyr" .slice(-8)}42`; // Cut off last 8 characters : "yo82mvyr" and add a number because the cognito password policy requires a number }
And finally we have the optional step to add the user to a group:
import AWS from 'aws-sdk'; export function adminAddUserToGroup({ userPoolId, username, groupName, }: { userPoolId: string; username: string; groupName: string; }): Promise<{ $response: AWS.Response<Record<string, string>, AWS.AWSError>; }> { const params = { GroupName: groupName, UserPoolId: userPoolId, Username: username, }; const cognitoIdp = new AWS.CognitoIdentityServiceProvider(); return cognitoIdp.adminAddUserToGroup(params).promise(); }
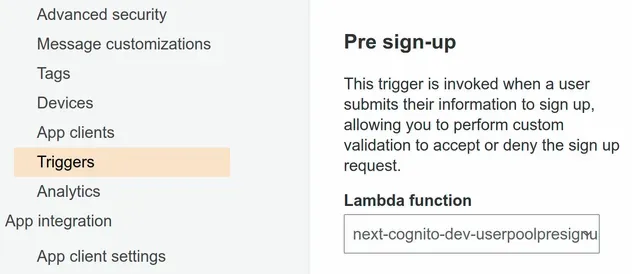
# Attaching the Pre Sign-up trigger in a Cognito User Pool
After you have defined the lambda function you have to attach it as a
pre sign-up trigger in your
Cognito User Pool.
You can do that by clicking on Triggers in the sidebar of the Cognito User
Pool console.
# Discussion
It's quite the flow to link user accounts and we have to consider multiple scenarios:
- if the user who's signing up is Federated or Cognito native
- if they have a native account or don't, etc.
It would definitely be nice if it were handled by the Cognito service, but that's the current way to solve the problem of having multiple unlinked users with the same email.
It's important to note that after you link the accounts they will still be
displayed as 2 separate accounts in the User Pool UI in the AWS Console,
however, their sub and all their properties will be the same and linked to one
another.
# Table of Contents
- Automatically Adding Cognito Users to a Group on Sign up
- Verify a Cognito User's Email
- Verify a Facebook OAuth Email in AWS Cognito
- Verifying a Google OAuth Email in AWS Cognito
- Customizing Emails in AWS Cognito
# Automatically Adding Cognito Users to a Group on Sign up
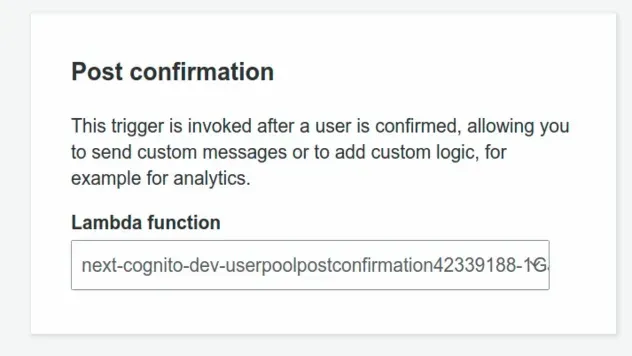
To add a Cognito user to a group when they sign up, we have to use the
Post Confirmation Lambda trigger.
This trigger is a Lambda function that gets invoked automatically after a user has confirmed their account.
# Implementing the Post Confirmation Trigger
The Post Confirmation Lambda trigger needs to have the IAM permission to run
the cognito-idp:AdminAddUserToGroup action on the User Pool.
Let's define the Lambda function that is going to add the Cognito users to a group after they register:
import {Callback, Context, PostConfirmationTriggerEvent} from 'aws-lambda'; import AWS from 'aws-sdk'; export async function main( event: PostConfirmationTriggerEvent, _context: Context, callback: Callback, ): Promise<void> { const {userPoolId, userName} = event; try { await adminAddUserToGroup({ userPoolId, username: userName, groupName: 'Users', }); return callback(null, event); } catch (error) { return callback(error, event); } } export function adminAddUserToGroup({ userPoolId, username, groupName, }: { userPoolId: string; username: string; groupName: string; }): Promise<{ $response: AWS.Response<Record<string, string>, AWS.AWSError>; }> { const params = { GroupName: groupName, UserPoolId: userPoolId, Username: username, }; const cognitoIdp = new AWS.CognitoIdentityServiceProvider(); return cognitoIdp.adminAddUserToGroup(params).promise(); }
Every user who successfully confirms their account gets added to the Users
group.
The lambda receives the user pool id and the username in the event object,
so all we have to specify is the name of the group we want to add the user to.
Post Confirmation trigger in the User Pool.# Discussion
In order to automatically add a Cognito user to a group we have to set a Post confirmation trigger in our User pool. The lambda function will automatically get invoked after a user confirms their account.
The function is passed the User Pool ID and the username in the event object, so all we have to add is the name of the Group we want to add the user to.
Note that the function has to have permission to run the
cognito-idp:AdminAddUserToGroup action.
I've also written a tutorial on how to use AWS Amplify Auth with React.js.
# Table of Contents
- Verify a Cognito User's Email
- Verify a Facebook OAuth Email in AWS Cognito
- Verifying a Google OAuth Email in AWS Cognito
- Customizing Emails in AWS Cognito
# Verify a Cognito User's Email
We need to verify a Cognito user's email because otherwise, they can't use the forget password and other functionality.
In order to verify a Cognito user's email, we have to set their
email_verified attribute to true. To set their email_verified attribute to
true we can use the admin-update-user-attributes command.
aws cognito-idp admin-update-user-attributes --user-pool-id YOUR_USER_POOL_ID --username john@gmail.com --user-attributes Name="email_verified",Value="true"
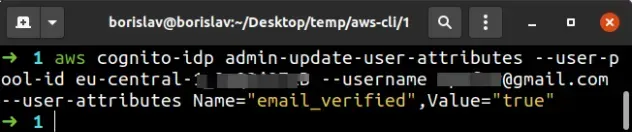
We're using the admin-update-user-attributes command to verify the user's email, however, it can be used to update any of the Cognito user's attributes.
To make sure the email of the user is verified, run the admin-get-user command.
aws cognito-idp admin-get-user --user-pool-id YOUR_USER_POOL_ID --username john@gmail.com --query "UserAttributes"
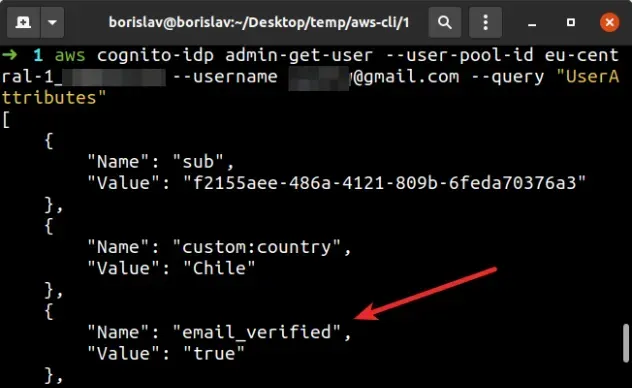
The admin-get-user command returns information about the Cognito user, however
we've filtered the output to only show the user's attributes, by setting the
--query parameter.
Once the user's email_verified attribute is set to true, they can use the
forget password functionality and get emails with confirmation codes.
# Table of Contents
- Verify a Facebook OAuth Email in AWS Cognito
- Verifying a Google OAuth Email in AWS Cognito
- Customizing Emails in AWS Cognito
# Verify a Facebook OAuth Email in AWS Cognito
When using Facebook OAuth by default the email_verified attribute is set to
false.
By setting the email_verified attribute to true we can use functionality like
Forgotten Password for Cognito native (email) accounts that are linked to the
Facebook OAuth account.
# Verifying Facebook OAuth Emails in Cognito
According to AWS Support, the best way to handle Facebook email verification is by using the Post Authentication Lambda trigger - support comment
AWS Cognito invokes the Post Authentication Lambda trigger after a user signs
in. In the function, we would have to update the email_verified attribute using
the AdminUpdateUserAttributes API.
It's important to note that, as the name Post Authentication suggests, this trigger is run every time the user logs in.
It would be more natural to handle something like this in the Post Confirmation Lambda Trigger, which runs only after a user has successfully been registered. However, that wouldn't work because you would get a race condition
Let's see how we can implement the Post Authentication Lambda trigger.
# Code for the Post Authentication Lambda Trigger
Let's define the email confirmation lambda function:
import AWS from 'aws-sdk'; import {Callback, Context, PostAuthenticationTriggerEvent} from 'aws-lambda'; import {adminUpdateUserAttributes} from './admin-update-user-attributes'; const adminUpdateUserAttributes = async ({ userPoolId, username, }: { userPoolId: string; username: string; }): Promise<AWS.CognitoIdentityServiceProvider.AdminUpdateUserAttributesResponse> => { const params = { UserPoolId: userPoolId, Username: username, UserAttributes: [{Name: 'email_verified', Value: 'true'}], }; const cognitoIdp = new AWS.CognitoIdentityServiceProvider(); return cognitoIdp.adminUpdateUserAttributes(params).promise(); }; export async function main( event: PostAuthenticationTriggerEvent, _context: Context, callback: Callback, ): Promise<void> { const {userPoolId, userName} = event; console.log('POST CONFIRMATION EVENT', JSON.stringify(event, null, 2)); if (event.request.userAttributes.email) { const identities = event.request?.userAttributes?.identities; const isExternalUser = /providername.*facebook/gi.test(identities) || /providername.*google/gi.test(identities); if (isExternalUser) { try { await adminUpdateUserAttributes({ userPoolId, username: userName, }); return callback(null, event); } catch (error) { console.log( 'POST AUTHENTICATION ERROR: ', JSON.stringify(error, null, 2), ); return callback(error, event); } } } return callback(null, event); }
We basically check if the user who's signing in is External (i.e. Facebook or Google - you can only check for the one you use).
If the user is external, we call adminUpdateUserAttributes, which sets the
email_verified property to true.
If the user is not an external one, we just return the callback, without doing anything.
cognito-idp:AdminUpdateUserAttributes action to call the necessary API.This policy grants the necessary permissions:
{ "Version": "2012-10-17", "Statement": [ { "Action": "cognito-idp:AdminUpdateUserAttributes", "Resource": "YOUR_USER_POOL_ARN", "Effect": "Allow" } ] }
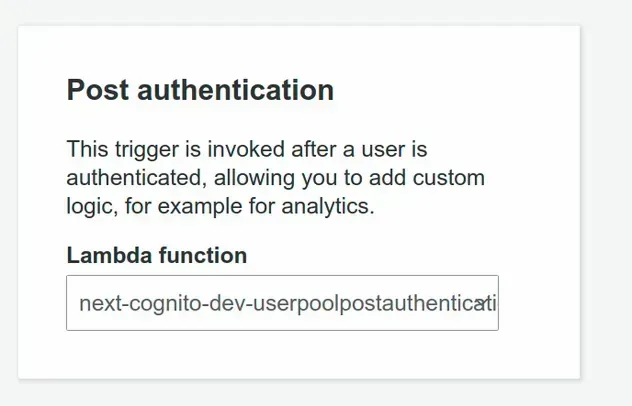
After you've defined the Lambda function you can set it as a Post Authentication Lambda trigger in your User Pool.
# Discussion
This is definitely one of the rough edges around Cognito as it doesn't make much sense to confirm a user's email every time they log in to your application.
However, this is the current way to handle this and in my implementation I haven't experienced any issues.
# Table of Contents
# Verifying a Google OAuth Email in AWS Cognito
When you use AWS Cognito and Amplify with Google OAuth user emails are not automatically verified.
In other words, the email_verified attribute is set to false for Google
registered users.
We need users to verify their email because otherwise, we can't use the forgot password functionality. This is very important in case you support Cognito native email login and link the accounts.
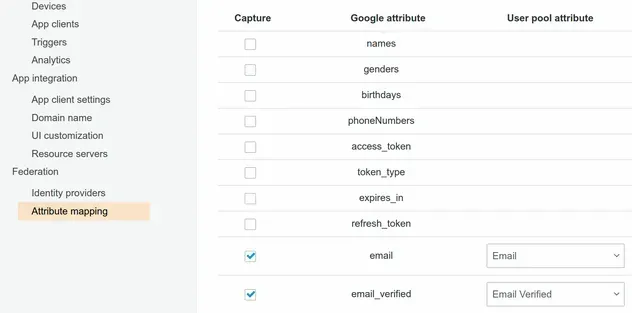
In order to verify the emails of Google OAuth accounts in Cognito, we have to
provide an attribute mapping between Google's email_verified attribute and
Cognito's email_verified attribute.
After the email_verified attribute has been mapped between Google and Cognito,
we can leverage the existing email_verified property on the user's Google
account.
Here's how the attribute mapping looks in the AWS Console:
The following snippet shows how to set the attribute mapping in AWS CDK.
this.identityProviderGoogle = new cognito.UserPoolIdentityProviderGoogle( this, 'userpool-identity-provider-google', { // ... other config attributeMapping: { email: { attributeName: cognito.ProviderAttribute.GOOGLE_EMAIL.attributeName, }, custom: { email_verified: cognito.ProviderAttribute.other('email_verified'), }, }, }, );
# Discussion
Once we map the email_verified attribute we can leverage the existing property
on the user's Google account.
The most intuitive way would be if the email_verified property of Google
accounts were set to true by default, but that's currently not the case.
# Customizing Emails in AWS Cognito
The default email AWS Cognito sends to our users looks as follows:
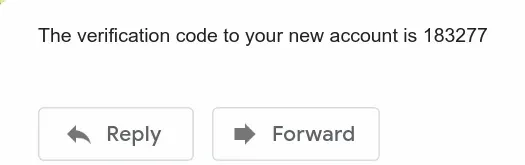
When a user signs up, requests an email change or a password reset, we have to send them an email. Since the default email is very plain, is quite common to have to provide a custom implementation.
The way to customize the default email messages provided by Cognito is by creating a Custom message Lambda trigger.
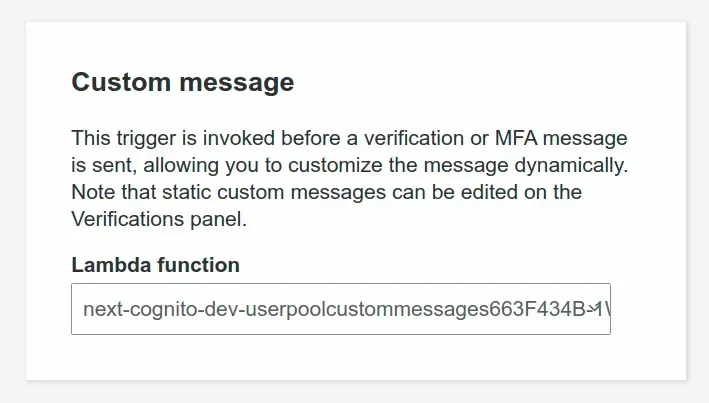
# Implementing the Custom Message Trigger
Let's implement the entry point of our Custom Message trigger function.
import {Callback, Context} from 'aws-lambda'; import CustomMessage from './custom-message'; interface Event { triggerSource: string; request: { codeParameter: string; userAttributes: { 'cognito:user_status': string; given_name: string; family_name: string; email: string; }; usernameParameter: string; }; response: { emailSubject: string; emailMessage: string; }; } export function main( event: Event, _context: Context, callback: Callback, ): void { // 👇 in this case DOMAIN_NAME is provided via ENV var const {DOMAIN_NAME} = process.env; const { triggerSource, request: {codeParameter, userAttributes, usernameParameter}, } = event; const customMessage = new CustomMessage({ domainName: DOMAIN_NAME, userAttributes, codeParameter, usernameParameter, }); /* eslint-disable no-param-reassign */ if ( triggerSource === 'CustomMessage_SignUp' && userAttributes['cognito:user_status'] === 'UNCONFIRMED' ) { event.response = customMessage.sendCodePostSignUp(); } else if (triggerSource === 'CustomMessage_ForgotPassword') { event.response = customMessage.sendCodeForgotPassword(); } else if (triggerSource === 'CustomMessage_UpdateUserAttribute') { event.response = customMessage.sendCodeVerifyNewEmail(); } else if (triggerSource === 'CustomMessage_AdminCreateUser') { event.response = customMessage.sendTemporaryPassword(); } else if (triggerSource === 'CustomMessage_ResendCode') { event.response = customMessage.resendConfirmationCode(); } // Return to Amazon Cognito callback(null, event); }
Note that the given_name and family_name
cognito attributes might not be present in
your user pool. If you haven't set them as required for when users register, you
will have to provide a more generic email message.
This entry function just calls a method of the CustomMessage class depending
on the event trigger source. Let's now look at the CustomMessage class.
interface CustomMessageProps { domainName: string; userAttributes: { given_name: string; family_name: string; email: string; }; codeParameter: string; usernameParameter: string; } interface CustomMessage extends CustomMessageProps {} interface CustomMessageMethod { emailSubject: string; emailMessage: string; } class CustomMessage { constructor(kwargs: CustomMessageProps) { Object.assign(this, kwargs); } sendCodePostSignUp(): CustomMessageMethod { return { emailSubject: `Validate your account for ${ this.domainName } | ${new Date().toLocaleString()}`, emailMessage: `Hi <b>${this.userAttributes.given_name} ${this.userAttributes.family_name}</b>! <br>Thank you for signing up. <br /> Please click on the link to activate your account: <a href="${this.domainName}/complete-registration?code=${this.codeParameter}&email=${this.userAttributes.email}">${this.domainName}</a>. `, }; } sendCodeForgotPassword(): CustomMessageMethod { return { emailSubject: `Reset your password for ${ this.domainName } | ${new Date().toLocaleString()}`, emailMessage: `Hi <b>${this.userAttributes.given_name} ${this.userAttributes.family_name}</b>! <br /> Please click on the link to update your password: <a href="${this.domainName}/complete-password-reset?code=${this.codeParameter}&email=${this.userAttributes.email}">${this.domainName}</a>. `, }; } sendCodeVerifyNewEmail(): CustomMessageMethod { return { emailSubject: `Validate your new email for ${ this.domainName } | ${new Date().toLocaleString()}`, emailMessage: `Hi <b>${this.userAttributes.given_name} ${this.userAttributes.family_name}</b>! <br /> Please click on the link to update your email address: <a href="${this.domainName}/complete-email-change?code=${this.codeParameter}">${this.domainName}</a>. `, }; } sendTemporaryPassword(): CustomMessageMethod { return { emailSubject: `Your account for ${ this.domainName } | ${new Date().toLocaleString()}`, emailMessage: `Hi User!<br>An administrator has created your credentials for ${this.domainName}. <br>Your username is <b>${this.usernameParameter}</b> and your temporary password is <b>${this.codeParameter}</b> <br>You can paste them in the form at <a href=${this.domainName}/login>${this.domainName}</a> in order to log in.`, }; } resendConfirmationCode(): CustomMessageMethod { return { emailSubject: `Your sign-up confirmation link for ${ this.domainName } | ${new Date().toLocaleString()}`, emailMessage: `Hi <b>${this.userAttributes.given_name} ${this.userAttributes.family_name}</b>!<br>Thank you for signing up. <br /> Please click on the link to activate your account: <a href="${this.domainName}/complete-registration?code=${this.codeParameter}&email=${this.userAttributes.email}">${this.domainName}</a>.`, }; } } export default CustomMessage;
The function has to have access to our domain name in order to compose a link for the user to click on.
In the methods, we handle the scenarios where the user:
- Has signed up and we have to send them an account activation link.
- Has forgotten their password and we have to send them a link where they can reset their password.
- Has requested an email change and we have to send them a link to confirm their new email.
- Has been created an account from an administrator and we have to send them their credentials.
- Hasn't received an email with the account activation link upon registration and we have to resend the link.
After we've defined the lambda function, we have to attach it as a
Custom Message trigger in our
Cognito User Pool.
# Custom Emails in AWS Cognito - Discussion
An important caveat is that the maximum length of the email messages is 20,000 UTF-8 characters - docs.
Should you exceed this limit of 20,000 UTF-8 characters, the default behavior is to send the one-liner plain email of type "Your code is 123", which can be very confusing.
In the above implementation of the lambda function, we build links, which we
send to the user. These links include the code and sometimes the email of
the user in the query parameters, so we can invoke the necessary APIs on the
frontend.
An alternative would be to just send the code to the user, like in the default email, but then the user would have to copy and paste the code into a form, which is less intuitive than clicking on a link.
# Additional Resources
You can learn more about the related topics by checking out the following tutorials:
- AWS Cognito & Amplify Auth - Review
- How to set User Pool Attributes in AWS Cognito
- AWS Amplify Auth with React - complete tutorial
- Cognito User Pool Example in AWS CDK - Complete Guide
- Add SES Support to a Cognito User Pool in CDK
- AWS CDK Tutorial for Beginners - Step-by-Step Guide
- Change User Status from FORCE_CHANGE_PASSWORD in Cognito
- Email Address is not Verified AWS SES Error [Solved]
- How to send emails with SES in AWS CDK

