User Pool Attributes in AWS Cognito - Complete Guide
Last updated: Jan 27, 2024
Reading time·8 min

# Table of Contents
# User Attributes in AWS Cognito
We will learn how to store default and custom User Pool attributes on Cognito Users.
User Pool attributes in AWS Cognito are:
- standard - the default user attributes you get with every User pool.
- custom - user attributes specific to your application that are not supported by default.
The default Attributes are: address, birthdate, email, family_name, gender, given_name, locale, middle_name, name, nickname, phone_number, picture, preferred_username, profile, updated_at, website, zoneinfo - docs.
When you want to store a property on a user that isn't included in the default
cognito-provided ones, you have to use a custom attribute, e.g. add a
boolean isAdmin attribute to your user.
# Initializing the Project
We will clone a GitHub repository that creates a Cognito stack including all the default and some custom attributes we have defined ourselves.
This stack creates the following resources in your AWS Account:
- User Pool
- User Pool Client
Clone the GitHub repository.
Change the directory and install dependencies.
cd aws-cognito-user-attributes && npm install
- Deploy the stack.
npm run cdk-create-stack
The stack has been deployed to your default region. You can check the region in the
cdk-exports-dev.jsonfile created in the root directory of the project.Open the AWS console and click on the cognito-user-attributes-dev stack.
# Storing User Attributes in AWS Cognito
We have created a User Pool and a User Pool Client.
The User Pool is the directory where you store and manage your users in AWS Cognito. A User Pool allows your users to register and sign in to your application, and allows you to manage their profiles.
The User Pool Client is the part of the User Pool that actually enables unauthenticated operations like registering, signing in and the forgotten password functionality. You can't call these operations without an
app client IDthat you get by creating a User Pool Client.
User Pool > General Settings > Attributes
Click on the cognito-user-attributes-dev User pool in the console and select
the Attributes property in the left sidebar:
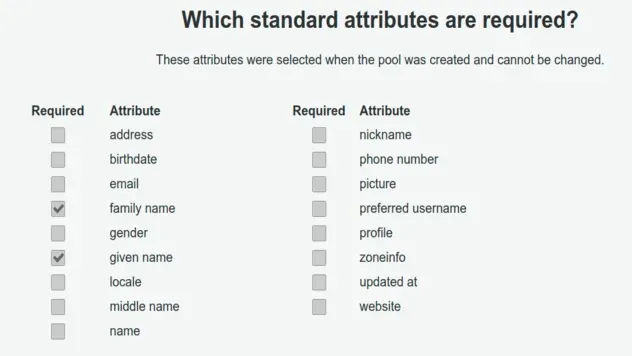
We have specified the family name and given name standard attributes as
required. We did this using the following code in the
infra/constructs/user-pool-construct.ts:
this.userPool = new cognito.UserPool(this, 'userpool', { //... rest standardAttributes: { givenName: { required: true, mutable: true, }, familyName: { required: true, mutable: true, }, }, });
Notice how the attributes are set to both required and mutable. The mutable
property specifies whether the value of the attribute can be changed. You can't
edit the mutable property after creating the attribute.
In the Attributes tab in the console, scroll down to the "Do you want to add
custom attributes?" section:
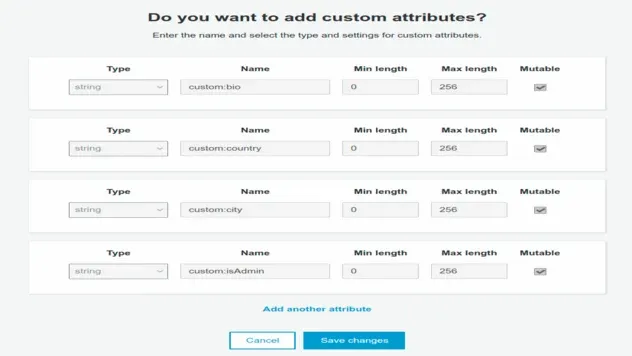
bio, country, city and isAdmin. Note that you can create new custom attributes after User Pool creation, however, you can't edit the existing ones.The code defining the custom attributes is located in the
infra/constructs/user-pool-construct.ts file again:
this.userPool = new cognito.UserPool(this, 'userpool', { // ... rest customAttributes: { bio: new cognito.StringAttribute({mutable: true}), country: new cognito.StringAttribute({mutable: true}), city: new cognito.StringAttribute({mutable: true}), isAdmin: new cognito.StringAttribute({mutable: true}), }, });
Note that we set the mutable attribute to true again because we want to be
able to change these values.
Notice that all of our custom attributes are of type string. You could say,
why would isAdmin be of type string, it should be a boolean.
That would make sense, however, the only truly supported type for custom
attributes is the string type. If you read the
cognito docs
they say you can use string or number if you read the
cdk docs
they say you can use boolean, datetime, number, string.
However, at the time of writing both are wrong and the only truly supported type
is string. If you're interested to learn more check out the Custom attributes
section of my cognito bugged article.
User Pool > General Settings > App clients
In the User Pool Client, we can set the read and write permissions for our standard and custom attributes.
The section concerning Attributes is "hidden" and a common source of confusion,
you have to first click on Show Details.
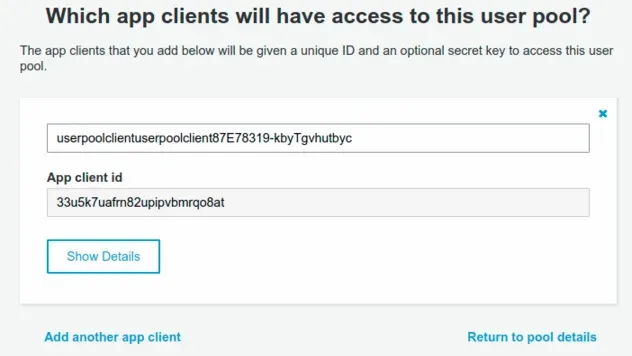
Then you have to scroll to the bottom and click on
Set attribute read and write permissions.
The Attributes table will be shown where you can see the read/write permissions for our attributes:
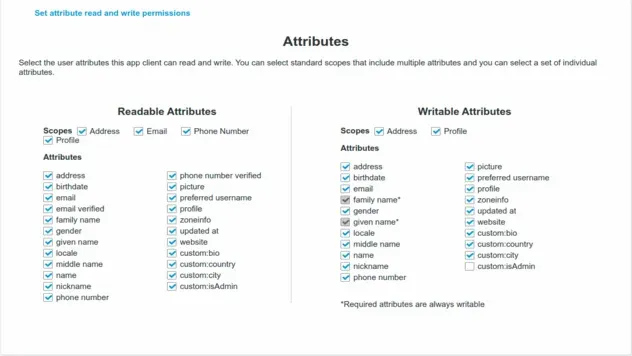
If an application tries to update an attribute that's not set as writable, you
would get a NotAuthorizedException error.
We have set the read attributes in our code in the
infra/constructs/user-pool-client-construct.ts file.
const clientReadAttributes = new cognito.ClientAttributes() .withStandardAttributes({ givenName: true, familyName: true, email: true, emailVerified: true, address: true, birthdate: true, gender: true, locale: true, middleName: true, fullname: true, nickname: true, phoneNumber: true, phoneNumberVerified: true, profilePicture: true, preferredUsername: true, profilePage: true, timezone: true, lastUpdateTime: true, website: true, }) .withCustomAttributes(...['bio', 'country', 'city', 'isAdmin']);
And the write attributes:
const clientWriteAttributes = new cognito.ClientAttributes() .withStandardAttributes({ givenName: true, familyName: true, email: true, // 👇 users can't update their emailVerified attribute emailVerified: false, address: true, birthdate: true, gender: true, locale: true, middleName: true, fullname: true, nickname: true, phoneNumber: true, profilePicture: true, preferredUsername: true, profilePage: true, timezone: true, lastUpdateTime: true, website: true, }) .withCustomAttributes(...['bio', 'country', 'city']);
One difference is the isAdmin property. We don't want users to be able to
update this property. Since the property is set as mutable, we can update it
using the CLI.
The emailVerified property is also set to false because we don't want users
to be able to verify their email without clicking on the verification link.
Another thing to note is that since we set the family name and given name
attributes to required in our User Pool, these attributes are always going to be
set to writable.
# Testing Cognito User Attributes
Make sure to update the YOUR_USER_POOL_ID placeholder in the command below.
You can find the user pool ID in the cdk-exports-dev.json file in the root
directory, or in the General settings tab in the User Pool console.
First, let's create the Cognito user:
aws cognito-idp admin-create-user \ --user-pool-id YOUR_USER_POOL_ID \ --username john@example.com \ --user-attributes Name="given_name",Value="john" \ Name="family_name",Value="smith"
User Pool > General Settings > Users and groups
If you now click in the Users and Groups section of your user pool and refresh the page you will see the user we've created.
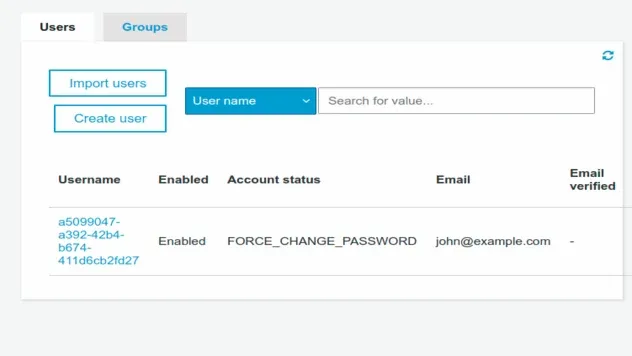
If you click on the user you will see that we have successfully initialized the
user with the given_name and family_name attribute:
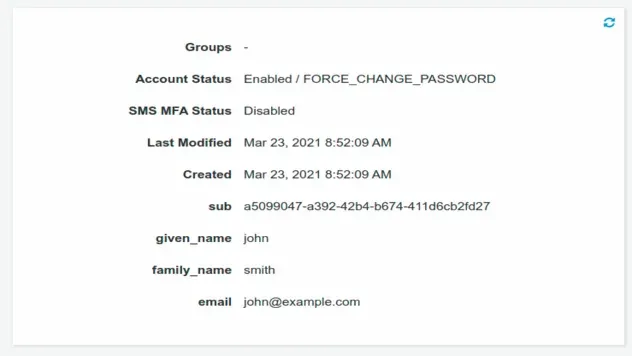
Let's now update some of the other standard (default) user attributes using the CLI (replace your-user-pool-id):
aws cognito-idp admin-update-user-attributes \ --user-pool-id YOUR_USER_POOL_ID \ --username john@example.com \ --user-attributes Name="gender",Value="m" \ Name="name",Value="john smith"
If you're wondering how I got the names of the default attributes, you can find them all in the docs.
If you were to refresh the Users page and click on your user, you would see the other standard attributes included in the user profile:
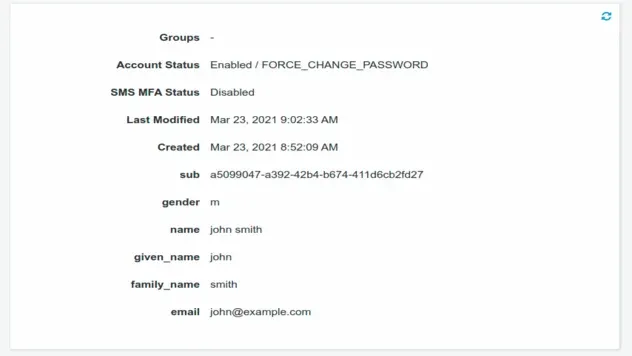
Let's update the custom attributes now. Note that when working with custom
attributes you have to prefix the attribute name with custom:.
Make sure to replace the YOUR_USER_POOL_ID placeholder with your actual user
pool id.
aws cognito-idp admin-update-user-attributes \ --user-pool-id YOUR_USER_POOL_ID \ --username john@example.com \ --user-attributes Name="custom:bio",Value="Loves long walks on the beach" \ Name="custom:country",Value="Chile" \ Name="custom:city",Value="Santiago" \ Name="custom:isAdmin",Value="yes"
If you refresh the page of the user with the email john@example.com you will see
that our custom attributes have been updated on the user object:

# Cleanup
Delete the CDK stack.
npm run cdk-destroy
Note that the default behavior for User Pools provisioned via CDK is for them to
be retained after stack deletion. However, I've explicitly set the removal
policy of this User pool to DESTROY, so it will get deleted when the stack is
deleted.
# Conclusion
We need both default and custom User Pool attributes in order to collect and store user information. Common attributes include shipping address, country, city, etc.
# Update Cognito User Attributes
User pool attributes in Cognito are of 2 types:
- standard - the default user attributes you get with every user pool
- custom - user attributes specific to your application that are not supported by default
This article shows how to update both types.
To update a Cognito user's attributes use the admin-update-user-attributes
command, specifying the user-pool-id, username and user-attributes
parameters.
Let's look at an example of how to update the standard attributes of a
Cognito user:
aws cognito-idp admin-update-user-attributes --user-pool-id YOUR_USER_POOL_ID --username john@example.com --user-attributes Name="gender",Value="m" Name="name",Value="john smith"
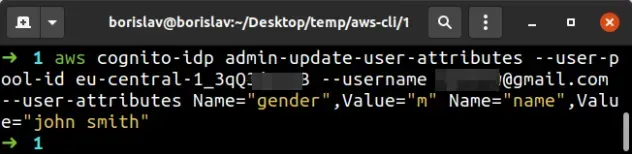
In the example above, we've set the gender attribute of the user to m and
their name attribute to john smith.
The admin-update-user-attributes command enables us to update a Cognito user's attributes, including verifying their email.
--user-attributes parameter expects space-separated name-value pairs, representing user attributes.To find a complete list of all standard user attributes visit the docs.
Let's now look at an example of how to update the custom attributes of a
cognito user:
aws cognito-idp admin-update-user-attributes --user-pool-id YOUR_USER_POOL_ID --username john@example.com --user-attributes Name="custom:bio",Value="Hello World" Name="custom:country",Value="Chile"
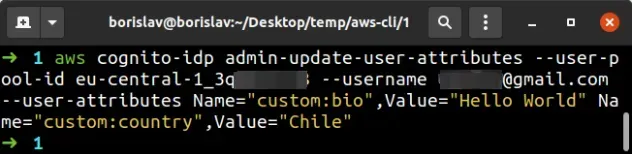
In the example above, we've set the user's custom bio attribute to
Hello World and their custom country attribute to Chile.
custom:.To verify that the Cognito user's attributes have been updated successfully, run the admin-get-user command.
aws cognito-idp admin-get-user --user-pool-id YOUR_USER_POOL_ID --username john@example.com
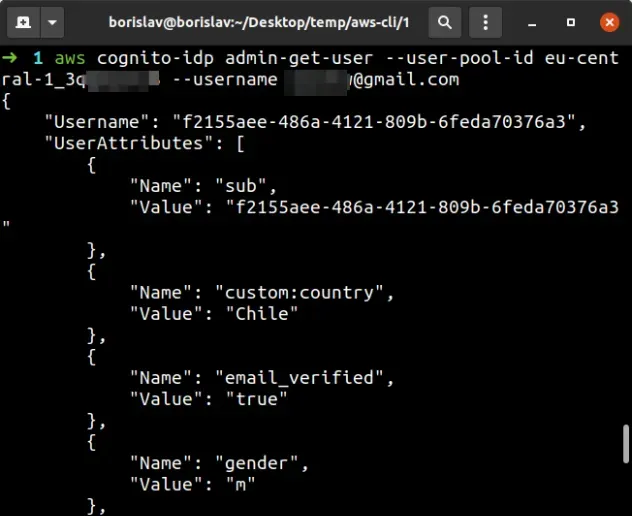
The admin-get-user command returns information about the user, including the
complete list of the user's attributes.
The output of the command shows that the standard and custom Cognito user attributes have been updated successfully.
I've also written a complete tutorial on how to use AWS Amplify Auth with React.js.
# Additional Resources
You can learn more about the related topics by checking out the following tutorials:
- AWS Cognito & Amplify Auth - Review
- AWS Amplify Auth with React - complete tutorial
- Cognito User Pool Example in AWS CDK - Complete Guide
- Add SES Support to a Cognito User Pool in CDK
- AWS CDK Tutorial for Beginners - Step-by-Step Guide
- How to use Parameters in AWS CDK
- Email Address is not Verified AWS SES Error [Solved]
- How to send emails with SES in AWS CDK

