VS Code: Git not found. Install it or configure it using the 'git.path' setting
Last updated: Apr 6, 2024
Reading time·5 min

# VS Code: Git not found. Install it or configure it using the 'git.path' setting
The VS Code error "Git not found. Install it or configure it using the
'git.path' setting" occurs when VS Code can't find where git is installed on
your machine.
You can resolve the error by making sure Git is installed and configuring the
git.path setting in VS Code.
You might get any of the following variations of the error.j
It looks like git is not installed on your system Git not found. Install it or configure it using the 'git.path' setting GitLens was unable to find Git. Please make sure Git is installed. Also ensure that Git is either in the PATH, or that 'gitlens.advanced.git' is pointed to its installed location There are no active source control providers. no source control providers registered
Make sure Git is installed on your machine and is added to your PATH environment variable.
You can start your terminal and issue the git --version command.
git --version
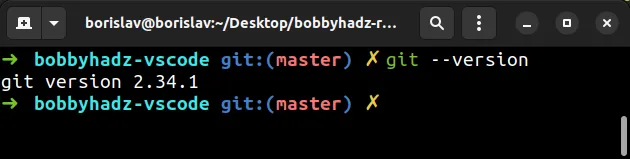
If you get a version number back, then Git is installed on your machine.
Otherwise, follow the official installation instructions for your operating system.
If you get the "xcrun: error: invalid active developer path (/Library/Developer/CommandLineTools)" error on macOS, click on the following subheading:
# Configure Git correctly in VS Code
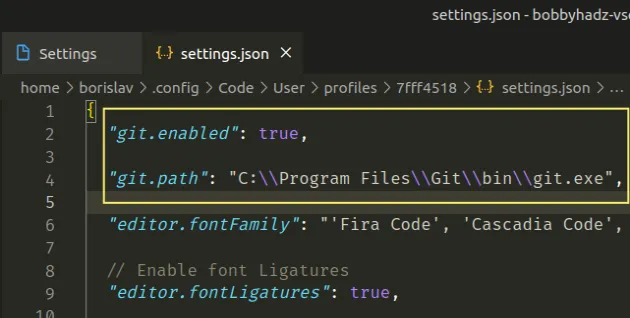
If you have Git installed, try to set the git.path property in VS Code.
On Windows, issue the following command to find where the git.exe file is
located.
# Windows where git
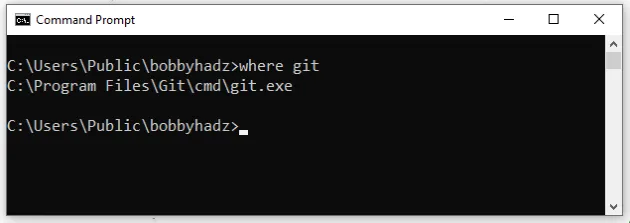
Make note of the directory, it might be something similar to:
C:\Program Files\Git\bin\git.exe- or
C:\Program Files\Git\cmd\git.exe
On macOS or Linux, issue the following command to find where git is located.
which git
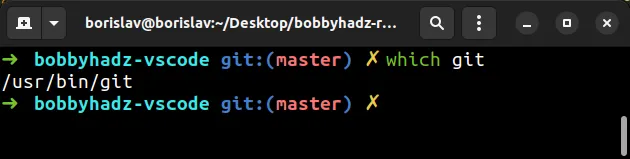
The path might be something similar to:
/usr/local/bin/git- or
/usr/bin/git
Make note of the path.
- Press
Ctrl+Shift+P(orCommand+Shift+Pon macOS).
F1 to open the Command Palette.Type user settings json.
Click on Preferences: Open User Settings (JSON)

- Add the following properties to your settings object.
{ // Enable Git in VS Code "git.enabled": true, // Point to the Git executable "git.path": "C:\\path\\to\\your\\git.exe" }
Make sure to specify the correct path to the git executable.
On Windows, you have to escape each backslash with another backslash as shown in the following example.
On macOS and Linux, you don't have to escape the path as it only contains
forward slashes, e.g. /usr/local/bin/git.
NOTE: the git.path property can also be set to an array of paths to your git
executables if you have multiple.
{ // Enable Git in VS Code "git.enabled": true, // Point to the Git executable "git.path": [ "C:\\path\\to\\your\\git.exe", "C:\\path\\to\\another\\git.exe", "C:\\path\\to\\third\\git.exe" ] }
If set to an array, the git extension goes to all of the values in the array
until it finds a usable git executable.
After setting the git.enabled and git.path properties:
- Save your
settings.jsonfile. - Restart VS Code. This step is very important.
- Check if the error is resolved.
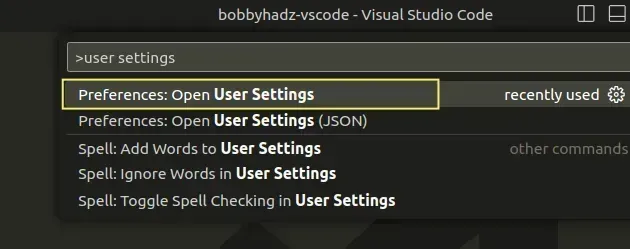
If you couldn't find the settings.json file:
- Press
Ctrl+Shift+P(orCommand+Shift+Pon macOS).
F1 to open the Command Palette.- Type user settings and select Preferences: Open User Settings.
You can also open the settings screen by pressing Ctrl + , on Windows and
Linux or Cmd + , on macOS.
- Click on the Open Settings (JSON) icon at the top right corner.
![]()
PowerShell on Windows, try switching to Git Bash or CMD instead.PowerShell often causes issues when used with VS Code.
After you switch your shell to CMD or Git Bash, restart VS Code.
# Installing git correctly on macOS
If you are on macOS and the error persists, try to run the following command to
install the Apple version of git.
xcode-select --install
Try to issue the which git command after, and you should be able to see a
valid path.
which git
When you issue the git --version command, you might get prompted to agree to
the license.
git --version
Make sure to agree to the license as that often causes the error.
If the error persists, run the following command to agree to the license.
sudo xcodebuild -license
Agreeing to the Xcode/iOS license requires admin privileges.
Hit the Enter key to view the license agreement.
You can also run the command with the accept option.
sudo xcodebuild -license accept
Once you agree to the license, restart VS Code and check if the error is resolved.
You can also install git using brew.
brew install git
Alternatively, you can follow the official installation instructions.
# There are no active source control providers
If you get the error message There are no active source control providers:
- Click on Extensions in the left sidebar.
- You can also open the Extensions menu by pressing:
Ctrl+Shift+Xon Windows or Linux.Command+Shift+Xon macOS.
- Type @builtin git.
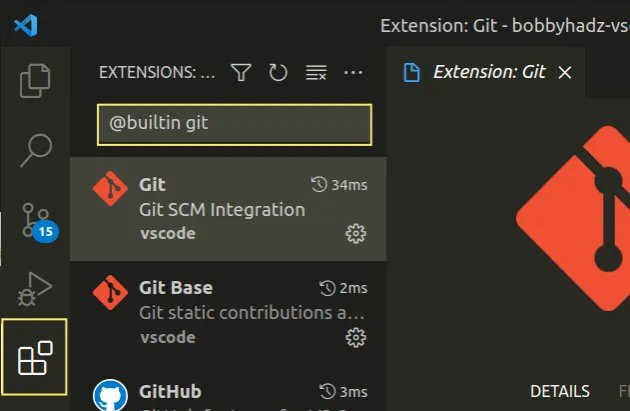
- Make sure the extension is installed and enabled.
The built-in Git and Git Base extensions from vscode must be installed and
enabled.
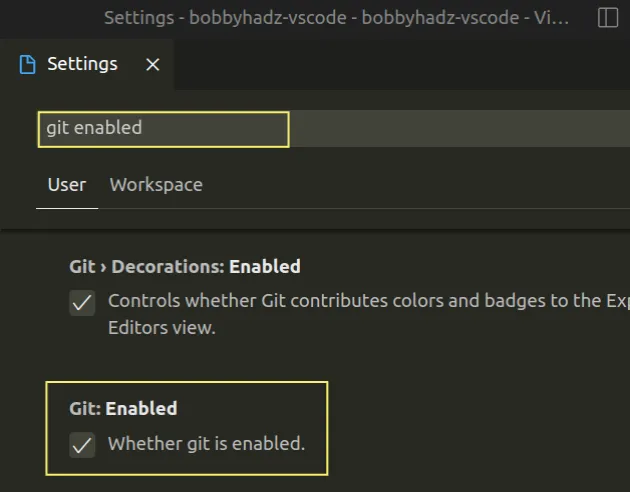
Another thing you should check is that the Git: Enabled checkbox is checked in your settings.
- Press
Ctrl+Shift+P(orCommand+Shift+Pon macOS).
F1 to open the Command Palette.- Type user settings and select Preferences: Open User Settings.
You can also open the settings screen by pressing Ctrl + , on Windows and
Linux or Cmd + , on macOS.
- Scroll down to the Git: Enabled checkbox and make sure it is checked.
If you don't have a git repository in your project, initialize one by running
the git init command.
- Press:
Ctrl+Shift+Pon Windows and Linux.Command+Shift+Pon macOS.
F1 to open the Command Palette.- Type toggle terminal and select View: Toggle Terminal.
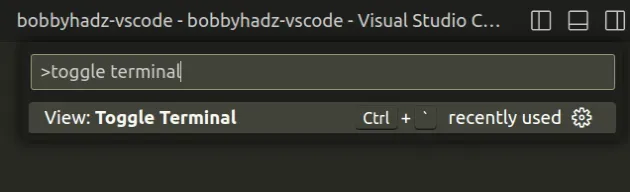
- Run the
git initcommand.
git init
# Try restarting your computer
If the error persists, try to restart your computer as you might have stale configuration.
The VS Code git configuration often glitches and a reboot often helps.
I've also written an article on how to use VS Code as your default Git editor, difftool and mergetool.
# Additional Resources
You can learn more about the related topics by checking out the following tutorials:
- What is the .vscode folder and should you Commit it to Git
- How to Undo the last Git Commit in Visual Studio Code
- How to view the Git History in Visual Studio Code
- How to easily delete Git Branches in Visual Studio Code
- Changing the Git user or the GitHub account in VS Code
- Reinitialized existing Git repository in /path/to/repo
- Please clean your repository working tree before checkout
- How to rename a Directory or a File on the GitHub website

