body-parser deprecated undefined extended: provide extended option
Last updated: Apr 5, 2024
Reading time·3 min
# body-parser deprecated undefined extended: provide extended option
The Express.js warning "body-parser deprecated undefined extended: provide
extended option" occurs when you forget to explicitly set the extended
property in the call to bodyParser.urlencoded.
To resolve the issue, set the extended property to a boolean value.
Here is an example of when the warning is shown.
import express from 'express'; import bodyParser from 'body-parser'; const app = express(); app.use(bodyParser.json()); app.use( bodyParser.urlencoded(), );
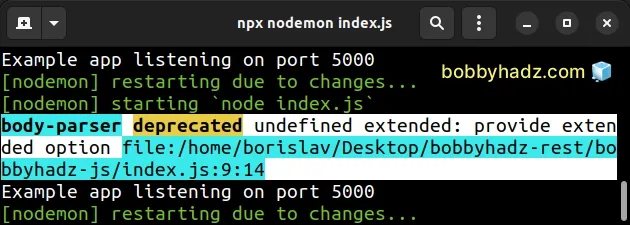
Here is the output of running the code.
body-parser deprecated undefined extended: provide extended option file:/home/borislav/Desktop/bobbyhadz-js/index.js:9:14
In order to resolve the issue, set the extended property in the options
object of the bodyParser.urlencoded() method.
import express from 'express'; import bodyParser from 'body-parser'; const app = express(); app.use(bodyParser.json()); app.use( bodyParser.urlencoded({ extended: true, }), );
The code sample above uses the ES6 modules import/export syntax.
If you use the CommonJS require() syntax, use the following import statements
instead.
// 👇️ using CommonJS require() const express = require('express'); const bodyParser = require('body-parser');
Make sure you have the body-parser module installed.
# If you need to generate a package.json file npm init -y # 👇️ with NPM npm install express body-parser # or with YARN yarn add express body-parser
If you use an Express.js version greater than 4.16, you can also use the
express.urlencoded() method which uses the body-parser module under the
hood.
import express from 'express'; // 👇️ If you use CommonJS require() // const express = require('express') const app = express(); app.use(express.json()); app.use( express.urlencoded({ extended: true, }), );
If you use an older version of Express, you can update the module by running the following command.
# with NPM npm install express@latest # or with YARN yarn add express@latest
Make sure to restart your Express.js server after making the change.
The extended option allows
you to choose between parsing the URL-encoded data with the
querystring library when false or
with the qs library when true.
The extended option defaults to true but using the default value has been
deprecated.
extended syntax allows for objects and arrays to be encoded into the URL-encoded format for a JSON-like experience.It's better to set the extended argument to true to use the qs module
because the querystring module has been deprecated
as shown in the package's NPM page.
The qs module is actively maintained and is used for query string parsing and stringifying.
Here is a complete example of setting up an Express.js server and configuring it correctly.
import express from 'express'; import bodyParser from 'body-parser'; // 👇️ if you use CommonJS require() // const express = require('express'); // const bodyParser = require('body-parser'); const app = express(); app.use(bodyParser.json()); app.use( bodyParser.urlencoded({ extended: true, }), ); app.post('/register', function (req, res) { console.log( `username: ${req.body.username}, password: ${req.body.password}`, ); res.send( `username: ${req.body.username}, password: ${req.body.password}`, ); }); const port = 5000; app.listen(port, () => { console.log(`Example app listening on port ${port}`); });
Assuming you save the code in an index.js file, you can run the following
command to start the Express.js server.
npx nodemon index.js
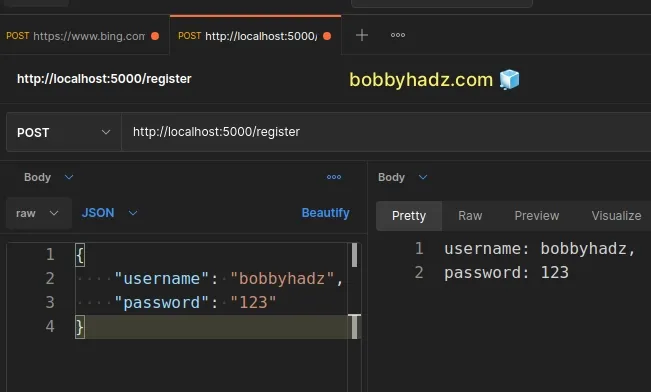
You can use Postman or a different HTTP client to send a POST request to
http://localhost:5000/register where you specify the username and password
parameters in the request body.
As noted previously, if you use an Express.js version greater than 4.16, you can
use express.json() and express.urlencoded() middlewares.
import express from 'express'; // 👇️ if you use CommonJS require() // const express = require('express') const app = express(); app.use(express.json()); app.use( express.urlencoded({ extended: true, }), );
Starting with Express 4.16, the body-parser module has been included in the
library, so you don't have to import it separately.
# Additional Resources
You can learn more about the related topics by checking out the following tutorials:
- Route.get() requires callback functions but got a object Undefined
- Cannot find module 'express' or 'cors' error in Node.js
- RangeError [ERR_HTTP_INVALID_STATUS_CODE]: Invalid status code
- How to ping a URL or a remote IP address using Node.js
- How to get the last modified Date of a File in Node.js
- How to Delete all Files in a Directory using Node.js
- DeprecationWarning: Buffer() is deprecated due to security and usability issues
- 413 Error: request entity too large in Node.js & Express

