Create React App with TypeScript - Complete Guide
Last updated: Feb 29, 2024
Reading time·4 min

# Table of Contents
- Create React App with TypeScript - Complete Guide
- Typing props in a React TypeScript project
- Typing state with the useState hook in React TypeScript
- Typing events in a React TypeScript project
- Typing refs in a React TypeScript project
# Create React App with TypeScript - Complete Guide
To create a React App with Typescript, run the npx create-react-app command
with the --template flag set to typescript.
npx create-react-app my-ts-app --template typescript
If you get an error, try forcing the command to the latest version of create-react-app.
npx create-react-app@latest my-ts-app --template typescript
If you have an existing Create React App project that is written in JavaScript, run the following command to add TypeScript support.
# 👇️ with NPM npm install --save typescript @types/node @types/react @types/react-dom @types/jest # 👇️ with YARN yarn add typescript @types/node @types/react @types/react-dom @types/jest
The next step is to rename any file with a .js extension to .tsx. Your
index.js file becomes index.tsx.
Now, create a tsconfig.json file in
your project's root directory (where your package.json file is) with the
following settings.
{ "compilerOptions": { "target": "es6", "lib": ["dom", "dom.iterable", "esnext"], "allowJs": true, "skipLibCheck": true, "esModuleInterop": true, "allowSyntheticDefaultImports": true, "strict": true, "forceConsistentCasingInFileNames": true, "noFallthroughCasesInSwitch": true, "module": "esnext", "moduleResolution": "node", "resolveJsonModule": true, "isolatedModules": true, "noEmit": true, "jsx": "react-jsx" }, "include": ["src/**/*"] }
Make sure to restart your development server and your IDE.
.tsx extension in any file that contains JSX code, and not the .ts extension.You will get a bunch of type errors that you have to fix before you continue development or build your project.
For example in your index.tsx file, use a type assertion when creating the
application root.
const root = ReactDOM.createRoot( document.getElementById('root') as Element );
# Typing props in a React TypeScript project
Use a type alias or an interface to type a component's props.
import React from 'react'; interface EmployeeProps { name: string; age: number; country: string; children?: React.ReactNode; // 👈️ for demo purposes } function Employee({name, age, country}: EmployeeProps) { return ( <div> <h2>{name}</h2> <h2>{age}</h2> <h2>{country}</h2> </div> ); } export default function App() { return ( <div> <Employee name="Alice" age={29} country="Austria" /> </div> ); }

The Employee component takes name, age and country props which we
defined in the EmployeeProps interface.
You can mark props as optional by using a question mark and you can set default values for props in the function's definition.
import React from 'react'; interface EmployeeProps { name?: string; // 👈️ marked optional age?: number; // 👈️ marked optional country: string; children?: React.ReactNode; // 👈️ for demo purposes } // 👇️ default values for props function Employee({name = 'Alice', age = 29, country}: EmployeeProps) { return ( <div> <h2>{name}</h2> <h2>{age}</h2> <h2>{country}</h2> </div> ); } export default function App() { return ( <div> <Employee country="Austria" /> </div> ); }
The name and age props in the EmployeeProps interface are marked as
optional,
so they don't have to be provided when using the component.
We also set default values for name and age, so if they aren't provided, the
default values are used.
# Typing state with the useState hook in React TypeScript
Use the generic on the useState hook to type the values it is going to store.
import {useEffect, useState} from 'react'; function App() { // 👇️ array of strings const [strArr, setStrArr] = useState<string[]>([]); // 👇️ an array of objects const [objArr, setObjArr] = useState< {name: string; age: number}[] >([]); useEffect(() => { setStrArr(['a', 'b', 'c']); setObjArr([{name: 'A', age: 1}]); }, []); console.log(strArr); console.log(objArr); return ( <div className="App"> <div>Hello world</div> </div> ); } export default App;
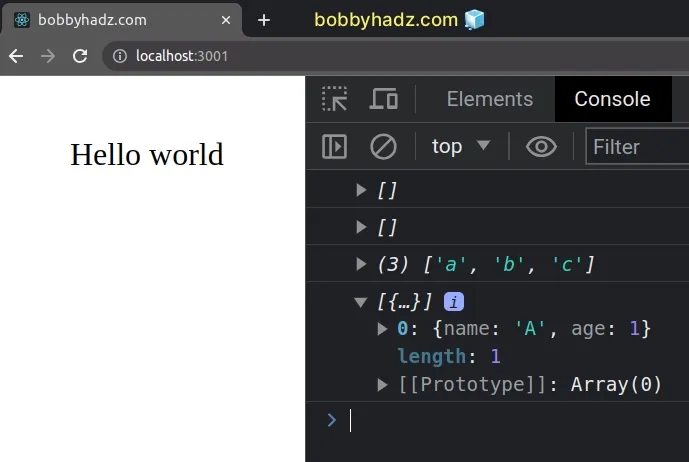
The examples above show how to type the state array as an array of strings or an array of objects.
Always make sure to explicitly type empty arrays in React when using TypeScript.
I've also written an article on how to type useState as an array or object.
# Typing events in a React TypeScript project
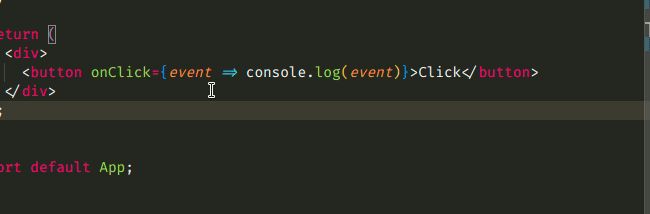
To type an event in a React TypeScript project, write the event handler
function inline and hover over the event object to get its type.
const App = () => { // 👇️ onClick event is written inline // hover over the `event` parameter with your mouse return ( <div> <button onClick={event => console.log(event)}>Click</button> </div> ); }; export default App;
event parameter and it shows me what the type of the event is.TypeScript is able to infer the type of the event when it's written inline.
This is very useful because it works with all events. Simply write a "mock"
implementation of your event handler inline and hover over the event parameter
to get its type.
Now that we know that the correct type for the onClick event in the example is
React.MouseEvent<HTMLButtonElement, MouseEvent>, we can extract our handler
function.
import React from 'react'; const App = () => { const handleClick = ( event: React.MouseEvent<HTMLButtonElement, MouseEvent>, ) => { console.log(event.target); console.log(event.currentTarget); }; return ( <div> <button onClick={handleClick}>Click</button> </div> ); }; export default App;
onClick events.As long as you write the event handler function inline and hover over the
event parameter, TypeScript will be able to infer the event's type.
# Typing refs in a React TypeScript project
Use the generic on the useRef hook to type a ref in React TypeScript.
import {useEffect, useRef} from 'react'; export default function App() { const inputRef = useRef<HTMLInputElement | null>(null); useEffect(() => { inputRef?.current?.focus(); }, []); return ( <div> <input ref={inputRef} /> </div> ); }
We set the ref on an input element, so we used the type HTMLInputElement or
null because the ref's initial value is null
HTML***Element. Once you start typing HTML.., your IDE should be able to help you with autocomplete.Some commonly used types are: HTMLInputElement, HTMLButtonElement,
HTMLAnchorElement, HTMLImageElement, HTMLTextAreaElement,
HTMLSelectElement, etc.
If you get the error Cannot assign to 'current' because it is read-only property, click on the link and follow the instructions.

