Failed building wheel for X when using pip install [Solved]
Last updated: Apr 9, 2024
Reading time·17 min

# Table of Contents
- Failed building wheel for X when using pip install
- Failed building wheel for psycopg2
- Failed building wheel for h5py
- Failed building wheel for grpcio
- Failed building wheel for Pillow
- Failed building wheel for uwsgi
- Failed building wheel for mysqlclient
- Failed building wheel for wordcloud
- Failed building wheel for llvmlite
- Failed building wheel for torch
# Failed building wheel for X when using pip install
The error "Failed building wheel for X" occurs for multiple reasons:
- Not having the
wheelpackage installed in the environment. - Having installed packages that clash with the package we are trying to install.
- Having a Python version that isn't supported by the package we're trying to install.
Failed building wheel for <package-name> Running setup.py clean for <package-name> Failed to build <package-name> Installing collected packages: <package-name> Running setup.py install for <package-name> ... done Successfully installed <package-name>
Open your terminal and run the following command to install wheel.
pip install wheel pip3 install wheel # 👇️ If you don't have pip in your PATH environment variable python -m pip install wheel python3 -m pip install wheel py -m pip install wheel

You should also upgrade your version of pip.
Here are the commands for upgrading pip on all operating systems.
# 👇️ If you have pip already installed pip install --upgrade pip # 👇️ If your pip is aliased as pip3 (Python 3) pip3 install --upgrade pip # 👇️ If you don't have pip in your PATH environment variable python -m pip install --upgrade pip # 👇️ If you don't have pip in your PATH environment variable python3 -m pip install --upgrade pip # 👇️ If you have easy_install easy_install --upgrade pip # 👇️ If you get a permissions error sudo easy_install --upgrade pip # 👇️ If you get a permissions error when upgrading pip pip install --upgrade pip --user # 👇️ Upgrade pip scoped to the current user (if you get a permissions error) python -m pip install --user --upgrade pip python3 -m pip install --user --upgrade pip # 👇️ Installing directly from get-pip.py (MacOS and Linux) curl https://bootstrap.pypa.io/get-pip.py | python # 👇️ If you get permissions issues curl https://bootstrap.pypa.io/get-pip.py | sudo python # 👇️ Alternative for Ubuntu/Debian sudo apt-get update && apt-get upgrade python-pip # 👇️ Alternative for Red Hat / CentOS / Fedora sudo yum install epel-release sudo yum install python-pip sudo yum update python-pip

After you upgrade pip, upgrade setuptools as well.
pip install --upgrade setuptools pip3 install --upgrade setuptools # 👇️ If you don't have pip in your PATH environment variable python -m pip install --upgrade setuptools python3 -m pip install --upgrade setuptools

After you install wheel and upgrade pip and setuptools, you should be able
to run the pip install command without getting any errors.
pip install requests pip3 install requests python -m pip install requests python3 -m pip install requests
If that didn't help, try to run the pip install command with the --upgrade
option.
pip install requests --upgrade pip3 install requests --upgrade python -m pip install requests --upgrade python3 -m pip install requests --upgrade

If the error is not resolved, try installing the package with the --no-cache-dir option to disable the cache.
pip install requests --no-cache-dir pip3 install requests --no-cache-dir

If that didn't help, use the --pre option to include pre-release and
development versions of the package.
pip install requests --pre pip3 install requests --pre python -m pip install requests --pre python3 -m pip install requests --pre

The --pre option makes it so pip includes pre-release and development
versions of the package. By default pip only finds stable versions.
wheel available for your version of Python.If the error is not resolved, try running the pip install command with the
--no-use-pep517 option.
pip install --no-use-pep517 requests pip3 install --no-use-pep517 requests python -m pip install --no-use-pep517 requests python3 -m pip install --no-use-pep517 requests

If the error is not resolved, download the wheel package from the
pypi page of wheel by clicking on the
.whl file under "Built Distribution".
Once you download the file, open your terminal in the folder where the .whl
file is located and install it.
pip install wheel-0.37.1-py2.py3-none-any.whl pip3 install wheel-0.37.1-py2.py3-none-any.whl python -m pip install wheel-0.37.1-py2.py3-none-any.whl python3 -m pip install wheel-0.37.1-py2.py3-none-any.whl
Make sure to specify the correct name of the .whl file as your version will
likely be different.

Once you install the wheel package, the error will be resolved.
If the error is not resolved, try installing the package with the
--no-cache-dir option to disable the cache.
pip install <package-name> --no-cache-dir pip3 install <package-name> --no-cache-dir
# Create a virtual environment
If that didn't help, try creating a virtual environment.
- Create a virtual environment.
- Activate the virtual environment.
- Run the
pip installcommand with the virtual environment active.
# 👇️ Use the correct version of Python when creating VENV python3 -m venv venv # 👇️ Activate on Unix or MacOS source venv/bin/activate # 👇️ Activate on Windows (cmd.exe) venv\Scripts\activate.bat # 👇️ Activate on Windows (PowerShell) venv\Scripts\Activate.ps1 # 👇️ Upgrade pip pip install --upgrade pip # 👇️ Install the specific package in the virtual environment pip install requests
If you get an error when running the python3 -m venv venv command, try the
following commands:
python -m venv venvpy -m venv venv
Make sure to use the correct command to activate your virtual environment depending on your operating system and your shell.
Your virtual environment will use the version of Python that was used to create it.
# Check if your Python version is supported by the package
You can check your Python version with the python --version command.
python --version
Google for the name of the package and check if your Python version is supported by the package.
For example, if I google "requests pypi" and click on the
pypi.org page, I can see the supported
Python versions in the sidebar on the left, under Meta > Requires.
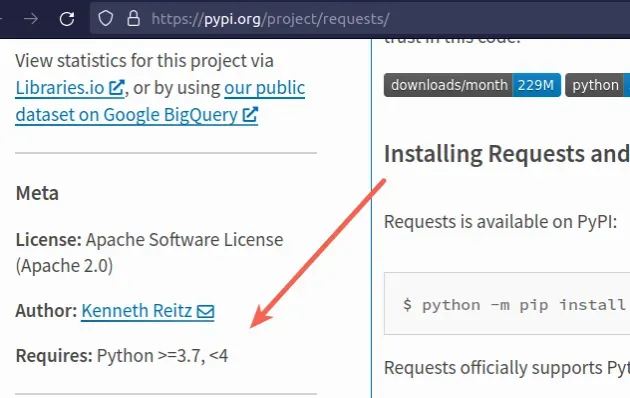
The screenshot shows that the package supports Python 3.7+.
You can also check if the package supports your version of Python in the Download files section of the package's pypi page.
cp310 in the name of a file under "Built Distributions" means Python version 3.10 is supported for the specific operating system.If the .whl files are not available for your version of Python, try running
the pip install command with the --pre option.
pip install requests --pre pip3 install requests --pre python -m pip install requests --pre python3 -m pip install requests --pre py -m pip install requests --pre
requests with the name of the actual package you are trying to install.The --pre option makes it so pip includes pre-release and development
versions of the package. By default pip only finds stable versions.
If that doesn't work, you have to install a Python version that is in the
specified range and then run the pip install <package_name> command.
You can upgrade your Python version by downloading the installer from the official python.org website and running it.
Make sure to tick the following options if you get prompted:
- Install launcher for all users (recommended)
- Add Python to PATH (this adds Python to your PATH environment variable)
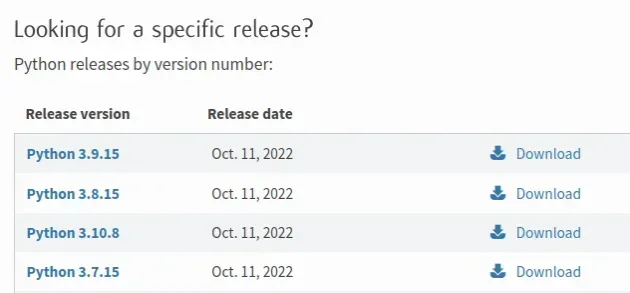
You can download a specific Python version that is supported by the package if the package doesn't support the latest Python version.
Different versions are available in the "Looking for a specific release" table.
# Try running pip install in verbose mode
If none of the suggestions helped, try running the pip install command in
verbose mode.
pip install requests -vvv pip3 install requests -vvv python -m pip install requests -vvv
The -v option stands for verbose mode and can be used up to 3 times.
When the pip install command is run in verbose mode, the command shows more
output and how the error occurred.
To solve the error "Failed building wheel for X", make sure:
- You have the
wheelpackage installed by runningpip install wheel. - You don't have any packages that clash with the package you're trying to install.
- Your version of Python is supported by the package.
# Here are some examples of packages that cause the error
Some packages require you to have certain prerequisites installed before you can
run the pip install command.
Here are the most common packages that cause the error.
# Table of Contents
- Failed building wheel for psycopg2
- Failed building wheel for h5py
- Failed building wheel for grpcio
- Failed building wheel for Pillow
- Failed building wheel for uwsgi
- Failed building wheel for mysqlclient
- Failed building wheel for wordcloud
- Failed building wheel for llvmlite
- Failed building wheel for torch
# Failed building wheel for psycopg2 error in Python
The error "Failed building wheel for psycopg2" error occurs for multiple reasons:
- Having an outdated version of
pip,setuptoolsorwheel. - Having a Python version that isn't supported by
psycopg2-binary. - Having installed packages that clash with the
psycopg2-binarymodule.
Failed building wheel for psycopg2 Running setup.py clean for psycopg2 Failed to build psycopg2
To solve the error, make sure:
- You don't have an outdated version of
pip,setuptoolsorwheel. - You don't have a Python version that is outside the version range supported
by
psycopg2-binary.
First, if you are on Debian (Ubuntu), make sure you have all the requirements of psycopg2-binary installed.
sudo apt-get install gcc libpq-dev python3-dev
If you are on macOS, make sure you have openssl installed.
# 👇️ Install openssl brew install openssl # 👇️ Add it to your LIBRARY_PATH env variable export LIBRARY_PATH=$LIBRARY_PATH:/usr/local/opt/openssl/lib/
The openssl location might be different depending on your operating system,
but is most commonly:
/usr/local/opt/openssl/lib//opt/homebrew/opt/openssl/lib
Run the following commands to upgrade pip, setuptools and wheel.
pip install --upgrade pip pip3 install --upgrade pip pip install --upgrade setuptools wheel pip3 install --upgrade setuptools wheel
After updating pip, setuptools and wheel, run the following command to
install psycopg2-binary.
# 👇️ first, uninstall psycopg2 first pip uninstall psycopg2 pip install psycopg2-binary pip3 install psycopg2-binary python -m pip install psycopg2-binary python3 -m pip install psycopg2-binary # 👇️ For Anaconda conda install -c conda-forge psycopg2-binary
If the error persists, check if your Python version is supported by
psycopg2-binary.
You can check your Python version with the python --version command.
python --version
You can check if a package has wheels available for a specific Python version in the Download files section of the package's pypi page.
cp310 in the name of a file under "Built Distributions" means Python version 3.10 is supported for the specific operating system.If the .whl files are not available for your version of Python, you can
download an older version.
# Failed building wheel for h5py in Python
The error "Failed building wheel for h5py" error occurs for multiple reasons:
- Having an outdated version of
pip,setuptoolsorwheel. - Having a Python version that isn't supported by
h5py. - Having installed packages that clash with the
h5pymodule.

ERROR: Failed building wheel for h5py Failed to build h5py ERROR: Could not build wheels for h5py, which is required to install pyproject.toml-based projects
To solve the error, make sure:
- You don't have an outdated version of
pip,setuptoolsorwheel. - You don't have a Python version that is outside the version range supported
by
h5py.
Run the following commands to upgrade pip, setuptools and wheel.
pip install --upgrade pip pip3 install --upgrade pip pip install --upgrade setuptools wheel pip3 install --upgrade setuptools wheel
After updating pip, setuptools and wheel, run the following command to
install h5py.
pip install h5py pip3 install h5py python -m pip install h5py python3 -m pip install h5py # 👇️ For Anaconda conda install -c conda-forge h5py
The error is sometimes caused when the package you are trying to install doesn't
have available wheels for your version of Python.
You can check your Python version with the python --version command.
python --version
You can check if a package has wheels available for a specific Python version in the Download files section of the package's pypi page.
cp310 in the name of a file under "Built Distributions" means Python version 3.10 is supported for the specific operating system.If the .whl files are not available for your version of Python, you can
download an older version.
# Failed building wheel for grpcio error in Python
The error "Failed building wheel for grpcio" error occurs for multiple reasons:
- Having an outdated version of
pip,setuptoolsorwheel. - Having a Python version that isn't supported by
grpcio. - Having installed packages that clash with the
grpciomodule.
Failed building wheel for grpcio Running setup.py clean for grpcio Failed to build grpcio
GRPC_PYTHON_BUILD_SYSTEM_OPENSSL and GRPC_PYTHON_BUILD_SYSTEM_ZLIB variables to 1 or true before installing grpcio.export GRPC_PYTHON_BUILD_SYSTEM_OPENSSL=1 export GRPC_PYTHON_BUILD_SYSTEM_ZLIB=1 pip install grpcio # 👇️ If you use Anaconda conda install -c conda-forge grpcio
To solve the error, make sure:
- You don't have an outdated version of
pip,setuptoolsorwheel. - You don't have a Python version that is outside the version range supported by grpcio.
Run the following commands to upgrade pip, setuptools and wheel.
pip install --upgrade pip pip3 install --upgrade pip pip install --upgrade setuptools wheel pip3 install --upgrade setuptools wheel
After updating pip, setuptools and wheel, run the following command to
install grpcio.
pip install grpcio pip3 install grpcio python -m pip install grpcio python3 -m pip install grpcio # 👇️ For Anaconda conda install -c conda-forge grpcio
The error is sometimes caused when the package you are trying to install doesn't
have available wheels for your version of Python.
You can check your Python version with the python --version command.
python --version
You can check if a package has wheels available for a specific Python version in the Download files section of the package's pypi page.
cp310 in the name of a file under "Built Distributions" means Python version 3.10 is supported for the specific operating system.If the .whl files are not available for your version of Python, you can
download an older version.
# Failed building wheel for Pillow error in Python
The error "Failed building wheel for Pillow" error occurs for multiple reasons:
- Having an outdated version of
pip,setuptoolsorwheel. - Having a Python version that isn't supported by
Pillow. - Having installed packages that clash with the
Pillowmodule.
Failed building wheel for Pillow Running setup.py clean for Pillow Failed to build Pillow
First, if you are on Debian (Ubuntu), make sure you have all the requirements of Pillow installed.
sudo apt-get install libjpeg-dev zlib1g-dev
To solve the error, make sure:
- You don't have an outdated version of
pip,setuptoolsorwheel. - You don't have a Python version that is outside the version range supported by Pillow.
Run the following commands to upgrade pip, setuptools and wheel.
pip install --upgrade pip pip3 install --upgrade pip pip install --upgrade setuptools wheel pip3 install --upgrade setuptools wheel
After updating pip, setuptools and wheel, run the following command to
install Pillow.
pip install Pillow pip3 install Pillow python -m pip install Pillow python3 -m pip install Pillow # 👇️ For Anaconda conda install -c anaconda pillow
The error is sometimes caused when the package you are trying to install doesn't
have available wheels for your version of Python.
You can check your Python version with the python --version command.
python --version
You can check if a package has wheels available for a specific Python version in the Download files section of the package's pypi page.
cp310 in the name of a file under "Built Distributions" means Python version 3.10 is supported for the specific operating system.If the .whl files are not available for your version of Python, you can
download an older version.
# Failed building wheel for uwsgi error in Python
To solve the error "Failed building wheel for uwsgi", run the
pip install --upgrade pip command to upgrade your pip version, install the
prerequisites and rerun the pip install uWSGI command.
Failed building wheel for uwsgi Running setup.py clean for uwsgi Failed to build uwsgi error: legacy-install-failure
First, make sure to install gcc and python3-dev if you are on Linux.
# 👇️ For Debian (Ubuntu) sudo apt-get install gcc python3-dev build-essential # 👇️ For RedHad / CentOS sudo yum install gcc python3-devel # 👇️ For Alpine Linux apk add gcc libc-dev
Run the following commands to upgrade pip, setuptools and wheel.
pip install --upgrade pip pip3 install --upgrade pip pip install --upgrade setuptools wheel pip3 install --upgrade setuptools wheel
After updating pip, setuptools and wheel, run the following command to
install uwsgi.
pip install uWSGI pip3 install uWSGI python -m pip install uWSGI python3 -m pip install uWSGI # 👇️ For Anaconda conda install -c conda-forge uwsgi
# Failed building wheel for mysqlclient in Python
The error "Failed building wheel for mysqlclient" error occurs for multiple reasons:
- Having an outdated version of
pip,setuptoolsorwheel. - Having a Python version that isn't supported by
mysqlclient. - Having installed packages that clash with the
mysqlclientmodule.
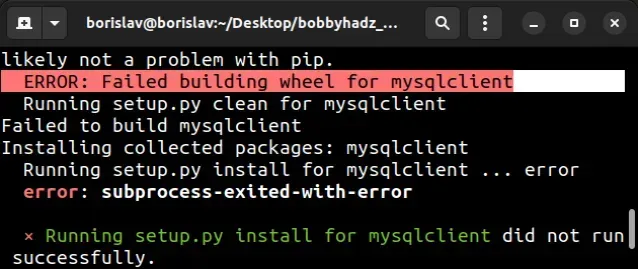
Failed building wheel for mysqlclient Running setup.py clean for mysqlclient Failed to build mysqlclient error: legacy-install-failure
First, if you are on macOS or Linux, install the prerequisites.
# 👇️ For macOS brew install mysql pip install mysqlclient # 👇️ For Debian/Ubuntu sudo apt-get install python3-dev default-libmysqlclient-dev build-essential pip install mysqlclient # 👇️ For Red Hat/CentOS sudo yum install python3-devel mysql-devel pip install mysqlclient # 👇️ For Anaconda conda install -c conda-forge mysqlclient # 👇️ For Jupyter Notebook !pip install mysqlclient
The mysqlclient module is a fork of
the unmaintained MySQL-python package and adds support for Python 3.
To solve the error, make sure:
- You don't have an outdated version of
pip,setuptoolsorwheel. - You don't have a Python version that is outside the version range supported
by
mysqlclient.
Run the following commands to upgrade pip, setuptools and wheel.
pip install --upgrade pip pip3 install --upgrade pip pip install --upgrade setuptools wheel pip3 install --upgrade setuptools wheel
After updating pip, setuptools and wheel, run the following command to
install mysqlclient.
pip install mysqlclient pip3 install mysqlclient python -m pip install mysqlclient python3 -m pip install mysqlclient # 👇️ For Anaconda conda install -c conda-forge mysqlclient
The error is sometimes caused when the package you are trying to install doesn't
have available wheels for your version of Python.
You can check your Python version with the python --version command.
python --version
You can check if a package has wheels available for a specific Python version in the Download files section of the package's pypi page.
cp310 in the name of a file under "Built Distributions" means Python version 3.10 is supported for the specific operating system.If the .whl files are not available for your version of Python, you can
download an older version.
If the error persists, follow the instructions in my ModuleNotFoundError: No module named 'ConfigParser' article.
# Failed building wheel for wordcloud in Python
The error "Failed building wheel for wordcloud" error occurs for multiple reasons:
- Having an outdated version of
pip,setuptoolsorwheel. - Having a Python version that isn't supported by
wordcloud. - Having installed packages that clash with the
wordcloudmodule.

Failed building wheel for wordcloud Running setup.py clean for wordcloud Failed to build wordcloud error: legacy-install-failure
To solve the error, make sure:
- You don't have an outdated version of
pip,setuptoolsorwheel. - You don't have a Python version that is outside the version range supported
by
wordcloud.
Run the following commands to upgrade pip, setuptools and wheel.
pip install --upgrade pip pip3 install --upgrade pip pip install --upgrade setuptools wheel pip3 install --upgrade setuptools wheel
After updating pip, setuptools and wheel, run the following command to
install wordcloud.
pip install wordcloud pip3 install wordcloud python -m pip install wordcloud python3 -m pip install wordcloud # 👇️ For Anaconda conda install -c conda-forge wordcloud
If you are on Windows, you can also download a suitable .whl file from the
https://www.lfd.uci.edu/~gohlke/pythonlibs/
website.
First, get your Python version and check if your Python installation is 64-bit or 32-bit.
You can do that by opening CMD and typing python.
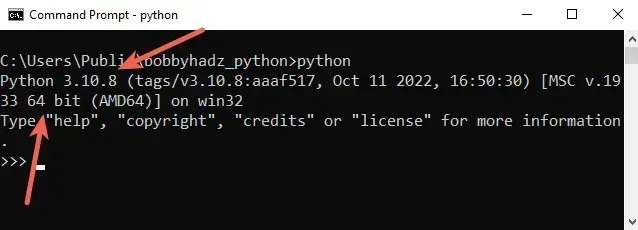
For example, the screenshot shows that my Python version is 3.10 and my Python interpreter is 64-bit.
Now, click on the
https://www.lfd.uci.edu/~gohlke/pythonlibs/
link, press CTRL + f and search for wordcloud or click the
following link.
Download the corresponding .whl file. For example, I would download the
following file.
wordcloud‑1.8.1‑cp310‑cp310‑win_amd64.whl
cp310 part is the version (Python 3.10) and amd64 means 64-bit.Once you download the file, open your shell in the directory where the file is
located (e.g. C:\Users\Example\Downloads) and install it using pip:
- Open the directory that contains the file in Explorer.
- Press
Shiftand right-click in Explorer.
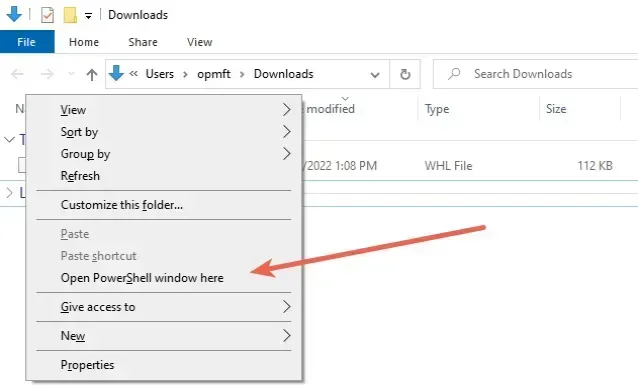
- Click on "Open PowerShell window here".
- Run the following command.
pip install wordcloud‑1.8.1‑cp310‑cp310‑win_amd64.whl pip3 install wordcloud‑1.8.1‑cp310‑cp310‑win_amd64.whl
Make sure to specify the name of the .whl file correctly as your Python
version will likely be different.
# Failed building wheel for llvmlite in Python
The error "Failed building wheel for llvmlite" error occurs for multiple reasons:
- Having an outdated version of
pip,setuptoolsorwheel. - Having a Python version that isn't supported by
llvmlite. - Having installed packages that clash with the
llvmlitemodule.
Failed building wheel for llvmlite Running setup.py clean for llvmlite Failed to build llvmlite
Run the following commands to upgrade pip, setuptools and wheel.
pip install --upgrade pip pip3 install --upgrade pip pip install --upgrade setuptools wheel pip3 install --upgrade setuptools wheel
To solve the error, make sure:
- You don't have an outdated version of
pip,setuptoolsorwheel. - You don't have a Python version that is outside the version range supported
by
llvmlite.
The solutions in this article also apply if you're trying to install numba.
After updating pip, setuptools and wheel, run the following command to
install llvmlite.
pip install llvmlite pip3 install llvmlite python -m pip install llvmlite python3 -m pip install llvmlite # 👇️ For Anaconda conda install -c conda-forge llvmlite
If you are on Windows, you can also download a suitable .whl file from the
https://www.lfd.uci.edu/~gohlke/pythonlibs/
website.
First, get your Python version and check if your Python installation is 64-bit or 32-bit.
You can do that by opening CMD and typing python.

For example, the screenshot shows that my Python version is 3.10 and my Python interpreter is 64-bit.
Now, click on the
https://www.lfd.uci.edu/~gohlke/pythonlibs/
link, press CTRL + f and search for llvmlite or click the
following link.
Download the corresponding .whl file. For example, I would download the
following file.
llvmlite‑0.38.1‑cp310‑cp310‑win_amd64.whl
cp310 part is the version (Python 3.10) and amd64 means 64-bit.Once you open the file, open your shell in the directory where the file is
located (e.g. C:\Users\Example\Downloads) and install it using pip:
- Open the directory that contains the file in Explorer.
- Press
Shiftand right-click in Explorer.

- Click on "Open PowerShell window here".
- Run the following command.
pip install llvmlite‑0.38.1‑cp310‑cp310‑win_amd64.whl pip3 install llvmlite‑0.38.1‑cp310‑cp310‑win_amd64.whl
Make sure to specify the name of the .whl file correctly as your Python
version will likely be different.
If you are trying to install the numba package, you can download its .whl
file from the
following link and repeat
the steps.
# Failed building wheel for torch (PyTorch) in Python
The error "Failed building wheel for torch" error occurs for multiple reasons:
- Having an outdated version of
pip,setuptoolsorwheel. - Having a Python version that isn't supported by
torch. - Having installed packages that clash with the
torchmodule.
Failed building wheel for torch Running setup.py clean for torch Failed to build torch
Run the following commands to upgrade pip, setuptools and wheel.
pip install --upgrade pip pip3 install --upgrade pip pip install --upgrade setuptools wheel pip3 install --upgrade setuptools wheel
To solve the error, make sure:
- You don't have an outdated version of
pip,setuptoolsorwheel. - You don't have a Python version that is outside the version range supported
by
torch.
After updating pip, setuptools and wheel, run the following command to
install torch.
pip install torch pip3 install torch python -m pip install torch python3 -m pip install torch # 👇️ For Anaconda conda install -c pytorch pytorch
You can also try to construct a suitable installation command from the official docs.
The error is sometimes caused when the package you are trying to install doesn't
have available wheels for your version of Python.
You can check your Python version with the python --version command.
python --version
You can check if a package has wheels available for a specific Python version in the Download files section of the package's pypi page.
cp310 in the name of a file under "Built Distributions" means Python version 3.10 is supported for the specific operating system.If the .whl files are not available for your version of Python, you can
download an older version.

