Fixed: Connection error [SSL CERTIFICATE_VERIFY_FAILED]
Last updated: Apr 10, 2024
Reading time·6 min

# Table of Contents
- Connection error: [SSL CERTIFICATE_VERIFY_FAILED]
- Add trusted hosts to your pip.conf or pip.ini file
- Using a command to update your
pip.inifile - Disable SSL certificate validation when using
requests - Upgrade your version of
pip - Create a virtual environment
- Specifying a certificate when running the command
- Try running pip install in verbose mode
# [Fixed] Connection error: [SSL CERTIFICATE_VERIFY_FAILED]
The "connection error: [SSL: CERTIFICATE_VERIFY_FAILED] certificate verify
failed" occurs when a firewall is preventing you from reaching the pypi
servers when trying to install a package.
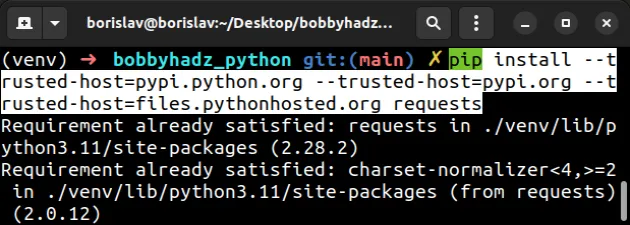
To solve the error, run the pip install command with the --trusted-host
option.
Downloading/unpacking <package> Getting page https://pypi.python.org/simple/<package>/ Could not fetch URL https://pypi.python.org/simple/<package>/: connection error: [SSL: CERTIFICATE_VERIFY_FAILED] certificate verify failed (_ssl.c:598) Will skip URL https://pypi.python.org/simple/<package>/ when looking for download links for <package> Getting page https://pypi.python.org/simple/ Could not fetch URL https://pypi.python.org/simple/: connection error: HTTPSConnectionPool(host='pypi.python.org', port=443): Max retries exceeded with url
If you got the error when using the
requestsmodule, click on the following subheading:
Open your shell and run one of the following commands, depending on your operating system and your version of Python.
Note that the commands contain <package-name> placeholder. Make sure to
replace the placeholder with the name of the package you're trying to install.
pip install <package-name> --trusted-host=pypi.python.org --trusted-host=pypi.org --trusted-host=files.pythonhosted.org # 👇️ pip3 (for Python 3) pip3 install <package-name> --trusted-host=pypi.python.org --trusted-host=pypi.org --trusted-host=files.pythonhosted.org # 👇️ If you don't have pip in PATH python -m pip install <package-name> --trusted-host=pypi.python.org --trusted-host=pypi.org --trusted-host=files.pythonhosted.org # 👇️ For Python3 python3 -m pip install <package-name> --trusted-host=pypi.python.org --trusted-host=pypi.org --trusted-host=files.pythonhosted.org # 👇️ py alias (Windows) py -m pip install <package-name> --trusted-host=pypi.python.org --trusted-host=pypi.org --trusted-host=files.pythonhosted.org
If you get a permissions error, try prefixing the command with sudo, or use
the --user option.
pip install <package-name> --user --trusted-host=pypi.python.org --trusted-host=pypi.org --trusted-host=files.pythonhosted.org
The --trusted-host option marks a host as trusted.
This helps when you try to reach the pypi servers from behind a firewall.
pip.conf (macOS and Linux) or pip.ini (Windows) file, so you don't have to do it every time you need to install a package.# Add trusted hosts to your pip.conf or pip.ini file
The location of your pip.conf (macOS and Linux) or pip.ini (Windows) is
going to be different depending on your operating system.
This section of the docs shows the different locations of the config file under "User".
For Linux, the location is $HOME/.config/pip/pip.conf.
$HOME/Library/Application Support/pip/pip.conf or $HOME/.config/pip/pip.conf.For Windows, the location is %APPDATA%\pip\pip.ini.
# 👇️ Windows %APPDATA%\pip\pip.ini # 👇️ Same as the following (Windows) C:\Users\<username>\AppData\Roaming\pip\pip.ini # ---------------------------------------------------- # 👇️ macOS $HOME/Library/Application Support/pip/pip.conf # 👇️ macOS $HOME/.config/pip/pip.conf # ---------------------------------------------------- # 👇️ Linux $HOME/.config/pip/pip.conf
The pip.conf (Linux or macOS) or pip.ini file should look as follows.
[global] trusted-host = pypi.python.org pypi.org files.pythonhosted.org
# Using a command to update your pip.ini file
An alternative to manually editing your pip.conf or pip.ini file is to use
a command.
pip config set global.trusted-host "pypi.python.org pypi.org files.pythonhosted.org" --trusted-host=pypi.python.org --trusted-host=pypi.org --trusted-host=files.pythonhosted.org
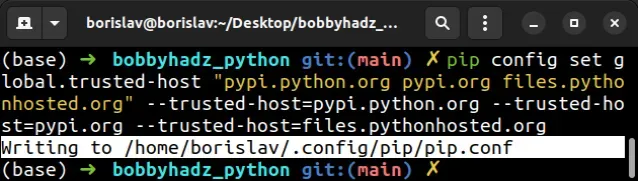
pip.conf or pip.ini file and prints the location of the file.This is quite convenient because finding the pip.conf or pip.ini file on
your operating system might be more difficult than expected.
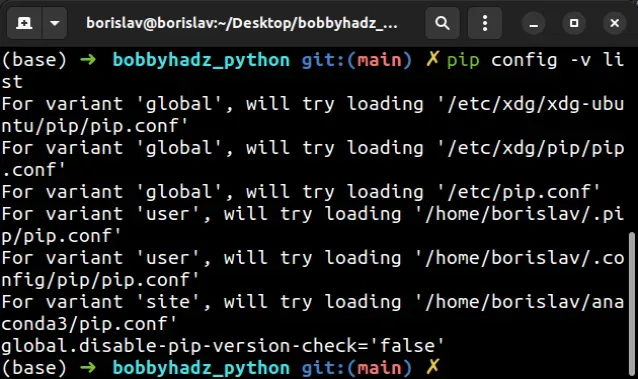
If you are unable to find the pip.conf or pip.ini file and want to add the
trusted hosts manually, run the pip config -v list command.
pip config -v list pip3 config -v list
Once you set the trusted-host variable in the pip.conf or pip.ini file,
you don't have to use the --trusted-host option every time you pip install a
module.
pip install numpy pip3 install numpy # 👇️ If pip is not set up in PATH python -m pip install numpy python3 -m pip install numpy # 👇️ py alias (Windows) py -m pip install numpy
# Disable SSL certificate validation when using requests
When using the requests library, you might get the error:
requests.exceptions.SSLError: [Errno 1] \_ssl.c:503: error:14090086:SSL routines:SSL3_GET_SERVER_CERTIFICATE:certificate verify failed requests.exceptions.SSLError: HTTPSConnectionPool(host='google.com', port=443): Max retries exceeded with url: / (Caused by SSLError(SSLError(1, '[SSL: CERTIFICATE_VERIFY_FAILED] certificate verify failed (_ssl.c:833)'),))
If you got the error when using the requests module, requests was unable to
verify the SSL certificate of the site.
Set the verify keyword argument to False to disable the SSL certificate
validation for the request.
Note that you should only disable SSL certificate validation during local development or testing as it could make your application vulnerable to man-in-the-middle attacks.
import requests def make_request(): try: url = 'https://reqres.in/api/users' # 👇️ Set verify to False response = requests.get(url, verify=False, timeout=30) parsed = response.json() print(parsed) except Exception as e: print(e) make_request()
The code sample sets the verify keyword arguments to False which disables
SSL certificate validation.
response = requests.get(url, verify=False, timeout=30)
If you have a .pem certificate file locally, set the verify keyword argument
to the path to the .pem file.
requests.get('https://github.com', verify='/path/to/certfile')
For example, your call to requests.get might look similar to the following.
# http://curl.haxx.se/ca/cacert.pem certificate_file = 'cacert.pem' r = requests.get('https://github.com', verify=certificate_file)
If you don't have a certificate .pem file, you can try using the one from
curl: http://curl.haxx.se/ca/cacert.pem.
Click on the link to download the .pem file and update the path.
# Try to set the --default-timeout parameter when running pip install
Another solution to the "ReadTimeoutError:
HTTPSConnectionPool(host='pypi.python.org', port=443): Read timed out." error
is to set the --default-timeout parameter when issuing the pip install
command.
pip install --default-timeout=100 numpy # or pip3 pip3 install --default-timeout=100 numpy
You can also specify the default timeout of pip commands by setting the
PIP_DEFAULT_TIMEOUT environment variable.
For example, if you are on macOS or Linux, issue the following command.
# For macOS and Linux export PIP_DEFAULT_TIMEOUT=100
And if you are on Windows and use CMD (Command Prompt), issue the following command.
# Windows (with CMD) SET PIP_DEFAULT_TIMEOUT=100
If you are on Windows and use PowerShell, issue the following command instead.
$env:PIP_DEFAULT_TIMEOUT="100"
# Upgrade your version of pip
If the error persists, run one of the following commands to upgrade your versions of pip, setuptools and wheel.
pip install setuptools wheel pip --upgrade # 👇️ For Python 3 pip3 install setuptools wheel pip --upgrade # 👇️ If you don't have pip in your PATH environment variable python -m pip install setuptools wheel pip --upgrade # 👇️ For Python 3 python3 -m pip install setuptools wheel pip --upgrade # 👇️ Using py alias (Windows) py -m pip install setuptools wheel pip --upgrade
If you get a permissions error, run the command with the --user option or
prefix it with sudo.
# 👇️ If you get a permissions error pip install setuptools wheel pip --upgrade --user sudo pip install setuptools wheel pip --upgrade
# Create a virtual environment
To solve the error:
- Create a virtual environment.
- Activate the virtual environment.
- Run the
pip installcommand with the virtual environment active.
# 👇️ Use the correct version of Python when creating VENV python -m venv venv # 👇️ Activate on Unix or MacOS source venv/bin/activate # 👇️ Activate on Windows (cmd.exe) venv\Scripts\activate.bat # 👇️ Activate on Windows (PowerShell) venv\Scripts\Activate.ps1 # 👇️ Install the specific package in the virtual environment pip install numpy
If the python -m venv venv command doesn't work, try the following 2 commands:
python3 -m venv venvpy -m venv venv
Make sure to use the correct command to activate your virtual environment depending on your operating system and your shell.
Your virtual environment will use the version of Python that was used to create it.
pip.conf (Linux, macOS) or pip.ini (Windows) file in the venv folder with the following contents.[global] trusted-host = pypi.python.org pypi.org files.pythonhosted.org
Try installing a module after that's done.
# Specifying a certificate when running the command
If you have a certificate stored in a local file, use the --cert option when
running the pip install command.
pip --cert </path/to/cert>.pem install <package_name>
For example, the complete command might look similar to the following.
pip --cert /etc/ssl/certs/MY_CERT.pem install requests
Make sure to correct the path to your .pem file and replace requests with
the name of the module you're trying to install.
If you don't have a certificate .pem file, you can try using the one from
curl: http://curl.haxx.se/ca/cacert.pem.
Click on the link to download the .pem file and update the path.
If none of the suggestions helped, try running the pip install command in
verbose mode.
# Try running pip install in verbose mode
If none of the suggestions helped, try running the pip install command in
verbose mode.
pip install numpy -vvv pip3 install numpy -vvv python -m pip install numpy -vvv
The -v option stands for verbose mode and can be used up to 3 times.
When the pip install command is run in verbose mode, the command shows more
output and how the error occurred.

