Could not install packages due to an EnvironmentError: [Errno 13] Permission denied
Last updated: Apr 9, 2024
Reading time·12 min

# Table of Contents
- Could not install packages due to an EnvironmentError: [Errno 13] Permission denied
- Could not install packages due to an EnvironmentError: HTTPSConnectionPool
# Could not install packages due to an EnvironmentError: [Errno 13] Permission denied
The error "Could not install packages due to an EnvironmentError: [Errno 13] Permission denied" occurs when we try to install a package in a folder where we don't have the necessary permissions.
To solve the error, run the command with the --user option, e.g.
pip install numpy --user.
Could not install packages due to an EnvironmentError: [Errno 13] Permission denied: '/usr/lib/python2.7/dist-packages' Consider using the --user option or check the permissions.
# Using the --user flag to solve the error
One way to solve the error is to run the pip install command with the --user
option.
pip install <package-name> --user # 👇️ For Python 3 user pip3 pip3 install <package-name> --user python -m pip install <package-name> --user python3 -m pip install <package-name> --user # 👇️ py alias for Windows py -m pip install <package-name> --user

Make sure to replace the <package-name> placeholder with the actual name of
the package, e.g. pip install numpy --user.
The --user option installs the package in the user's home directory.
However, the --user option wouldn't work if you have a virtual environment
active.
# Run the installation command with elevated permissions
Another way to solve the error is to run the command with elevated privileges by
prefixing it with sudo.
sudo pip install <package-name> --user sudo pip3 install <package-name> --user sudo python -m pip install <package-name> --user sudo python3 -m pip install <package-name> --user
# Create a virtual environment
Alternatively, you can create a virtual environment.
- Create a virtual environment.
- Activate the virtual environment.
- Run the
pip installcommand with the virtual environment active.
# 👇️ Use the correct version of Python when creating VENV python3 -m venv venv # 👇️ Activate on Unix or MacOS source venv/bin/activate # 👇️ Activate on Windows (cmd.exe) venv\Scripts\activate.bat # 👇️ Activate on Windows (PowerShell) venv\Scripts\Activate.ps1 # 👇️ Install the specific package in the virtual environment pip install numpy
If the python3 -m venv venv command fails, try issuing one of the following 2
commands:
python -m venv venvpy -m venv venv
Make sure to use the correct command to activate your virtual environment depending on your operating system and your shell.
Your virtual environment will use the version of Python that was used to create it.
sudo because then you'd only permit root users to install packages.If you created your virtual environment using sudo, try changing its
permissions or recreate it without sudo.
sudo chmod -R 777 venv
The command above assumes that your virtual environment is in a folder called
venv.
777 means granting all users full access to the contents of the directory.
If that didn't work, try upgrading your pip version.
# Upgrade your pip version
Here are the commands for upgrading pip on all operating systems.
Which command works depends on your operating system and your version of Python.
# 👇️ If you have pip already installed pip install --upgrade pip # 👇️ If your pip is aliased as pip3 (Python 3) pip3 install --upgrade pip # 👇️ If you don't have pip in your PATH environment variable python -m pip install --upgrade pip # 👇️ If you don't have pip in your PATH environment variable python3 -m pip install --upgrade pip # 👇️ If you have easy_install easy_install --upgrade pip # 👇️ If you get a permissions error sudo easy_install --upgrade pip # 👇️ If you get a permissions error when upgrading pip pip install --upgrade pip --user # 👇️ Upgrade pip scoped to the current user (if you get a permissions error) python -m pip install --user --upgrade pip python3 -m pip install --user --upgrade pip # 👇️ Installing directly from get-pip.py (MacOS and Linux) curl https://bootstrap.pypa.io/get-pip.py | python # 👇️ If you get permissions issues curl https://bootstrap.pypa.io/get-pip.py | sudo python # 👇️ Alternative for Ubuntu/Debian sudo apt-get update && apt-get upgrade python-pip # 👇️ Alternative for Red Hat / CentOS / Fedora sudo yum install epel-release sudo yum install python-pip sudo yum update python-pip
If you get the error "ModuleNotFoundError: No module named 'pip' in Python", check out my other article:
If the commands from the code sample didn't work for you, click on the "Install pip in Python" link.
After you upgrade pip, upgrade setuptools as well.
pip install --upgrade setuptools pip3 install --upgrade setuptools python3 -m pip install --upgrade setuptools
Try installing the package with pip and setuptools upgraded.
pip install <package-name> # 👇️ For Python 3 user pip3 pip3 install <package-name> python -m pip install <package-name> python3 -m pip install <package-name>
If that didn't help, try running CMD as an administrator.
# Run CMD as an administrator
To run CMD as an administrator:
- Click on the search bar and type "cmd".
- Right-click on "Command Prompt".
- Click on "Run as administrator".
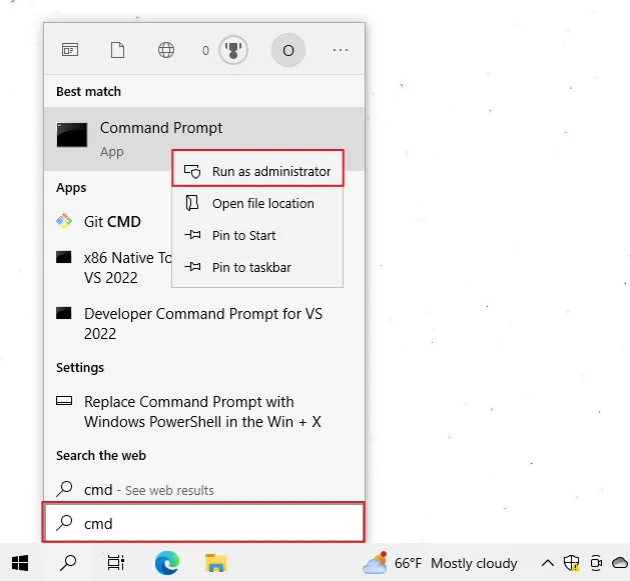
- Once you open the shell as an administrator, rerun the
pip installcommand.
pip install <package-name> pip3 install <package-name> python -m pip install <package-name> python3 -m pip install <package-name>
pip install command.If opening CMD as an administrator didn't help, try to open PowerShell as an administrator and run the command.
To run PowerShell as an administrator:
- Click on the search bar and type "PowerShell".
- Right-click on "Windows PowerShell".
- Click on "Run as administrator".
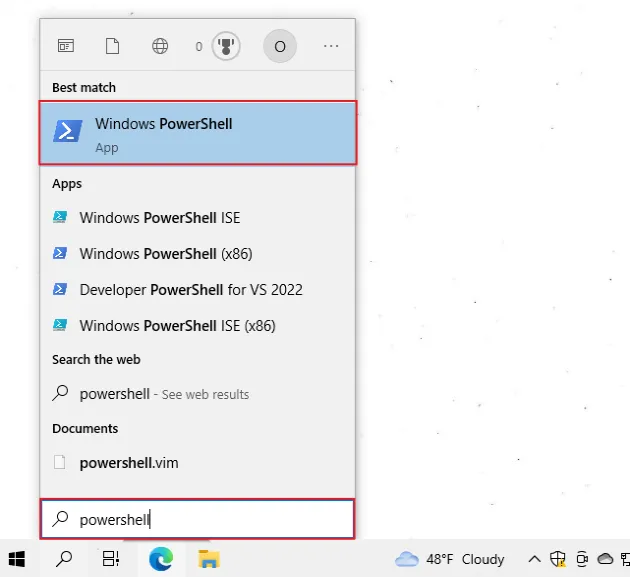
pip install command.Windows throws "EnvironmentError: [Errno 13] Permission denied" when the file is locked by another process.
If the error persists, change the user's access permissions.
# Change the user's access permissions
The error "Could not install packages due to an EnvironmentError: [Errno 13] Permission denied" is often caused because the user doesn't have access to modify the directory where the package should be installed.
To solve the error, allow the user full access to the Python directory.
To change the access permissions for the user:
- Open the folder where you installed Python e.g.
C:\Program Files (x86)\Python310.
You can find where Python is installed with either of the following 2 commands.
where python python -c "import os, sys; print(os.path.dirname(sys.executable))"
- Once you open the directory where Python is installed, right-click on the "Python" or "Python310" folder and click "Properties".
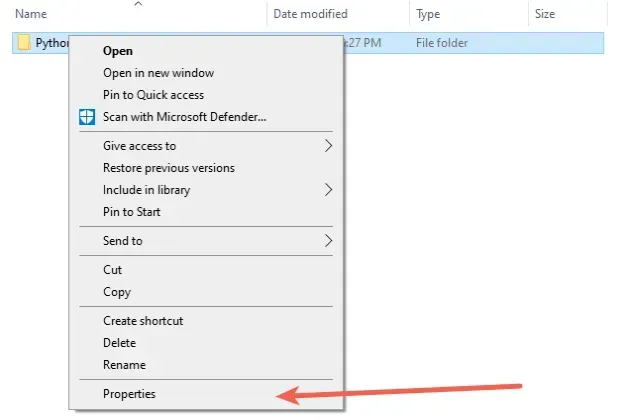
- Go to the "Security" tab and click on the "Edit" button.
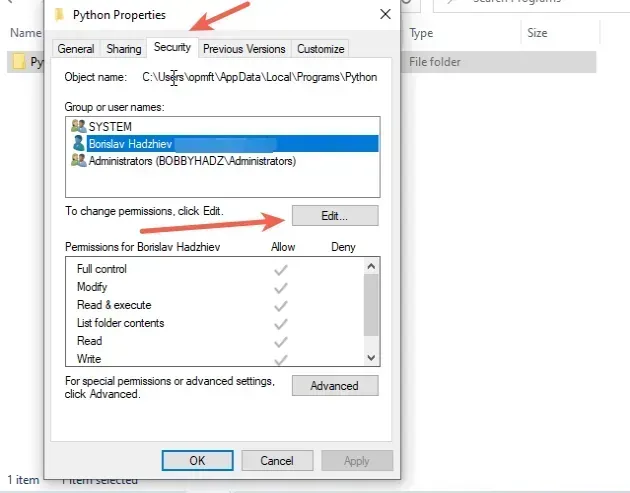
- Allow "Full control" to your user or the entire "Users" group.
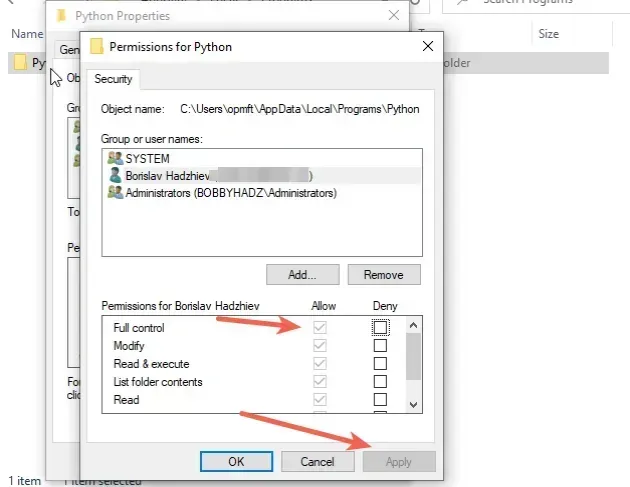
- Click on "Apply".
- Run the
pip install <package-name>command again.
Once you give "Full access" permissions to the user, you should be able to
pip install packages without getting any errors.
If you have a virtual environment active, your Python location will be scoped to the specific virtual environment.
You can run the where python command with your virtual environment active to
find the directory.
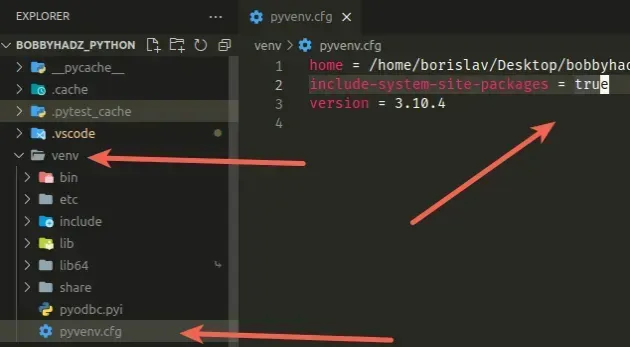
# Set "include-system-site-packages" to "true"
If you use a virtual environment, another thing that might help is to:
- Open your
venvfolder. - Click on the
pyvenv.cfgfile. - Set the
include-system-site-packagesproperty totrue. - Save the file.
- Rerun the
pip installcommand.
# Conclusion
The solve the "Could not install packages due to an EnvironmentError: [Errno 13] Permission denied" error:
- Run the
pip installcommand with the--useroption. - Create a virtual environment and install the package in it.
- Grant the user full access to the Python directory.
# Could not install packages due to an EnvironmentError: HTTPSConnectionPool
The error "Could not install packages due to an EnvironmentError: HTTPSConnectionPool" occurs when we try to install a package without having the necessary permissions.
To solve the error, add trusted hosts or run the pip install command with
the --user option.
Could not install packages due to an EnvironmentError: HTTPSConnectionPool(host='files.pythonhosted.org', port=443): Max retries exceeded with url: (Caused by ProtocolError('Connection aborted.', ConnectionResetError(10054, 'An existing connection was forcibly closed by the remote host', None, 10054, None)))
The most common reason the error is caused is running the pip install command
from behind a proxy.
This often happens if your corporate network is protected by a firewall.
One way to solve the error is to add trusted hosts.
pip install --trusted-host=pypi.python.org --trusted-host=pypi.org --trusted-host=files.pythonhosted.org <package-name> # 👇️ pip3 (for Python 3) pip3 install --trusted-host=pypi.python.org --trusted-host=pypi.org --trusted-host=files.pythonhosted.org <package-name> python -m pip install --trusted-host=pypi.python.org --trusted-host=pypi.org --trusted-host=files.pythonhosted.org <package-name> # 👇️ For Python3 python3 -m pip install --trusted-host=pypi.python.org --trusted-host=pypi.org --trusted-host=files.pythonhosted.org <package-name> # 👇️ py alias (Windows) py -m pip install --trusted-host=pypi.python.org --trusted-host=pypi.org --trusted-host=files.pythonhosted.org <package-name>
If you get a permissions error, try prefixing the command with sudo.
sudo pip install --trusted-host=pypi.python.org --trusted-host=pypi.org --trusted-host=files.pythonhosted.org <package-name> # 👇️ pip3 (for Python 3) sudo pip3 install --trusted-host=pypi.python.org --trusted-host=pypi.org --trusted-host=files.pythonhosted.org <package-name>
Notice that the command ends with <package-name>. Make sure to replace the
placeholder with the name of the package you are trying to install, e.g. numpy
or tensorflow.
You can also use a command to set the trusted hosts in a
pip.conf or pip.ini
file, so you don't have to add the --trusted-host option every time you need
to install a package.
pip config set global.trusted-host "pypi.python.org pypi.org files.pythonhosted.org" --trusted-host=pypi.python.org --trusted-host=pypi.org --trusted-host=files.pythonhosted.org

pip.conf or pip.ini file and prints the location of the file.If you are running the command from behind a proxy, add the --proxy option.
sudo pip install --trusted-host=pypi.python.org --trusted-host=pypi.org --trusted-host=files.pythonhosted.org --proxy=127.0.0.1:3128 <package-name> # 👇️ pip3 (for Python 3) sudo pip3 install --trusted-host=pypi.python.org --trusted-host=pypi.org --trusted-host=files.pythonhosted.org --proxy=127.0.0.1:3128 <package-name>
The
--proxy
option is used to specify a proxy in the form
scheme://[user:passwd@]proxy.server:port.
pip install command.Likely your company's firewall is not allowing you to reach the pypi servers.
You could also contact your company's system administrator.
Something else you might try to do is increase the timeout for the pip install
command.
The error is also caused when the pip install command times out because your
wifi is too slow.
sudo pip install --default-timeout=180 numpy sudo pip3 install --default-timeout=180 numpy
Make sure to replace numpy with the name of the package you are trying to
install.
Alternatively, you can try to run the pip install command with the --user
option.
# Install the package using the --user option
The error "Could not install packages due to an EnvironmentError: HTTPSConnectionPool" occurs when we don't have the necessary permissions to install a package.
To solve the error, run the command with the --user option, e.g.
pip install numpy --user.
One way to solve the error is to run the pip install command with the --user
option.
pip install <package-name> --user pip3 install <package-name> --user python -m pip install <package-name> --user python3 -m pip install <package-name> --user
Make sure to replace the <package-name> placeholder with the actual name of
the package, e.g. pip install tensorflow --user.
The --user option installs the package in the user's home directory.
However, the --user option wouldn't work if you have a virtual environment
active.
Another thing you could try is to elevate your permissions using sudo.
sudo pip install <package-name> sudo pip3 install <package-name> sudo python -m pip install <package-name> sudo python3 -m pip install <package-name>
If that didn't help, try creating a virtual environment.
# Create a virtual environment
To solve the "Could not install packages due to an EnvironmentError: HTTPSConnectionPool" error:
- Create a virtual environment.
- Activate the virtual environment.
- Run the
pip installcommand with the virtual environment active.
# 👇️ Use the correct version of Python when creating VENV python3 -m venv venv # 👇️ Activate on Unix or MacOS source venv/bin/activate # 👇️ Activate on Windows (cmd.exe) venv\Scripts\activate.bat # 👇️ Activate on Windows (PowerShell) venv\Scripts\Activate.ps1 # 👇️ Install the specific package in the virtual environment pip install numpy
If the python3 -m venv venv command doesn't work, try the following 2
commands:
python -m venv venvpy -m venv venv
Make sure to use the correct command to activate your virtual environment depending on your operating system and your shell.
Your virtual environment will use the version of Python that was used to create it.
sudo because then you'd only permit root users to install packages.If you created your virtual environment using sudo, try changing its
permissions or recreate it without sudo.
sudo chmod -R 777 venv
The command above assumes that your virtual environment is in a folder called
venv.
777 means granting all users full access to the contents of the directory.
If that didn't help, try to run CMD as an administrator.
# Run CMD as an administrator
To run CMD as an administrator:
- Click on the search bar and type "cmd".
- Right-click on "Command Prompt".
- Click on "Run as administrator".

- Once you open the shell as an administrator, rerun the
pip installcommand.
pip install <package-name> pip3 install <package-name> python -m pip install <package-name> python3 -m pip install <package-name>
pip install command.If opening CMD as an administrator didn't help, try to open PowerShell as an administrator and run the command.
To run PowerShell as an administrator:
- Click on the search bar and type "PowerShell".
- Right-click on "Windows PowerShell".
- Click on "Run as administrator".

pip install command.Windows throws "Could not install packages due to an EnvironmentError: HTTPSConnectionPool" when the file is locked by another process.
If the error persists, change the user's access permissions.
# Change the user's access permissions
The error "Could not install packages due to an EnvironmentError: HTTPSConnectionPool" is often caused because the user doesn't have access to modify the directory where the package should be installed.
To solve the error, allow the user full access to the Python directory.
To change the access permissions for the user:
- Open the folder where you installed Python e.g.
C:\Program Files (x86)\Python310.
You can find where Python is installed with either of the following 2 commands.
where python python -c "import os, sys; print(os.path.dirname(sys.executable))"
- Once you open the directory where Python is installed, right-click on the "Python" or "Python310" folder and click "Properties".

- Go to the "Security" tab and click on the "Edit" button.

- Allow "Full control" to your user or the entire "Users" group.

- Click on "Apply".
- Run the
pip install <package-name>command again.
Once you give "Full access" permissions to the user, you should be able to
pip install packages without getting any errors.
If you have a virtual environment active, your Python location will be scoped to the specific virtual environment.
You can run the where python command with your virtual environment active to
find the directory.
If that didn't resolve the error, try upgrading your version of pip.
Here are the commands for upgrading pip on all operating systems.
Which command works depends on your operating system and your version of Python.
# 👇️ If you have pip already installed pip install --upgrade pip # 👇️ If your pip is aliased as pip3 (Python 3) pip3 install --upgrade pip # 👇️ If you don't have pip in your PATH environment variable python -m pip install --upgrade pip # 👇️ If you don't have pip in your PATH environment variable python3 -m pip install --upgrade pip # 👇️ If you have easy_install easy_install --upgrade pip # 👇️ If you get a permissions error sudo easy_install --upgrade pip # 👇️ If you get a permissions error when upgrading pip pip install --upgrade pip --user # 👇️ Upgrade pip scoped to the current user (if you get a permissions error) python -m pip install --user --upgrade pip python3 -m pip install --user --upgrade pip # 👇️ Installing directly from get-pip.py (MacOS and Linux) curl https://bootstrap.pypa.io/get-pip.py | python # 👇️ If you get permissions issues curl https://bootstrap.pypa.io/get-pip.py | sudo python # 👇️ Alternative for Ubuntu/Debian sudo apt-get update && apt-get upgrade python-pip # 👇️ Alternative for Red Hat / CentOS / Fedora sudo yum install epel-release sudo yum install python-pip sudo yum update python-pip
If you get the error "ModuleNotFoundError: No module named 'pip' in Python", check out my other article:
If the commands from the code sample didn't work for you, click on the "Install pip in Python" link.
After you upgrade pip, upgrade setuptools as well.
pip install --upgrade setuptools pip3 install --upgrade setuptools python3 -m pip install --upgrade setuptools
Try to run the pip install command now that pip and setuptools are
upgraded.
# Set "include-system-site-packages" to "true"
If you use a virtual environment, another thing that might help is to:
- Open your
venvfolder. - Click on the
pyvenv.cfgfile. - Set the
include-system-site-packagesproperty totrue. - Save the file.
- Rerun the
pip installcommand.

# Conclusion
To solve the "Could not install packages due to an EnvironmentError: HTTPSConnectionPool":
- Add trusted hosts to be able to access
pypifrom your machine. - Run the
pip installcommand with the--useroption. - Run the
pip installcommand prefixed withsudo. - Try creating a virtual environment and install the package in it.
- Run CMD as an administrator before installing the package.

